The iPad is a great device for both recording videos and archiving movies of all kinds. Unfortunately, managing video files on iPad is not always easy to do. It is true that with iTunes and iCloud it is possible to synchronize videos between computer and iPad but only a few video formats are supported including MP4, H.264, M4V, MOV, MPEG-4 and M-JPEG.
For example, if you want to copy and play WMV videos on iPad, you will notice that it is not possible. Below we will see how to overcome this problem and how transfer videos from iPad to PC and from PC to iPad.
- Part 1: Transfer videos between iPad and PC with iCloud
- Part 2: Transfer videos between iPad and PC with iCloud Drive
- Part 3: Transfer videos between iPad and PC with iTunes
- Part 4: Add Videos to iPad with Cloud Services
- Part 5: Transfer videos between iPad and PC with TunesGO (recommended)
iCloud is the cloud service released by Apple for iPad and iPhone users. This service allows you to quickly access and transfer different types of files between iPad and PC, including video files.

Step 1: Turn on your iPad, go to Settings, tap your name and go up iCloud> Photos and activate it. Once your iPad is online, the videos will be saved to your iCloud account as well.
Step 2: Then log into icloud.com via any browser and log in by entering yours Apple ID and password. Enter the verification code if two-factor authentication is enabled.
Step 3: Access the icon Gallery on the iCloud page and then open iCloud photo.
Step 4: Open the folder where the desired videos are stored, drag and drop them to the iCloud page to transfer them to iPad.
iCloud Drive is software available for PCs with Windows 7/8/10 and Mac OS X. After setting up iCloud Drive on PC and iPad, you can copy YouTube videos to iPad and use them in iMovie or other applications
Step 1: To enable iCloud Drive on iPad, go to Settings> iCloud> iCloud Drive and activate it. Activate apps like iMovie
Step 2: Open the software iCloud on your PC. It is free to download from the Apple website.
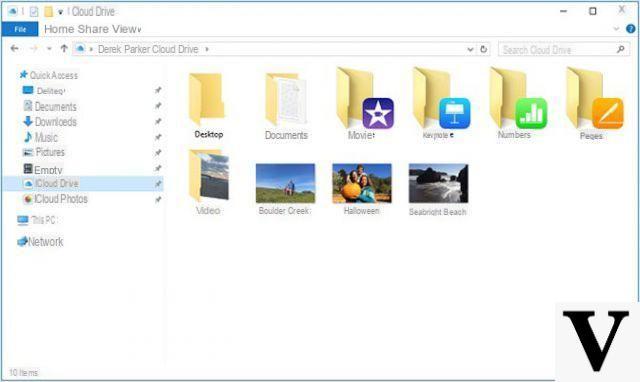
Step 3: apri Explore on Window and select iCloud Drive in the left navigation bar. Then copy and paste the videos to the desired folder.
Step 4: Verifica iCloud Drive on the program and click on “Apply” to start the transfer.
Note: After setting up iCloud Drive on PC and iPad, videos will automatically sync once connected to a network.
iTunes is a long-standing utility available to iPad users for managing files. Of course, it supports MP4 transfer between iPad and PC. We show you how to rip videos to iPad via iTunes.

Step 1: Connect your iPad to computer with a Lightning cable and run the latest version of iTunes.
Step 2: Click on the icon Device after the iPad is detected. Go to the card Riepilogo, select Manually manage music and videos and click the button Apply.
Step 3: Click on the option File sharing on the left side and select the correct video app, such as iMovie.
Step 4: Finally, click the button Add files, go to the video and click the button apri to copy the video to iPad.
Today, most of the cloud services have released mobile apps for iPad, such as Dropbox, Google Drive, OneDrive and more. These apps are useful for transferring videos to iPad without iTunes and without iCloud. We use Google Drive for example:

Step 1: Go to https://drive.google.com
Step 2: Log in with your Google details. Then go in My Drive from the left side and open a folder to store your videos.
Step 3: Drag and drop the videos you want to play on iPad into the folder to upload them to Google Drive first.
Step 4: When finished, activate the Google Drive app on your iPad and you will find the videos. Now you can play them and / or move them to another place.
Note: Cloud services are capable of transfer videos between iPad and PC, but the videos are stored on the server. Also, the videos are not saved in the memory of your iPad. It also requires a good Wi-Fi network.
Both iCloud and third-party cloud services cannot copy large video to iPad. For advanced users, TunesGO is a good way to quickly transfer your movie collection to iPad or copy video from iPad to PC. Here are the features of TunesGO:
> Add movies, TV shows and more to iPad with one click.
> Use multi-thread and hardware accelerator to speed up video synchronization.
> Maintains the original video quality during the process.
> Automatically convert videos to iPad supported formats.
that's how transfer videos from iPad to PC / Mac with TunesGO.
Download the program to your computer (Windows or Mac)


Open TunesGO and connect your iPad to the computer. TunesGO will immediately detect it and bring up a screen like this:
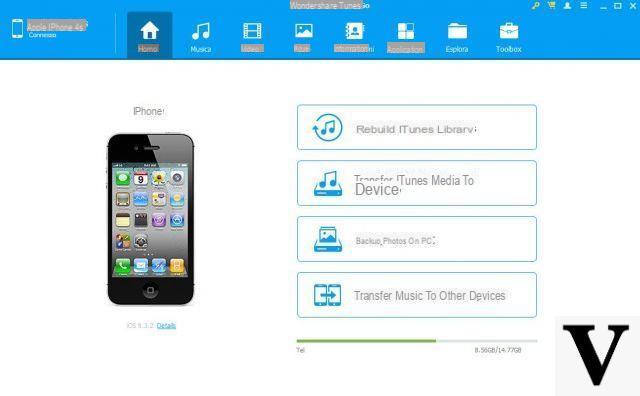
Access the menu "Video”To see all the videos on your iPad. At the top click on ADD to import new videos from computer to iPad or vice versa click on EXPORT to transfer them from iPad to computer.

That's it!
I downloaded and installed Tunes go but when I connect my ipad to the pc it first appears that the drive is being installed then in the end it is impossible to connect to your device. Can you help me?
-
Make sure you:
1. You have installed iTunes (latest version) on your computer. In this way you will automatically have all the drivers necessary to make the iPad detect the computer and therefore also the program
2. Momentarily turn off the iCloud service on the iPadThen try again to connect the device to the computer .. a notification “Authorize this PC?” Should appear on the iPad screen. Press on Authorize and at that point TunesGO will be able to access your ipad data and start managing.


