You have just returned from your last trip out of town and, eager to show the photos taken to friends, you immediately proceeded to connect the camera to the computer to transfer your shots to it. Too bad that in doing this you realized one thing: some images are strongly blurry and moved.
How do you say? Is the situation precisely this and there is nothing left to do but trash everything? Never! Rather, take a few minutes of free time for yourself and concentrate on reading this tutorial of mine dedicated to programs to focus photos. You probably weren't aware of it, but there are a lot of useful software designed to improve - as far as possible - photos that are blurry or that I can do particularly handy in circumstances of this type.
If you want to try them, concentrate on reading the following and try to put my advice into practice: I repeat that miracles cannot be done (if the photos are very blurry, there is no software that takes, you will have to trash them), but at least some shots you should be able to recover it. Happy reading and good luck for everything!
Unshake (Windows/macOS/Linux)

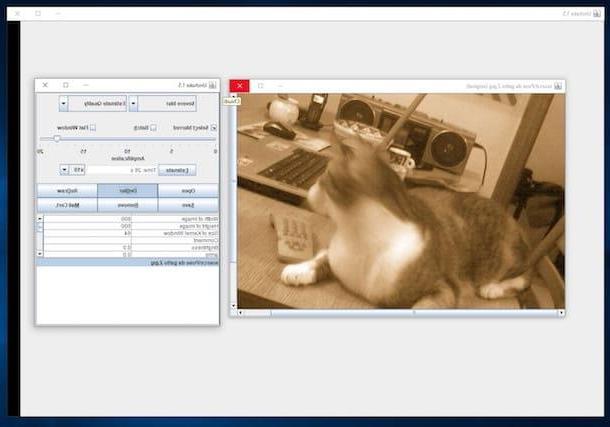
Unshake is a free application that allows you to focus blurry and blurred photos by applying to them a series of filters designed for the purpose. The program is universal, in the sense that it can "run" without problems on Windows, macOS and Linux, but to make it work you need to have the software installed on your computer Java (for more information, I refer you to reading my guides on how to download and install Java, in fact). Using it is a real breeze: just select the photo to correct and choose the filters to apply to it to fix the defects.
To download Unshake on your computer, connect to the program's website and click on the link I Agree present in the center of the page. Once the download is complete, extract the ZIP file just got it and move the blurry photo you want to go to act on in the folder soruce of the program. After that, if you are using Windows, double-click the file Launch always present in the software folder, while if you are using MacOS, double-click the file maclaunch.sh.
Now that you see the main Unshake screen on your screen, use the menus at the top of the window to select the type of correction to apply and the quality of the photo. By moving the adjustment bar below you can change the intensity of the effect.
To preview the final result, press the button Estimate. If you are satisfied, then click on the button Save to save the changes made to the current file. Easy, right?
Photoshop (Windows / macOS)

When you are talking about programs to focus photos it's hard not to even think about Photoshop, the most complete and used photo editing software available on the market. Thanks to the many filters it offers, it is possible to correct images that are not focused correctly, those that are blurred and those that have some slightly blurred details.
It is not always possible to obtain miraculous results, but with a bit of skill the photos can really improve. The software is for a fee (it is available as a subscription version at the basic price of 12,90 euros / month), but it can be used in a free trial version that allows you to test all its functions for a period of 7 days.
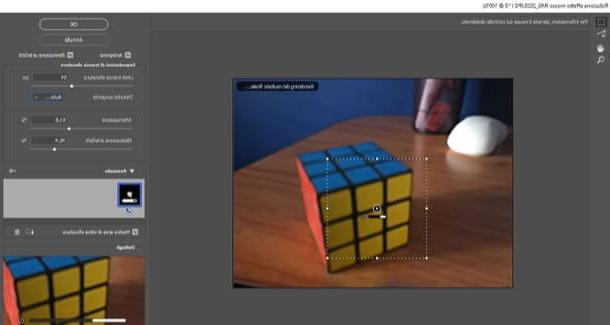
To use it for your purpose, first download the program by following the instructions on what to do that I gave you in my tutorial on how to download Photoshop for free. Subsequently, open the photo relating to which you are interested in going to act by selecting the item apri from the menu Fillet located at the top. Then use the filter Blur reductionby selecting the latter from the menu Filter> Sharpness.
In the additional window that appears on the desktop, you should see a dotted selection on the image. If not, expand the menu Advanced located on the right and make sure there is a check mark next to the item Show blur estimation areas.
Next, select a blur track and act on the controls located on the right: Trace limits blur (allows you to indicate the size of the number in pixels of the blur on which you want to act), attenuation (allows you to attenuate the noise generated by the sharpness applied to the shot) e Artifact elimination (it allows you to remove the noises that are usually highlighted when you sharpen an image or a part of it). When your changes are complete, click the button OK per salvare i Cambiomenti.
Finally, save the edited image by calling up the menu Fillet program by selecting the item Save with name and, through the window that opens, indicating the output location and the name you intend to assign it, then click on the button Save.
For more details on how Photoshop works and how to use the program to fix blurry photos, I refer you to reading my guide specifically dedicated to how to fix a blurry photo with Photoshop.
SmartDeblur (Windows / macOS)

SmartDeblur is a very easy to use program that allows you to focus photos without resorting to overly complex photo editing software. among its main features is an advanced deblurring algorithm that can identify and remove blur patterns in an image automatically, giving excellent results and effortlessly. It is paid (the basic license costs $ 49), but it is available in a free trial version that allows you to test all the functions for a limited period of time. It is compatible with Windows and macOS.
To use it, connected to the program's website, press the button Download and, in the new page displayed, click on the button Download Home that you find under the name of the operating system in use on your computer. At this point, if you are using Windows, april il .exe file obtained and, in the window that appears on the desktop, click on the button Si. Then, press the button Next, select the voice I accept the agreement, click here Next four times in a row and finally press the buttons install e Finish.
Se, invece, stai using MacOS, april il package .dmg obtained, drag the program icon into the folder Applications computer, right click on it and select the item apri from the context menu that appears, in order to start the program, however, going around the limitations imposed by Apple on applications from non-certified developers (operation that must be performed only at the first start).
Regardless of the operating system used, once the main program window is displayed on the screen, click on the button Trial Mode to access the trial version of the same, then click on the button OK and presses the button with the green folder placed at the bottom, in such a way as to select the photo on which to go to act.
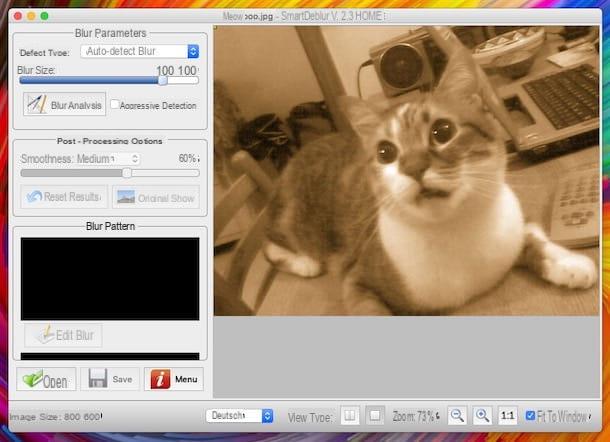
Then use the tools located on the left, in correspondence with the section Blur parameters, to adjust the blur of the photo. To be precise, using the drop-down menu Defect type you can set the type of defect to be corrected, while by moving the slider below you can adjust the degree of correction to be applied.
When you've got the final result you want, click the button Analyze Blur on the right and, if you want to apply an even more intense effect, check the box next to the item Aggrssive Detection. Then wait for the changes to be completed and, if necessary, make further corrections on the image using the tools attached to the section Post-processing options (to the left).
Finally, remember to save the correct photo by clicking the button with the floppy disk at the bottom, indicating the location where you want to store the file and the name you want to give it.
Focus Magic (Windows / macOS)

Focus magic is a program specifically designed to focus on photos that have become blurry or a little shaky. It includes a wide range of filters to choose from (depending on the type of blur to remedy) and each filter can be customized in the degree of intensity. It is paid (it costs 65 $), but it is available in a free trial version that allows you to test all its functions on up to 10 photos. It is compatible with both Windows (in the form of standalone software) and macOS (as a plugin for Photoshop).
To use it, go to the Focus Magic website and click the button Downloada (Win) (if you are using Windows) or on that Download (Mac) (if you are using macOS). When the download is complete, if you are using Windows, open the .exe file appena ottenuto and click on the button Yes in the window that appears on the desktop. Next, select the item I accept the agreementclick on your button Next (three times in a row), on that install and, finally, presses on the buttons OK e Finish.
Then, start Focus Magic using the special shortcut that has been added to the desktop and select the blurry photo you want to act on through the pop-up window on the screen. Then click on the drop-down menu Filter on the left and select the option Focus (if you want to fix a blurry photo) or that Fix Motion Blur (if you want to correct a blurred photo), then click on any point of the image to have a preview of it (visible at the top left) after treatment with the program.
You can also take advantage of the menus Blur Width e Amount located at the top of the window to adjust, respectively, the percentage of blur to correct and the intensity of the correction to be applied to the photo. You can then start the actual image optimization procedure by clicking on the button with the green light (top right). Once the procedure is complete, you can save the edited photo on your computer by clicking on the menu Fillet and selecting the voice Save as.
If, on the other hand, you are using macOS, extract the ZIP file obtained and move the plugin contained within it to the path indicated on this page depending on the version of Photoshop used. Then you can start using Focus Magic from Photoshop by calling up the menu filters of the latter.
Lunapic (Online)

You don't want or can't download programs to focus photos on your computer and would you like to know if there is any solution that can be used directly online? Then try now Lunapic. It is one of the most popular web services for image processing. among the various tools offered there is also one to improve the focus of photographs. It's free, works from any browser and requires no registration.
To use it, connect to the Lunapic website and click on the button under the heading Upload your photo for blur (above), to select the photo you wish to act on, then click on the button Upload. If the photo you want to improve is online, you can also download it directly from the Internet by entering the relevant link in the field next to the item or, open URL and then clicking on the button Go.
Then, move the slider located at the top to adjust the degree of blur of the image. The changes made to the image will be visible in real time. Finally, press the button Apply, in order to apply the changes, right click on the image and choose the option to save it locally from the context menu that opens.
Enhance.Pho.to (Online)

As an alternative to the above service, you can rely on Enhance.Pho.to: it is always another free web service, working with any browser and very easy to use. It allows you to improve the overall quality of your photos and even any blur, all in just a few clicks.
To use it, connect to its website and press the button Scegliere placed at the top, in order to select the photo you want to improve. If the image is online, you can also download it directly from the Internet, specifying the link after clicking on the button Put URL, or from Facebook, by first clicking on the button From Facebook.
Once upload is complete, you will find yourself directly in front of the improved version of your photograph. If you want to make further changes, you can set the corrections to apply by affixing or removing the check mark from the items above. The options that in the specific case of blurry photos can be useful are Denoise (eliminates "noises") e Deblur (makes photos sharper).
Finally, compare the enhanced image with the original one by clicking on the buttons, respectively Outcome e Source top right. If the final result convinces you, save the photo on your computer by pressing the button Save to disk down below.
App to focus photos

You do not have a computer at hand and would like to understand if, apart from programs to focus the photos, there are also some Whatsapp used for this purpose usable directly on the move, from smartphones and tablets? Yes, of course! In this regard, below you will find those that, in my humble opinion, constitute the best solutions in the category for Android e iOS: try them now and you will see that you will not regret it.
- Adobe Photoshop Express (Android / iOS) - as can be guessed from the name itself, this is an app made available by the Adobe software house, a sort of "pocket" Photoshop that allows you to improve blurry photos by intervening on sharpness and various other parameters, as well as than to perform various other image editing operations. It's free.
- Autodesk Pixlr (Android / iOS) - interesting and high-performance app at no cost for mobile devices, thanks to which it is possible to perform various photo editing operations on the move, including the one covered by this tutorial. Note that it also integrates some useful functions for creating collages.
- Snapseed (Android / iOS) - free application from Google thanks to which you can edit and correct photos. I have chosen to report the app to you as it includes some filters useful for intervening on the most important defects of the images, such as the one covered by this tutorial.


