Fit an image to a Word sheet on PC and Mac

If you want to learn how to fit an image to a Word sheet in a simple and quick way, first insert the photo you want to use in your document. If you don't know how to do it, click anywhere on the page where you want to insert the image, select the tab Inserisci Word (top left) and click on the button Images (also located at the top left). Then navigate to the folder that contains the photo of your interest and select it by double-clicking.
If you use a Mac, after clicking the button Images present in the card Inserisci Word, you have to choose an option between Browser photo e Image from file in the menu that opens: the first allows you to call up the macOS photo browser, browse the app library Gallery e Photo booth and drag the images of your interest into the Word document; the second allows you to normally select the images found in the computer folders.

Once you have inserted the image of your interest in the document, click on it and go to the tab Size that appears at the bottom of the Word toolbar (or Image format, if you are using the Mac version of the program).
At this point, click on the button Wrap text (located at the top) and select the item In front of the text from the menu that appears. If you don't want to use the image as the cover of your document, but as a background, select the item Behind the text.
Well: now you should be free to move your image with absolute freedom within the document. Then use the indicators present at the edges of the photo to resize it and move it to the part of the document you prefer by dragging it with the mouse. Excess parts of the image will automatically be excluded from the sheet.

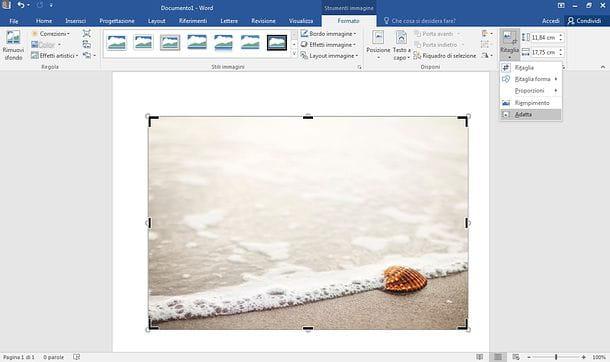
If, on the other hand, you prefer to rely on a slightly more precise and professional solution, you can fit an image to a Word sheet by clicking on it and selecting the option Cut out from the card Size (o Image format) of the program.
At this point, use the mouse to outline the edges of the image (through the corners of the black frame around the photo) and the size of the image itself (using indicators whites). Then expand the button menu Cut out and select the item Suitable from the box that opens. In this way, you will be able to adjust not only the size of the image but also the spacing it should have with respect to the rest of the document.

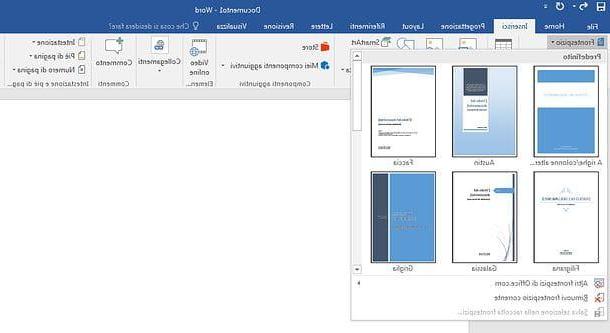
Are you trying in every way to adapt a photo to the Word sheet to create a cover for your document? Well then why don't you use one of the coversincluded in the program, in which you can also use custom images?
All you have to do is go to the first sheet of the document, select the tab Inserisci from the Word toolbar and click on the item Frontispiece located at the top left.

Finally, choose the cover template that best suits you (from the box that appears) and modify it in the way you think is most appropriate, replacing the text and / or using the edit design that appear in the menu at the top right. Easier done than said!
Word Online

Are you working on a computer that doesn't have Word installed? Do you have an urge to fit an image into a document and are you desperate because you don't know how to do it? Don't panic: by connecting to the web version of Word, you can freely edit your documents (or create new ones) using nothing more than your favorite web browser, such as Chrome, Safari o Firefox.
If you had never heard of it, Word Online is a "lightened" and free version of the famous Microsoft word processing software that works from the browser without requiring additional plugins or software: all you need to use it is a Microsoft account. If you don't have such an account yet, fix it now by following my guide on how to create a Microsoft account.
To edit a document in Word Online, you must first upload it to OneDrive, the Microsoft cloud storage service (which I told you extensively in my dedicated guide). Once logged in to OneDrive, drag the document you want to edit in Word Online in the browser window and wait for the upload to finish (you can follow the progress of the operation via the icon of the arrow which appears at the top right).

Once the upload is complete, open Word Online, select the document to edit (or choose to create a new one, if you need it) and proceed as I explained to you for the "classic" version of Word: then select the tab Inserisci located at the top left, click on the button Image, Then Choose File / Browse, select the photo to insert in the document and press the button Inserisci.
Once the photo is inserted into the document, click on it, select the card Size from the Word Online toolbar, press the button Text arrangement and select the item In front of the text from the menu that opens. If you do not intend to use your image as a cover, but as the background of the page you are working on, select the option Behind the text instead of “In front of the text”.
Then use the white indicators to position the image as you see fit and download your Word document by clicking on the button first Fillet which is located at the top left, then on the item Save with name present in the screen that opens (on the left) and, finally, on the button Download a copy. The document will also be automatically saved to OneDrive.
Please note: in the online version of Word there are neither the Crop / Adapt function nor the insertion of the title page, therefore the alternative procedures to adapt an image to a Word sheet that I explained to you in the previous chapter of the tutorial cannot be implemented.
Adapt an image to a Word sheet on a smartphone

Come già accennato in opening of the post, Word it is also available as an app for Android, iOS and Windows 10 Mobile. It is free for all devices with a screen size smaller than 10.1 "(otherwise requires a subscription Office 365, starting from 7 euros / month) and allows you to adapt an image to a sheet in a fairly simple way.
If you work from a smartphone, the procedure you need to follow is this: start the Word app, log in to your Microsoft account and open the document to be edited. You can select files from the device memory, from Dropbox, Google Drive, iCloud (if you use iOS) and other cloud storage platforms. Otherwise you can create a new document by pressing the appropriate button.
At this point, if it helps, make a "pinch" on the screen to reduce the size of the page and view it as a whole on the screen. Then press anywhere on the sheet, tap the button ... located at the bottom right, expand the drop-down menu Home, select the voice Inserisci from the latter and, after touching the voice Images, select the photo to include in the document.
When the operation is completed, tap onimage just inserted in the document, make sure that the option is selected in the drop-down menu at the bottom left Imagei went his Wrap text and, in the screen that opens, select the option Behind the text o In front of the text, depending on your preferences (choose the first option to use the image as the cover of the document or the second to use it as a background).
Finally, use the black indicators placed on the sides of the photo to resize it and that's it. The changes will be automatically saved to the file if it is an existing document. If, on the other hand, you have created a new document, you will have to save it "manually" by first pressing the icon of arrow located at the top left and then on the button Save which appears below.
Fit an image to a Word sheet on a tablet

Su tablet, the Word for Android and iOS application has an interface very similar to that of Word for Windows and macOS, since its toolbar is divided into tabs.
This means that to adapt an image to a Word sheet on a tablet, all you have to do is start the app, log in to your Microsoft account, open the document to be edited (or create a new one) and make a "pinch ”On the screen to have a more complete view of the page.
At this point, you need to go to the tab Inserisci located at the top left, press the icon of photo and select the image to insert into the document. Once this is done, select the tab Image pop-up at the top right, expand the menu Wrap text e seleziona l'opzione In front of the text (if you want to use the photo as a cover) or Behind the text (if you want to use the photo as a background), resize the image using the black indicators present on its sides and that's it.
The document will be saved automatically, if it is an existing Word file, otherwise you will have to press the icon first arrow located at the top left and then on the button Save.
How to fit an image to a Word sheet


