If you are curious to try the latest version of Ubuntu but you don't have a memory space to dedicate to them on your device, don't despair. In fact, it is possible to use live distros. These are versions that can be installed on USB and can be booted from virtually any PC, after correct configuration of the boot options. These live distros despite being physically present inside the USB take advantage of the hardware of the machine to which they are connected. So if you are in the library, at the university or at a friend's house, it could be one of the best solutions not only in terms of portability, but also of security. Let's see together how to create one live USB distro on Ubuntu su Windows 10 in simple and few steps.
Preliminary information
We always recommend doing an installation through one 100% genuine and original license, this is to avoid data loss or hacker attacks. We are aware that purchasing a license on the Microsoft store has a high cost. For this we have selected for you Mr Key Shop, a reliable site with free assistance specialized in in your language, secure payments and shipping in seconds via email. You can check the reliability of this site by reading the many positive verified reviews. Windows 10 licenses are available on this store at very advantageous prices. Furthermore, if you want to upgrade to the latest versions of Windows operating systems, you can also purchase the upgrade to Windows 11. We remind you that if you have a genuine version of Windows 10, the upgrade to the new Windows 11 operating system will be free. Also on the store you can buy the various versions of Windows operating systems, Office packages and the best antivirus on the market.
Materials to get started
Before starting make sure you have a USB stick or external HDD or SSD with at least a memory 16 GB. Go to the Rufus website and download one of the available versions. If you don't want to install anything on your PC, opt for the version portable.
If you have not yet downloaded the latest version of Ubuntu then go to the official website and proceed with the download. For those who do not have a fast connection to speed up the download I suggest the Internet Download Manager software.
Creation of the USB
If you've downloaded everything you need and have an external storage device, then it's time to get started. Remember to make a data backup present on the USB, at the end of the procedure they will be permanently deleted. In a few minutes you will have your new OS bootable from any PC. Follow the steps below:
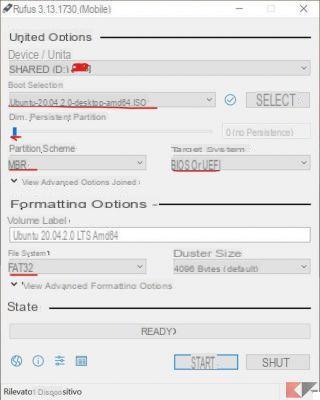
- open Rufus
- select lto your USB in the section Device / unit
- click on select and import the file . Iso Ubuntu downloaded previously
- choose MBR like partition scheme
- choose BIOS / UEFI like target system
- like File System choose FAT32
- return to the section Unit options and choose how much space to reserve for give Ubuntu (apps, customizations, documents, etc. etc.) by acting on Persistent partition size
- click on starts and wait

At the end of the procedure the USB device is ready to be used.
Doubts or problems? We help you
Remember to subscribe to our Youtube channel for videos and other reviews. If you want to stay up to date, subscribe to our Telegram channel and follow us on Instagram. If you want to receive support for any questions or problems, join our Facebook community or contact us on Instagram. Don't forget that we have also created a search engine full of exclusive coupons and the best promotions from the web!


