Are you practicing Photoshop and would like a hand in changing the background of a photo? No problem, I assure you that this is a much simpler operation than you imagine. All you have to do is select the subject of a photo, open the image you want to use as a background and “stick it” on it.
It will take a few minutes, you will see. The tools that will help you achieve your goal will be the inevitable magnetic lasso (to make a first selection of the subject), the quick mask (to refine the selection made with the lasso) and the "improve edge" function that allows you to correct all the smudges left by the lasso and the quick mask.
Courage! Don't waste any more time, open Photoshop right away and find out how to change photo background... how do you say? Have you taken photos with your smartphone and would like to change their wallpaper without going through the PC? This can also be done. There are apps that should be right for you. But now let's try to go in order. Let's see first how to change the background of a photo with Photoshop and then, calmly, we will also talk about smartphones and tablets. Find everything below.
Change photo background with Photoshop
The first step you have to take - I already told you before - is to open the two images you need to work on: the one that contains the subject to "cut out" and the one with the background on which you want to "paste" the latter.

Then go to the menu File> Open Photoshop and select both photos. Once the upload is complete, go to the photo that contains the subject to "crop" and activate the tool magnetic loop from the Photoshop toolbar. If not how to do it, right click on the icon loop (the "chord" located at the top left) and choose the voice magnetic loop give the menu check if you press.
At this point, try to select the edges of your subject as precisely as possible. The magnetic lasso adheres intelligently to the profile of the image, however, beware, it is not perfect. To get good results you have to “help” him to recognize the outline of the subject by clicking on the most “critical” points of the image (for example in the curves and in the most “confusing” parts where the edges are not well defined).

Once you have finished selecting it with the magnetic lasso, click on the rectangular icon located immediately below the color palette (bottom left) to activate the quick mask.
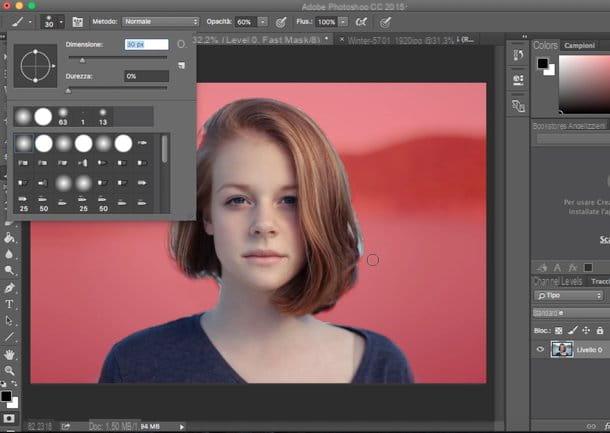
The quick mask is a tool that allows you to refine the selection made with the magnetic lasso by marking, using the brush tool, the parts of the image that must be added or removed from the selection. Once activated, the whole image will turn red except the portion you previously lassoed.
To refine the selection you made earlier with the lasso, choose it brush tool from the toolbar and set the colors in the Photoshop palette White e black: white will be used to add new content to the selection, black to remove parts of an existing selection.
If you want to avoid smudging, use a brush with a soft tip, not too large in size and with an opacity level of 50-60% so that you can make more "passes" to define the selection (all brush settings can be adjusted in the menu that appears at the top, immediately below the Photoshop title bar).
Once you have adjusted all the properties of the brush, “color” the parts of the image you want to remove from the selection with black and the parts you want to add to it with white. To avoid errors or smudging, increase the zoom level of the image by pressing the key combination Ctrl + on the computer keyboard (cmd + on Mac).

When you think you have completed the work with the quick mask, deactivate it by clicking on its icon again (or by pressing the key Q on the PC keyboard) and activate any selection tool from the Photoshop toolbar (e.g. the rectangular selection).
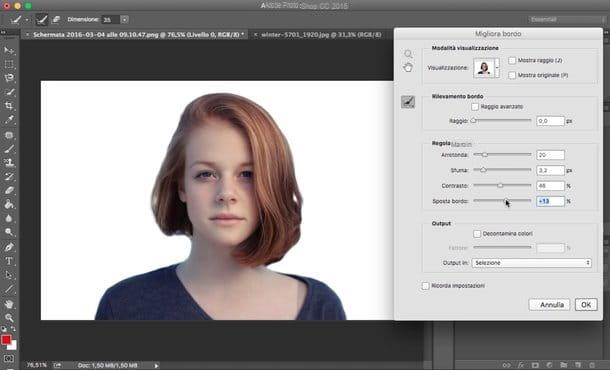
Then click on the button Refine Edge located at the top right and uses the adjustment bars related to the functions Round up, Fade, Contrast e Move edge to make the subject selection as natural as possible (there should be no jagged edges, shading or other warping).

When you are satisfied with the result, click on the button OK to save the selection. Then copy the subject of your photo and paste it on the background you opened at the beginning of the procedure. If you don't know how to do this, press the key combination Ctrl + C on your PC keyboard (cmd + c if you are using a Mac), select the image with the background and press Ctrl + V (cmd + v on Mac) to complete the operation.
Now only the final touches are missing! Then go to the menu Edit> Transform> Scale of Photoshop and change the size and position of the subject you pasted on the image so that it fits perfectly into the background. Then press the button Submit on the PC keyboard to apply the changes and save the final result by selecting the item Save with name from the menu Fillet of Photoshop.

If you want to make your “collage” even more realistic, go to the blending options of the layer you just pasted on the image and apply light and shadow effects to the subject of the photo by activating the functions Inner shadow, Inner glow, Drop shadow e External glow from the window that opens. If you do not know how to access the merging options of a layer, just right click on its name in the panel located at the bottom right and select the item Blending options give the menu to compare.
Change photo wallpaper on smartphone and tablet

As mentioned at the beginning of the post, it is possible change photo background even from smartphones and tablets. Here are a couple of applications that allow you to do this in an extremely easy and fast way.
- PhotoLayers (Android) - excellent free application for Android that allows you to remove the background from a photo and change it with another image taken from the phone (or tablet) gallery. To use it, just press the button Load a background image and select a background image. Then you have to press the button Add Photo, select the photo that contains the subject to add to the background, and use the tool Cut (cut) to remove its original background.
- Superimpose Studio (iPhone / iPad) - iOS also has a great free app to change the background of photos. Its name is Superimpose Studio and its operation is extremely intuitive. Once installed, you have to press the button Background > Library to select the image to use as wallpaper. Then you have to "tap" on the button Layer > Library to select the photo whose background you want to change and you have to call up the tool Cut (Eraser) to mark the parts of the image to be removed (so that only the subject is in the foreground).
Change photo background online

Don't feel like installing Photoshop on your PC and smartphone apps seem too limited? No problem, you can change photo background using some very valid photo editing tools available online.
If you want to know more, check out my tutorial titled “Editing photos online: here's how” in which I pointed out some of the best online photo editing services.
How to change photo background


