IPhones, for the design they have and for what they cost, are little gems and a bit of fear at the beginning is normal, especially if you have never used one before. If you bought your first iPhone and you are afraid of making a mistake with the initial configuration then follow the advice in this article: we will help you in the correct iPhone configuration.
IPhone initial setup
Even if you are not very familiar with electronic products or with the iOS system you can rest assured, the initial configuration is very simple thanks to the clear and simple interface made available by Apple.
Preparations
Before starting the configuration procedure, insert the SIM into the special compartment and make sure you have a promotion that allows you to connect to the Internet or, better still, a nearby Wi-Fi network.
"Hi"
Once you have completed the previous steps, turn on the device by holding pressed the screen lock key until the "apple" is displayed. You will see a screen that says "Hello”In various languages, swipe right to begin the procedure. You don't have to wait for the english language to come out, the choice will be made later. For those with visual impairments, you can activate the utilities made available by Apple from this screen.
Language and residence
Once you have done the swipe to the right choose the language desired and the state in which you live. This information is used to set the date, time and other features of the phone.
Activation
This is the actual activation of the phone. To do it you will have to connect to the Internet via Wi-Fi or data network, or connect the device to the PC and open iTunes. Then connect to a network and activate the localization (you can also leave it deactivated but I do not recommend it).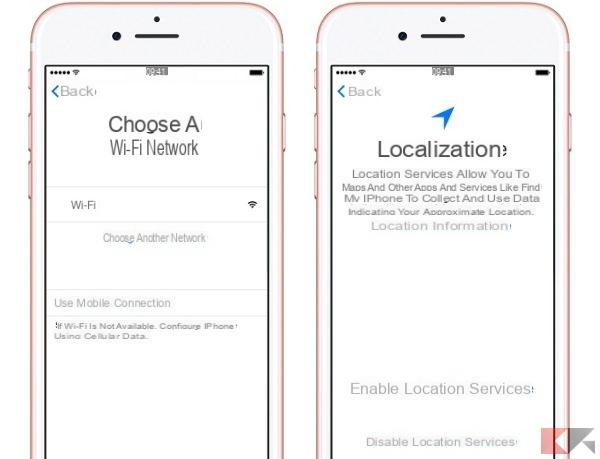
Everyday security
If you care about your privacy, now you will have the possibility to set a code that will be requested each time the device is unlocked, and configure the touch ID (if present) to unlock the screen without entering the PIN. In addition, with the fingerprint sensor, you can shop at the Apple Store and use Apple Pay. If, on the other hand, you do not want to use the code, click on “code options” in the entry screen.
Data recovery
This is a key part of making data migration from an old device as fast as possible. Here you will be able to choose whether to restore data from iCloud, yes iTunes, yes Android or activate the device as new, therefore without data.
Whichever option you choose, you will have on-screen instructions explaining how to do the migration.
Apple ID
Once you have followed the procedure to restore the data, you will need to log in with an Apple ID (or create it if you don't already have one). Those who have chosen to restore an iPhone from iCloud, however, are already signed in to their Apple account, so they can skip this step. The procedure to create an account is very simple, you will need to enter a couple of data, an email and a password.
Siri!
From this screen you can choose whether or not to use Siri, Apple's voice assistant that will allow you to perform some functions only using your voice.
Home key
If you have one of the recent iPhone models you will have an extra screen that will allow you to set the feedback of the home button. On these models, in fact, the central button is no longer physical but is a touchscreen with a motor that simulates the pressure of the button.
Display resolution and data to developers
We are almost done… From iPhone 6 onwards you will be asked to set the display resolution. If you choose "standard"You will see more information on the screen, if you choose"zoom”You will see less but those present will be more enlarged. Select one and click on "NEXT".
Then you will have to choose whether to send anonymous data to the developers on the use of the apps and any errors. Choose the option that inspires you the most.
Everything ok: it "begins"!
The procedure is over, click on "Start”And you will see the home of your new iPhone appear. Begin to familiarize yourself with the system and… Best Wishes!


