When you are new to the world of computers, it is always difficult to juggle the terms used by those who have been used to working with the PC for some time. For example, I know you panicked when your colleague asked you if you know how to zip a folder.
Of course, by now you know the meaning of the word “zipping” too, but how do you create a compressed archive and insert files or folders into it? Don't worry, if you want I can explain it to you, recommending some extremely intuitive tools for Windows, macOS and even for smartphones and tablets.
Courage: take five minutes of free time, identify the solutions that you think will best suit you and use it, following the instructions I am about to give you. There is nothing left for me to do, but wish you a good read and a big good luck for everything!
- ZArchiver (Android)
- iZIP (iOS / iPadOS)
How to zip a folder on Windows
If you want to create a compressed archive in ZIP format on a PC Windows, know that you can perform this operation both with the system utility, and through third-party software. How? You will find everything you need in the next chapters.
System utility

On PC Windows a system utility is available (Compressed folder), which allows you to easily create archives in .ZIP. You don't need to enable any features, because it's already available and enabled by default in the operating system. Be aware, though, that this tool will simply allow you to collect your files in an archive, without performing a file compression.
In reality, the compression will take place, reducing the total size of the files present in the archive, but this will be slight, unlike what can be done by creating an archive using third-party software. Having clarified this concept, if you only need to create a ZIP archive without worrying about its total reduction in "weight", this solution can certainly be for you.
To zip a folder with Windows, all you have to do is select the folders (and possibly other files) you want to put in the archive and right-click on them. You can also simply right-click on the folder containing all the files to be zipped.
In the context menu that is shown to you, select the items Send to> Compressed folder, to generate an archive in .ZIP in the same position where the previously selected data are present.
7-Zip

You own a PC Windows and you would like to understand how to zip a folder through third party software? If the answer is affirmative, I invite you to resort to using 7-Zip. It is a free and open source program, fully translated into British, which allows you to zip files, folders and multimedia files in a few clicks: also ideal for zip a folder of photos, video o papers different.
The first step you need to take to use 7-Zip is to download the program to your computer. To do this, go to the official 7-Zip website and click on the entry Download for the 32-bit or 64-bit version of the software, depending on the operating system you are using. If you do not know what is the architecture of the operating system installed on your computer, I suggest you read my tutorial dedicated to the subject.
At the end of the download open, by double clicking on it, the fillet just downloaded and, in the window that opens, first click on Yes, Then install and finally on Close, to finish the 7-Zip installation process.
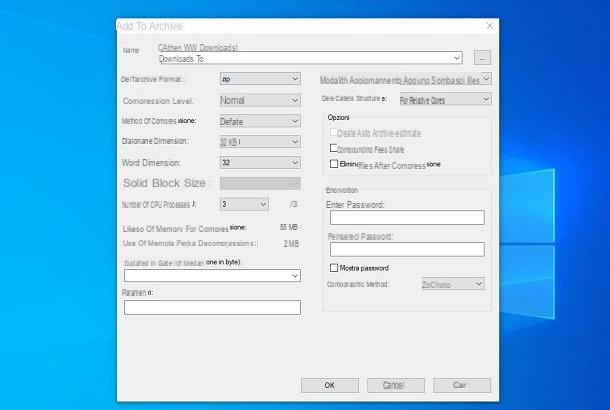
At this point, believe it or not, to be able to zip a folder, all you have to do is click with the right mouse button on it, select the item 7-Zip attached to the menu that is shown to you and then choose the item Aggiungi all'archivio.
In the screen that opens, select the type of archive you want to create (in this case ZIP) from the drop-down menu located next to the item Archive format and its compression level from the appropriate drop-down menu: Memorization does not compress the archive but creates the zip file instantly, Incredibly compresses the archive to the maximum but takes longer to create.
Once this is done, type the name to be assigned to the archive in the field Archive name and click on OK, to start its creation. At the end of the procedure, you will find a compressed archive in .ZIP in the same location where the source folder was located.
If you want, you can also protect your archives with a password. To set one, type the keyword you want to use in the fields below the items Enter password e Re-enter password, present at the bottom right of the window for creating a new archive.
Are you compressing a large file? You can divide it into several parts and save it on the media you prefer (eg CD, DVD, etc.) without worrying about the space occupied. To create a multi-volume zip archive, all you have to do is select the dimensions that you intend to make each part of the archive assume through the drop-down menu located under the heading Divide into portions.
You can also set 7-Zip to become the default program for opening archives in ZIP, RAR, GZIP, TAR, etc. format by accessing the program via the Start menu Windows (the one that opens by pressing the icon pennant) and selecting the voice options from the menu Instruments of the same.
In the window that opens, click on the button [+] twice in a row and save the changes by clicking on first Apply and then OK. Alternatively, select the tab System, press the combination Ctrl + A on your PC keyboard, to select all archive formats supported by the software, and first click on the button Apply and then OK. The procedure may change depending on the software version installed.
How to zip a folder on Mac
Possiedi a Mac? Also in this case, you can zip a folder easily, thanks both to the default utility present in the Apple operating system, and through some third-party applications that guarantee more functionality than the default tool. In the next chapters you will find everything you need to create a digital archive containing your data.
Compression Utility

Possiedi a Mac and would you like to understand how to zip a folder? Yes? Well, then know that I have good, indeed excellent news to give you: to do this it is not necessary to install third-party programs, as it is sufficient to use the tool Compression Utility integrated into macOS. In fact, on all Macs there is a tool to compress files and folders in a very simple way. Now I'll explain how to use it.
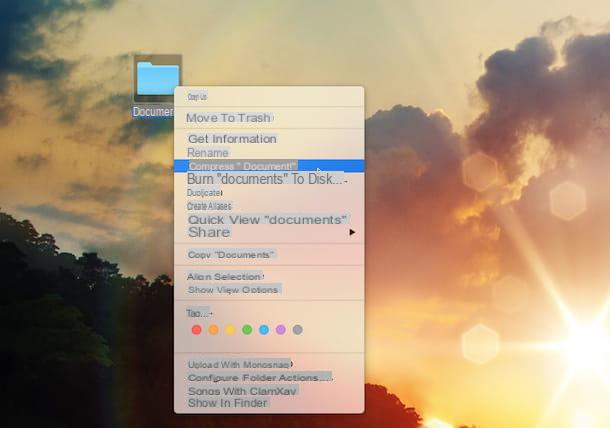
To zip a folder on Mac using Compression Utility, all you have to do is select the folder on which you intend to act, click on it with the right mouse button and choose the item Compress [folder name] give the menu check if you press.
Once this is done, macOS will create a .ZIP file with the previously selected folder inside it. The compressed archive will be saved in the same location as the source files and will take the same folder name.
Of course, you can change the name automatically assigned to the generated archive by clicking on it with the right mouse button and selecting the option Rhinomine from the menu that is shown to you. To learn more, check out my guide on how to rename files on Mac.
If you need to, you can also customize the "behavior" of Compression Utility, starting the program in question by searching for it in Spotlight (which you can call up via the magnifying glass located at the top right of the menu bar or by pressing cmd + space).
Then wait for the Compression Utility icon to be visible on the Dock, select it, click on the item Compression Utility present in the upper left part of the menu bar and select the option Pref Renze.
Using the new screen that will be shown to you, you can change the path where to save the unzipped files, choose the default action to be performed after creating an archive and much more. To confirm the changes made, simply close the utility window.
cake

A very good third-party solution for zip a folder on Mac is the one offered by cake. It is an excellent application that allows you to easily extract the contents of the main archive formats, including the ability to create compressed folders.
You can download Keka for free from its official website using the button Download. You can also decide to support the developer by purchasing the application on the Mac App Store, at the cost of 3,49 € (the functions are the same). After downloading the .dmg file from the Keka website, double click on it and drag theKeka icon in the folder Applications.
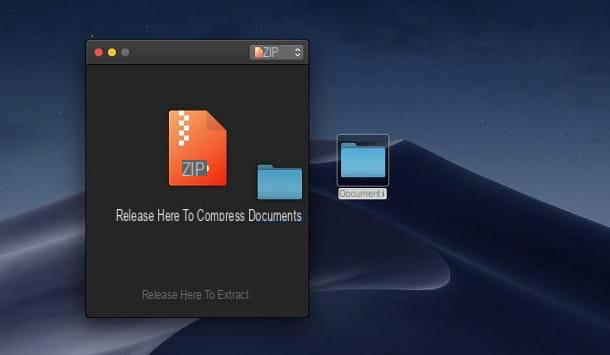
After starting Keka via its icon in the LaunchPad, first prize apri to access the application configuration panel. Using the drop-down menu at the top, select then ZIP as the archive format (or any other) and set the compression level, using the appropriate lever. Then choose whether to create a multi-volume archive, indicating the value in MB of each volume, using the box Division. You can also set one Password, typing it in the appropriate boxes.
When you have properly configured the parameters to be used for creating the archive, it's time to proceed: all you have to do is drag the folder you want to compress onto the Keka screen: a compressed archive will be immediately generated, which it will be placed in the same position as the folder to be dragged. Easy, right?
How to zip a folder on Linux

Do you own a computer equipped with Linux and would you like, therefore, to understand how to proceed in order to zip a folder on this operating system? Know that the procedure to follow is very simple and will only take you a few minutes of your time.
There are third-party tools that allow you to do this very simply: if you want to know more, read my guide on how to zip a Linux folder.
How to zip a folder online

The default utility of the operating system installed on your PC does not satisfy you but you do not want to install any third-party software so as not to "burden" the computer too much? Then the solution for you is to look for Web services that allow you to create compressed archives.
You must know, in fact, that you can zip an online folder easily, thanks to the Web services you find on the Internet. However, be careful what you want to use: you must make sure that, according to the terms of service, the data you transmit is deleted from the server or that it is not used for other purposes. In any case, if you have any doubts about it, you can still consult this guide of mine, in which I have provided you with some solutions that can do for you.
How to zip a folder on smartphone / tablet
You need to zip a folder but, instead of doing it from your computer, you would like to understand how to do it directly from your own smartphone o tablet? Then I invite you to take a look at the advice I will give you in the next chapters.
ZArchiver (Android)

If you want zip a folder on Android, my advice is to use the app ZArchiver. This free app supports many formats of compressed archives and you can set a password on them, improve the compression ratio or split the archive into multiple files. You can also decide to support the app with a donation of 1,50 €, but it is not essential.
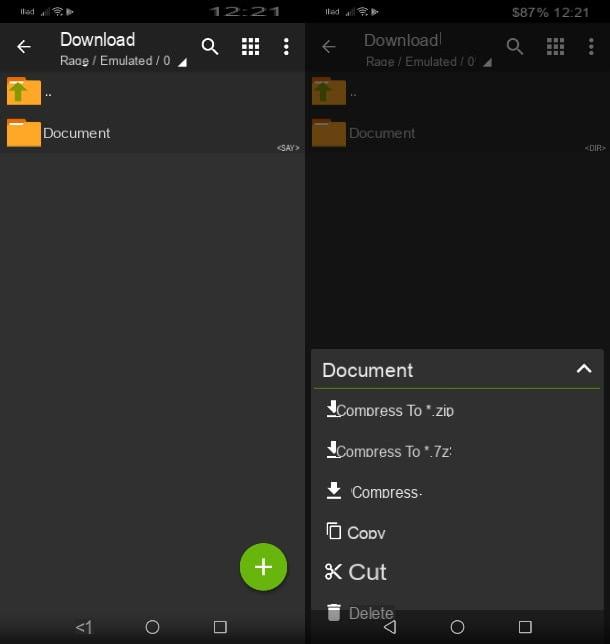
After downloading the app from the Android Play Store, start it via its icon on the home screen or in the drawer and reach the folder you want to zip.
When you have identified it, keep your finger pressed on it and, in the box that is shown below, choose the option * Compress in .zip **, to immediately generate a compressed archive in this format, or press on the voice Collapse, to customize the compression parameters.
If you have chosen the latter option, a panel will allow you to customize some parameters, such as the file name, format, compression level, password protection and splitting into multiple volumes. When you are done, press the button OK, to generate the compressed archive in .ZIP format.
iZip (iOS / iPadOS)

If you have a iPhone or iPad, you can zip a folder thanks to the app Zip. The app is free and includes tons of features that can definitely be right for you. Know that in case you want to create password-protected compressed archives, you will need to make an in-app purchase of 7,99 € to unlock the Premium version.
After downloading the app Zip from the iOS / iPadOS App Store, tap on its icon on the home screen to start it. Now, click on the wording Document Browser or on one of the items related to supported cloud services, to import all the files you want to insert in the compressed archive into the app. Then reply in the affirmative to the message relating to importing the data into the card Files by iZip.
Now, go to the tab Files e premi sull 'pencil icon, up. Then press the button add Folder, to create a new folder by giving it a name. Once this is done, press again onpencil icon located at the top and select all the files previously imported. Finally, press the button Move and choose the folder you just created to move files into it.
Well: we're almost there! At this point, you just have to zip the folder you just created containing all your files. Put a check mark next to the folder name and press the icon Zip down.
Then choose a name to assign to the new archive and click on OK, to confirm. Now that the archive has been created you can share it outside the app, using the button Share placed at the bottom.
How to zip a folder


