You would love to create caricatures to your PC to entertain your friends but you only recently discovered how to use Photoshop and you don't know how. I still don't understand why you are asking yourself these problems! As I have shown you several times with my guides, Photoshop can be used easily even by those who are not a graphic expert and even distorting photos to create caricatures can be an operation within everyone's reach.
Do not you believe it? So take a few minutes of free time and follow the directions I'm about to give you about how to warp photos with Photoshop. You will see, in just a few clicks and without having to learn complicated photo editing techniques you will be able to create hilarious photorealistic caricatures starting from any photo of you or your friends. The show is guaranteed!
If you want to learn how to warp photos with Photoshop, the first step you need to take is obviously to start the program through its icon on the desktop or in the Windows Start menu and import the photo to be deformed into it by selecting the item apri from the menu Fillet.
If you intend to create caricatures, my advice is to use frontal photos close enough, or at least some shots in which all the details of the face of the person to be transformed into a caricature are clearly visible.
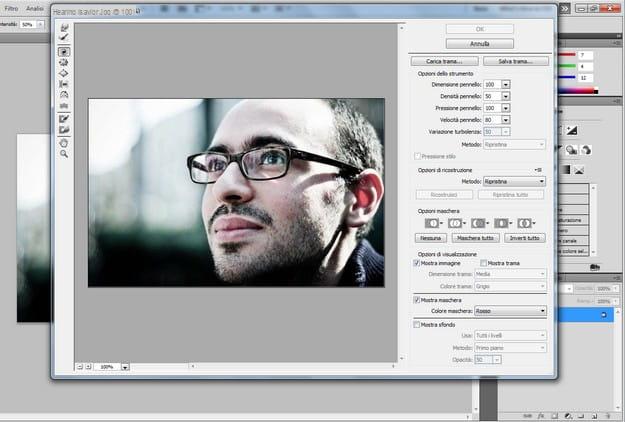
Once you have imported the photo to be distorted into Photoshop, select the entry Liquify from the menu Filter and a new window will appear with your photo in the center and a toolbar on the left with the tools you will need to deform the image.

Starting from the first icon at the top, the tools you will need a warp photos with Photoshop I'm: Warp ahead which allows you to blend the selected portions of images in any direction; Rebuild tool that undoes the changes made to the photo; Spiral clockwise which deforms the portions of selected images by creating spirals; Piega that folds portions of selected images; Swelling which deforms the portions of selected images by zooming them; Push left which allows you to blur the portions of selected images to the left; Reflection which creates the mirror effect in the selected portions of photos e Turbulence which deforms the portions of selected images by creating “waves”.
Now that you know all the tools at your disposal, you can get to work! How about starting with a nice big nose? Then select the tool Swelling and click three or four times on the nose of the person portrayed in the photo. Do you also want to touch up your mouth by making it thinner? Use the tool Piega on it, and so on. In short, all you have to do is give vent to the imagination and create the caricatures according to your tastes.

When you are done with warp photos with Photoshop and you are satisfied with the result, click on the button OK to save the changes. At this point, if you have no other changes to make, you can save your distorted image by selecting the Save As item from the menu Fillet di Photoshop.
In the window that opens, select the folder in which to save the edited photo, give it a name and click on the button Save to complete the procedure. Since it wasn't that hard?
How to warp photos with Photoshop


