You took a series of great photos with yours iPhone, would you like to share them with friends and relatives who also use Apple-branded smartphones, but you don't know how to do it? Are you about to buy a new iPhone and fear losing your photos because you still don't know how to transfer them from one phone to another? Don't worry, I'm here to give you a hand!
Whether you want to send photos or albums to other people or copy the entire photo library of an iPhone to a new model of "iPhone by", read the instructions on how to transfer photos from iPhone to iPhone that I am about to give you and I assure you that you will be able to solve all your problems in an extremely easy and fast way! All you have to do is take a few minutes of free time and choose one of the solutions mentioned below.
There are many ways you can take: you can take advantage of Apple's cloud systems to synchronize your photos on multiple devices, wireless sharing systems to send single photos or albums to other people and much more. Read on to learn more!
Transfer single photos and albums from iPhone to iPhone
Do you want to transfer a photo you took with your iPhone to your friend or relative's iPhone? Nothing simpler. Indeed, there are so many solutions at your disposal - both included "standard" in iOS and offered by third parties - that you are spoiled for choice!
AirDrop
AirDrop is Apple's proprietary wireless file transfer system. It is available on all iPhone models from iPhone 5 onwards and on all iOS versions starting from 7. Using it, you can send photos, videos, documents and many other types of files from one iPhone to another without installing any applications. third parties and very quickly. The only care you need to have is to check that both the Wi-Fi and the Bluetooth.
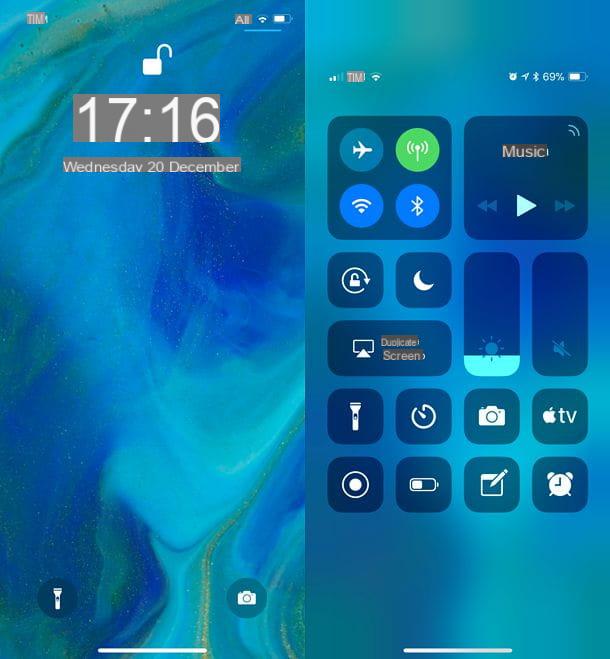
To check the status of Wi-Fi and Bluetooth, call up the control center of iOS by swiping from the bottom of the screen to the top (or from the top right corner of the screen to the bottom, if you are using iPhone X) and check if the buttons with the icons of the Wi-Fi and Bluetooth they are on: if they are not on, press on them to turn them on.
Another setting that you need to check - only on the iPhone of who has to receive the photos though - is the one related to AirDrop privacy level. AirDrop, in fact, can be configured to accept files from anyone, only from contacts (therefore only from people in the iPhone address book) or from anyone. If you want to send photos to someone who hasn't added you to their address book, you need to tell them to access settings iOS device (the gear icon located on the home screen), select the items Generali > AirDrop and put the check mark next to the item All.

After checking the Wi-Fi, Bluetooth, and AirDrop settings on the two iPhones involved in the photo exchange, you can take action. So take your "iPhone by", open the app Gallery and select the photos you want to share with the other iPhone. If you don't know how to select multiple photos at the same time, tap on the item Select placed at the top right and put the check mark on the thumbnails of the images of your interest.
Then, press on theshare icon (the square with the arrow inside) located at the bottom left, wait a few seconds and select the photo of the person with whom you want to share the photos from the menu Tap to share with AirDrop that appears on the screen.
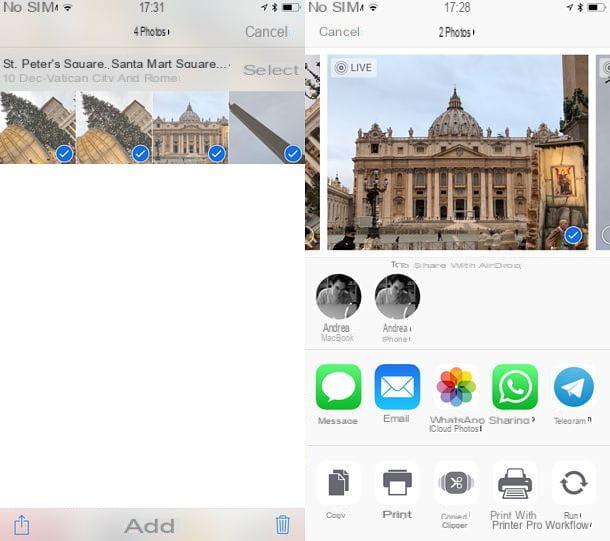
If everything goes right, a request for accepting the photos will appear on the recipient's iPhone: by confirming, he will automatically receive the images you sent him and will be able to access them freely via the iOS Photos app.
Please note: AirDrop does not work if the function is active on one of the two iPhones involved in the data transfer Personal hotspot. If this function is active on your "iPhone" or that of the recipient, deactivate it by going to the menu Settings> Personal Hotspot.
Send Anywhere
Need to send photos (or videos) to an iPhone that doesn't support AirDrop? In this case, I suggest you contact Send Anywhere, a free app that allows you to transfer photos, videos, documents and other files to various devices (including PCs, tablets and non-Apple devices) without making recordings and without stringent space limits.
To share photos with Send Anywhere, install the app on your iPhone and have it also installed on the iPhone of the recipient of the images, then launch it, allow access to the photo library of the device and select the tab Gallery located at the top left.
At this point, select the thumbnails of the photos to share, tap the button Send which appears at the bottom right and communicates the code of 6 code that appears on your iPhone screen to the recipient of the images.
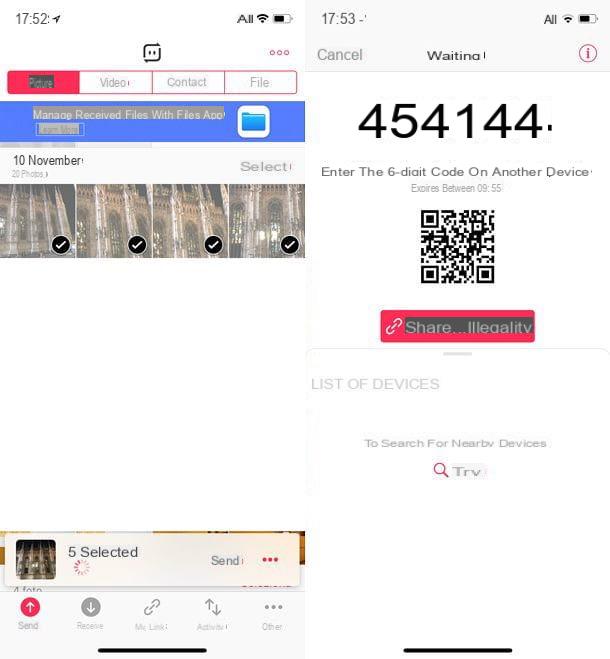
Once the code has been obtained, the recipient of the photos will have to open Send Anywhere on their "iPhone by", select the tab You will recive located at the bottom left and type the code in question in the text field located at the top. Then he will have to press the button You will recive and wait for the photos to be transferred.
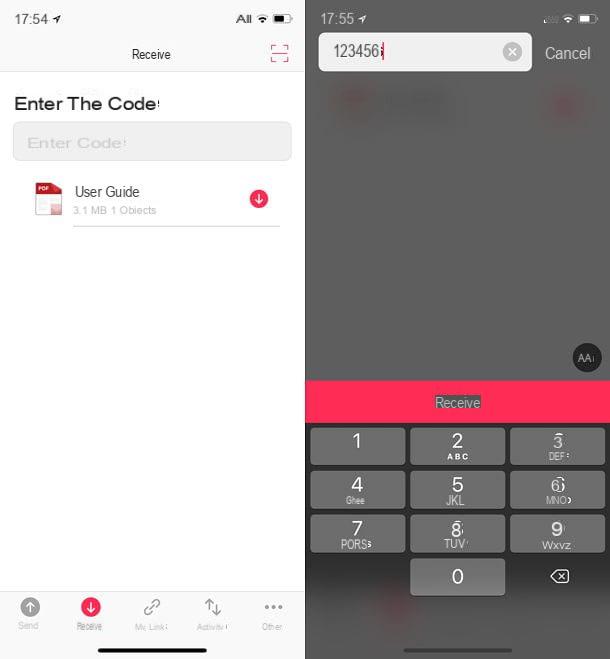
Please note: Send Anywhere codes have a duration of 10 minutes. If the image transfer is not completed within this time, the entire procedure must be repeated.
ICloud Photo Sharing
Is the person you want to share your photos with away from you? No problem. Thanks to iCloud photo sharing you can create photo albums on the Internet and share them easily with other Apple users (therefore with other owners of iPhone, iPad or Mac).
To take advantage of iCloud photo sharing, go to the menu Settings iOS device (the gear icon on the home screen) and make sure your "iPhone by" is associated with an iCloud account. In case of negative result (if, that is, in the settings menu there is no name and no iCloud account is indicated), tap on the item Log in to iPhone and log in with your Apple ID. If you don't have an Apple ID yet, you can create one and use it on your "iPhone by" following the instructions you find in my tutorial on how to activate iCloud on iPhone.
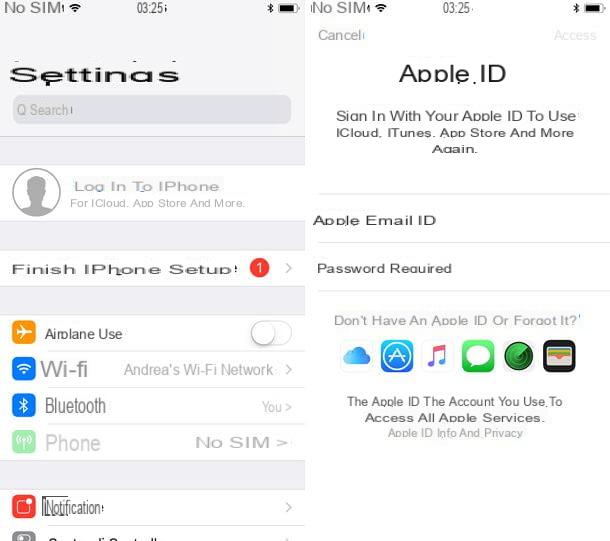
After checking your iCloud account settings, go back to the menu Settings on iOS, pigia sul you don't know located at the top and select the items iCloud e Gallery from the screen that opens. Then check the status of the option ICloud Photo Sharing and, if this is not active, activate it by moving the relative lever to ON.
At this point, open the app Gallery iOS, select the photos you want to share with your friends / relatives and press the icon of sharing (the square with the arrow inside, located at the bottom left) and select the item ICloud Photo Sharing give the menu check if you press.
Next, tap on the item New shared album and type the title you want to assign to the album in which to insert the photos, press the button NEXT, enter i names of the people with whom you want to share the album (taking them from the address book of your iPhone) and presses on NEXT. Finally, type a comment to the album (if you want), press the button Public And that's it.
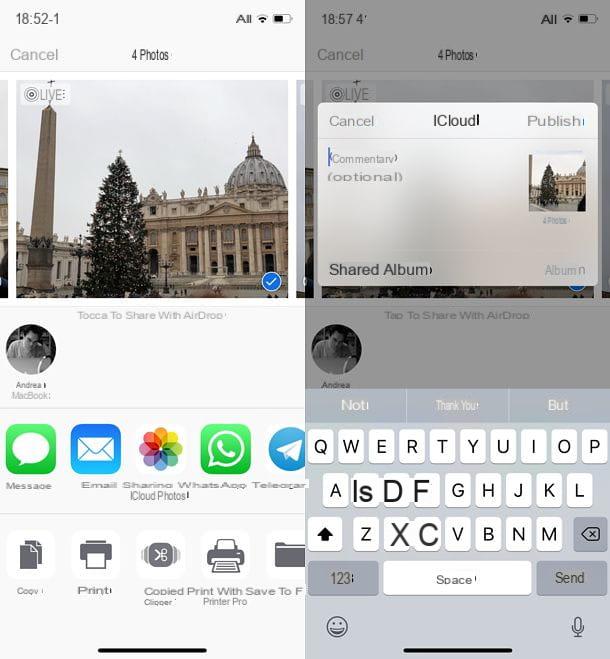
The people you shared your album with will be able to access it simply by opening the app Gallery of iOS and selecting the tab He shared which is located at the bottom right.
Email and instant messaging services
Even if this is a trivial advice, I remind you that you can transfer photos from one iPhone to another even via email or instant messaging systems.
To email photos, open the app Gallery iOS, select the images to send, press the icon of sharing located at the bottom left and select the icon of your favorite email client (eg. Mail o gmail) from the menu that opens. Then type the address of the person you want to send the photos to, enter a subject for the email, type an accompanying message for the images (if you want) and send it all by pressing the appropriate button.

If you have difficulty setting up Mail on iPhone and / or want help setting up Gmail on iPhone or setting up Hotmail on iPhone, read my tutorials dedicated to the topic.
If, on the other hand, you prefer to use the services of instant messaging, such as WhatsApp, Telegram and Messenger, you can exchange photos simply by selecting a recipient from the list of your contacts and pressing the attachment icon (eg. clip or the symbol [+]).
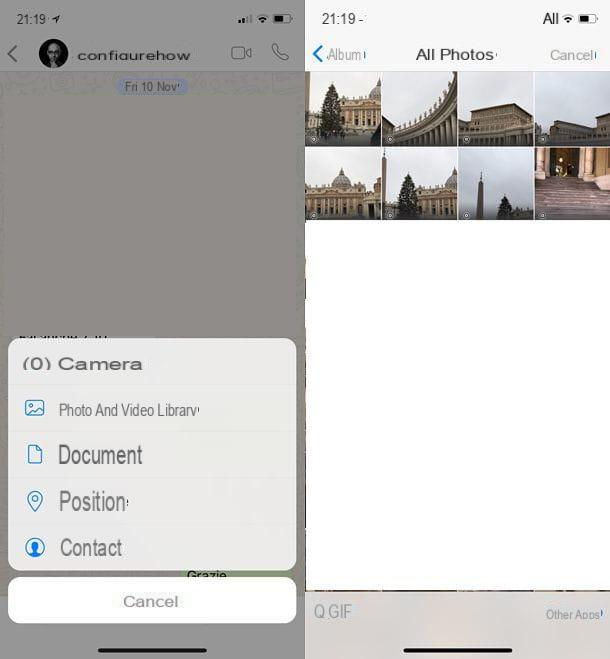
If you need more information on how WhatsApp works, how to use Telegram or how Messenger works, read my guides dedicated to these famous messaging services.
Transfer entire photo library from iPhone to iPhone
Are you about to change your iPhone and would you like to transfer your entire photo library to the new "iPhone by"? Nothing impossible. Indeed, even in this case you have several solutions to rely on, all extremely immediate and easy to use.
ICloud Photo Stream
Photo stream is a service included "standard" in all iPhones on which an iCloud account has been set up. Automatically and, above all, free of charge on the cloud the photos that are present in the iOS Camera Roll. It has two major limitations: it does not include videos and only saves photos from the last 30 days, but on the other hand it does not erode the iCloud Drive storage space.
To take advantage of Photo Stream, go to the menu Settings iOS (the gear icon located on the home screen), tap the you don't know, they said iCloud> Photo and activate the lever for the option Upload to my photo stream.
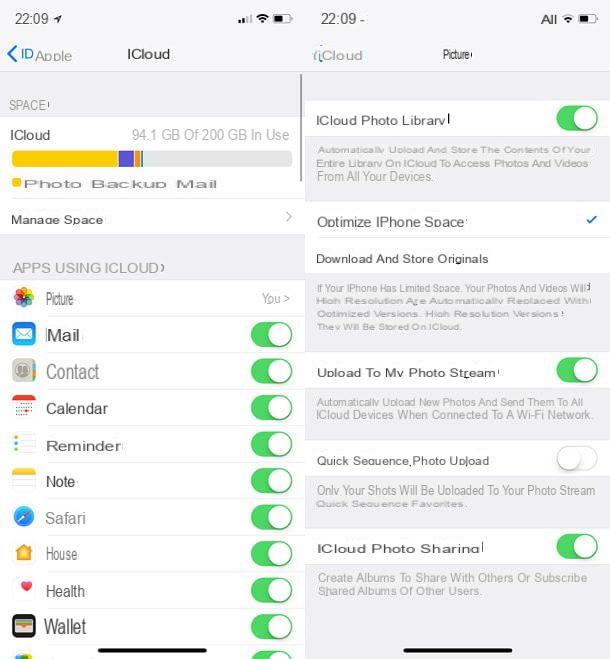
Repeat the same operation on the new iPhone (which obviously must be linked to the same Apple ID as the previous iPhone) and you will be able to access the contents of your Photo Stream via the app Gallery of iOS.
ICloud Photo Library
If Photo Stream seems a little too limited to you, you can rely on the ICloud Photo Library: another service offered by Apple that, unlike the other, allows you to store all the photos and videos in the iOS Camera Roll on the cloud without any time limit. It is free, but it involves the erosion of the storage space present on iCloud Drive: this means that to use it the 5GB of storage offered for free by Apple are not enough, you must subscribe to one of the paid plans of iCloud Drive.
- 50 GB: 0,99 euro / month
- 200 GB: 2,99 euro / month
- 2 TB: 9,99 euro / month
To activate an iCloud Drive paid plan, sign in to Settings of iOS, tap the you don't know in the screen that opens (you will see your name only if you have previously connected the phone to an Apple ID) and go first to iCloud and then Manage space e Change storage plan. So put the check mark next to the type of subscription you want to subscribe and that's it.
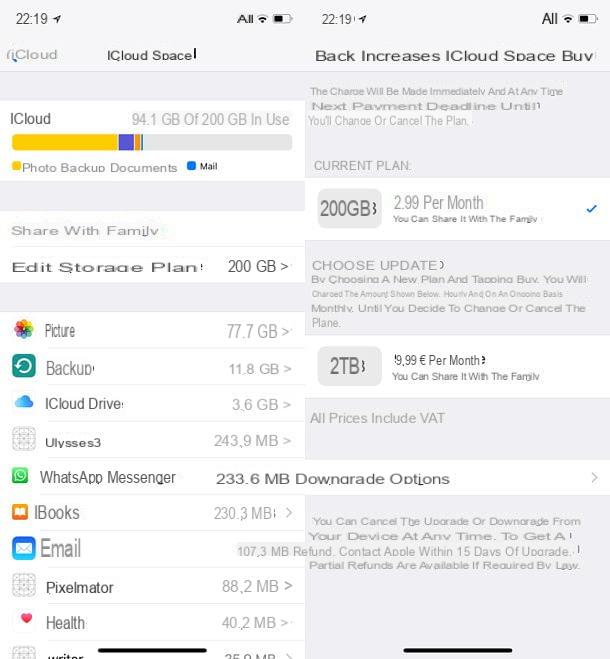
After activating an iCloud Drive paid plan, to activate the ICloud Photo Library, go to the menu Settings of iOS, tap the you don't know and go up first iCloud and then Gallery. Then activate the lever for the option ICloud Photo Library And that's it.

If you want to preserve the memory space of your "iPhone by", also activate the function Optimize iPhone space: this will allow you to keep the original versions of photos and videos in the cloud (downloadable at any time by recalling them from the iOS Photos app) and to save space on the iPhone, where low-resolution versions of the latter will remain.
Once the iCloud Photo Library is activated, to transfer photos from one iPhone to another, all you have to do is configure the new "iPhone by" associating it with the same Apple ID as the previous one and also activate the iCloud Photo Library on the latter. via the menu Settings> iCloud> Photos.
Google Photos
If you don't intend to subscribe to an iCloud Drive paid plan and, at the same time, find Apple Photo Stream too limited, you can turn to Google Photos.
Google Photos is a cloud storage service for photos and videos offered for free by Google: it allows store images and videos online without any time limit and without any space limit (as long as you accept a resolution reduction to a maximum of 16 megapixels for photos and a maximum of 1080p for videos) synchronizing them on all devices, both iOS and Android.
To archive the photos (and videos) in your iPhone Camera Roll to Google Photos, download the official app of the service from App Store, launch it, give it access to the device gallery and log in with yours Google account. If you don't have a Google account yet, create it by following my tutorial dedicated to the topic.
Once logged in, tap the ☰ button of Google Photos (top left), select the icon of thegear from the bar that appears on the side and go up first Backup and synchronization and then Dimensioni cartoon. Then put the check mark next to the option High quality And that's it.
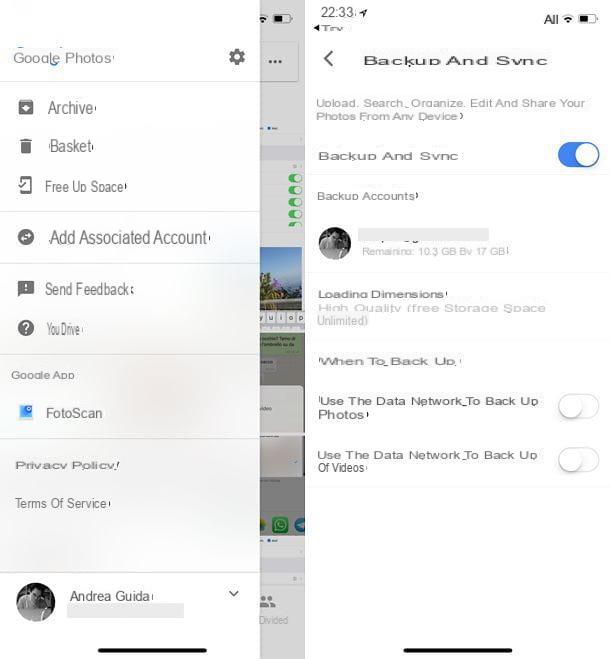
Now all you have to do is leave the iPhone on with the Google Photos app running and it will upload all the contents of the Camera Roll to the cloud (including the Live Photos, which will keep their animations). The operation could take days and days, so be patient and take into account the possibility of leaving the iPhone charging for a long time (if the phone turns off and / or you exit the Google Photos app, the upload will will interrupt).
Once the upload is complete, to download the photos on the new iPhone, all you have to do is install the Google Photos app on the latter and log in with the same Google account you used on the previous "iPhone by".
Backup on iTunes/iCloud
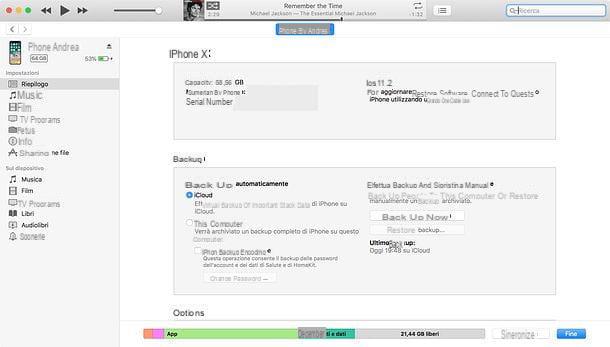
In conclusion, I would like to point out that you can transfer photos from an old iPhone to a new one using the backup on iTunes o on iCloud. To take advantage of the former you have to connect the phone to the PC and choose the restore option from the latter, while to take advantage of the latter you can choose the appropriate restore function in the initial configuration procedure of the iPhone (the backup files will be downloaded automatically from the Internet).
If you don't know how to make iPhone backups and how to restore them to transfer photos, apps and data from one "iPhone by" to another, follow the tutorial I wrote on the subject.
How to transfer photos from iPhone to iPhone


