The internal memory of your smartphone Huawei it is almost full and so, to free up some space, you thought of pouring all the photos on it onto a microSD card. Good idea! But if you're here today and you're reading this post, I think something went wrong. Let me guess: you have inserted the microSD in your smartphone but you do not know how to set it as the default destination for photos and / or how to move the images that are present on the internal memory of your device to it. Did I "hit the mark"? Then no problem, I already know how to help you.
If you give me five minutes of your time, I can explain how to move photos to huawei sd card and how to set the memory card as the main memory unit for saving the new photos that you will take with your smartphone (or tablet). I assure you that this is really a breeze, so let's not get lost in chat further and get to the action immediately: find all the information you need right below.
For the tutorial I will use a P9 Lite equipped with Android 6.0 and with the EMUI 4.1.1 interface. In any case, the indications that you will find below are valid for all models of Huawei smartphones and all versions of Android and EMUI (at most, some items to be selected in the system menus can change). So I just have to wish you a good reading and hope that the instructions below can really help you.
Preliminary operation

Prima di enter the live of this tutorial and spiegarti how to move photos to huawei sd card, I want to underline one important thing, namely that before exporting all your shots to an external memory card, you must make sure about the quality of the latter.
MicroSD cards are not all the same: they are distinguished not only by data storage capacity, but also by the quality and speed of reading and writing information. If you want to prevent your photos from coming to a bad end or the performance of the Camera app becoming poor, be sure to buy a good quality microSD.
How do you find a good quality microSD? I explained it to you in my post on which micro SD to buy, in which you can find a detailed explanation of all the technical characteristics of microSD and a list of all the best cards currently available on the market.
As regards'inserting the microSD into the phone, I don't think there is much to explain. If you have a smartphone with a metal casing, you must extract the SIM slot (using the paper clip supplied with the device), insert the memory card into the appropriate slot and reinsert the drawer in its place. If, on the other hand, you have a smartphone with a plastic backcover, you have to lift the back cover by inserting your finger or a screwdriver into the appropriate "cut", then you have to locate the slot for the microSD and insert the card in it. If any steps are not clear to you, take a look at my tutorial on how to insert Huawei SIM cards, where I explained how to access the SIM and microSD slots of Huawei smartphones.
Move photos from internal memory to microSD
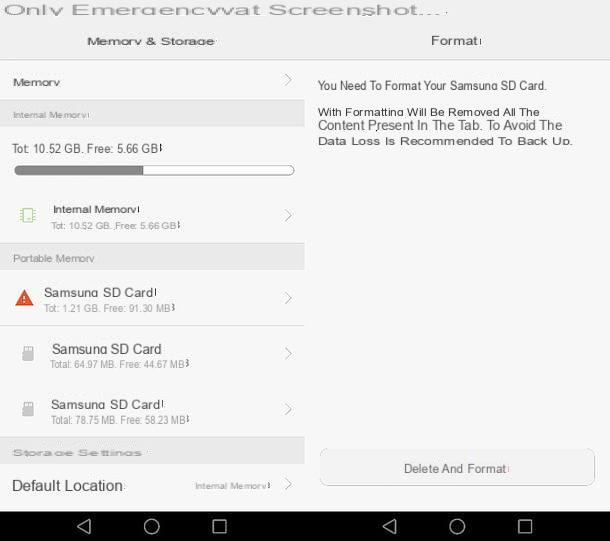
After inserting the microSD into the smartphone, this should be ready for use and should already be set as the default destination for new photos taken with the device (later we will see how to check this configuration better). Before proceeding, however, I recommend that you enter the Android settings and format the memory card in order to make it 100% compatible with your phone and check for errors inside.
Then click on the icon Settings (the gear) that you find on the home screen of your smartphone, go up Advanced Settings> Memory & Storage and select the name of your microSD card (ex. Samsung SD card) from the menu that opens. Next, tap on the option Format, pigia sul pulsating Erase and format and wait patiently for the card to be formatted. At the end of the procedure - which will delete all the data on the unit - a check will be carried out to find the presence of any errors on the memory card. You can follow the progress of the check via the Android notifications menu (which can be called up by swiping from the top of the screen to the bottom).
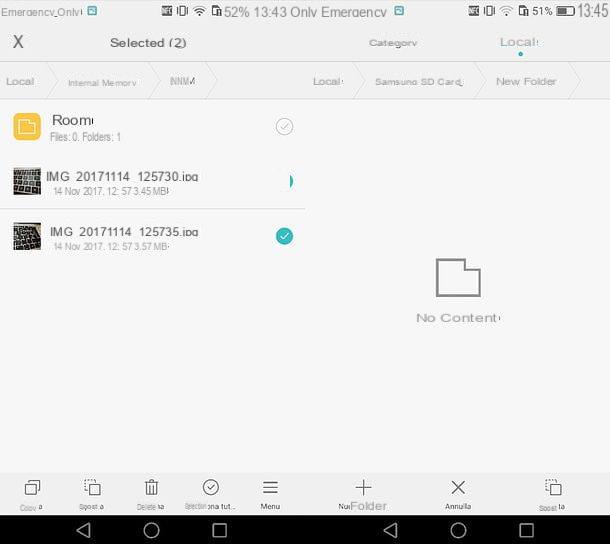
Once formatted, you can proceed with moving the photos from the main memory of the smartphone to the microSD. Then start the application File Management Huawei (which should be installed "standard" on your smartphone), select the tab Local which is at the top right and go up Internal Memory.
At this point, select the path DCIM (which is where the photos and videos captured with the phone's camera are saved), make a long tap on any image to call up the file selection tool and press the button Select all which appears below.
Per conclusdere, pigia sul pulsating Move (bottom left), go back by selecting the item Local located at the top left of the path bar, enter the SD card, select (or create) the folder where you want to move the photos and press the button Move (bottom right) to start transferring data from the smartphone's main memory to the SD card.
Should the application File Management is not present on your smartphone, you can move photos from the internal memory of your smartphone to the SD card using a third-party file manager: personally I recommend X-plore File Manager, which is not "attractive" like other more popular solutions (eg example ES File Explorer), but it is very effective, it is light and has no invasive functions. All free of course.
To transfer photos to the SD using X-plore File Manager, download the latter from the Play Store, launch it and grant it permission to access the files contained on the microSD. Next, tap on the icon related to internal memory smartphone, go to the path DCIM (the one in which the photos and videos made with the phone's camera are saved) and select all the images you want to move to the SD by two taps on the checkmark located next to the "DCIM" folder icon (so that a orange check mark next to the thumbnails of all photos).
At this point, pigia sul pulsating Copy negli appunti located in the X-plore File Manager sidebar, select the icon for the SD card, select (or create) the folder to move the photos to, put the check mark next to the item Move mode (delete source file) e fai tap sul pulsating Paste to start the data transfer.
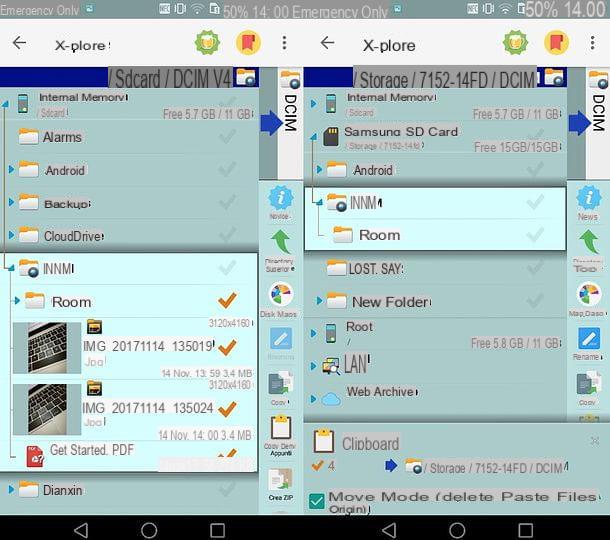
The first time you use X-plore File Manager to copy files to the microSD, you will need to authorize the app to write data to the drive. Upon the appearance of the request relating towrite access on the microSD (which will be displayed automatically after pressing the "Paste" button), then presses the button Continue, select the SD card from the screen that opens and tap the button Select all which is located at the bottom. Easier than that?
Please note: if in addition to the photos and videos taken with the smartphone camera you want to transfer the screenshots to the microSD, repeat the procedure I just illustrated with the files in the path Memoria interna > Pictures > Screenshots.
Set SD as the default photo destination
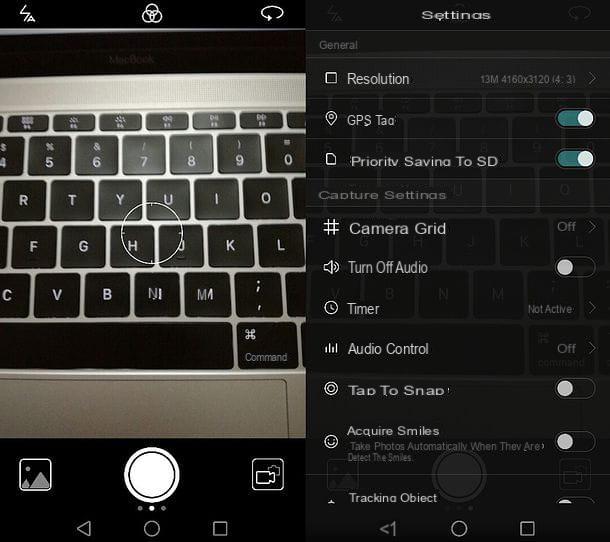
As mentioned above, once the microSD is inserted into your smartphone, it should automatically become the default destination drive for photos and videos taken with the device.
To check the setting (and possibly correct it), open the app Camera of Android, swipe from right to left and check if the option Priority saving on SD is active. If not, move up ON the lever that concerns it and all the photos and videos taken with the smartphone camera will be saved in the folder DCIM of the SD.
If you have purchased a large enough (16GB or more) and high-performance microSD, you can make Android save photos of (almost) all apps directly to the microSD by turning the card into the main storage unit of the device.
To set the microSD as the main storage unit of your smartphone, open the Settings (the gear icon on the home screen), go up Advanced Settings> Memory & Storage, select the option Default position and put the check mark next to the name of the SD card.
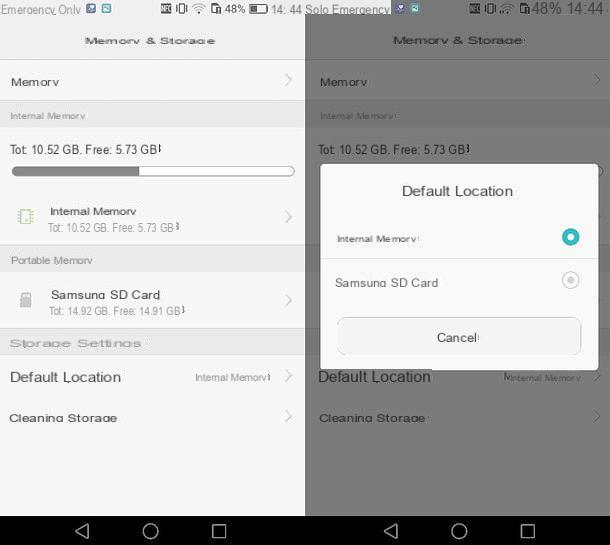
It should be noted that setting the microSD as the main memory unit of the smartphone is recommended only if the card is high-performance (possibly with certification A1, relating specifically to Android devices).
Another thing worth pointing out is that some apps, despite setting the microSD as the main storage unit, will continue to save data on the phone's internal memory. To bypass this limit you should root Android and use ad hoc applications (eg Link2SD) to force the movement of data on the memory card. For more info on this, read my tutorial on how to move apps to SD card.
How to move photos to Huawei SD card


