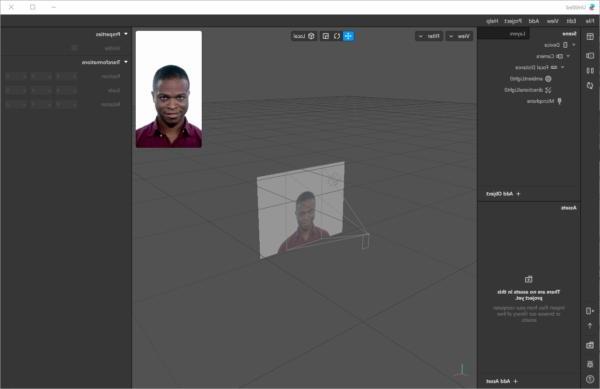
Finally, creating filters for Instagram is no longer a privilege for a few! Since August, Facebook has decided to open its Spark AR Studio software to the whole community interested in this new adventure. But let's see better what it is.
What are we going to talk about?
- What is Spark AR Studio
- First steps in the software
- Posting the filter on Instagram
What is SPARK AR Studio
Spark AR Studio is software for Windows and Mac made available totally free of charge by Facebook Inc.
Born for the development of augmented reality filters to be used in Instagram stories, used every day by half a million people, it was initially intended only for a programmed number of users. Only from 13 August 2019 the Zuckerberg company has decided to launch the beta of the software to the public.
The company also tends to underline in its official press release on the Spark AR Studio website that anyone can try their hand at developing filters without the need for special technical knowledge. Precisely for this reason it has made available on the official website a series of guides, tutorials and sample effects to learn how to use the software and a support group on Facebook.
To give notoriety to users who decide to undertake this activity, in conjunction with the launch of the beta, has introduced the Effect Gallery, which can be viewed by clicking on "Browse Effects" at the end of the effects bar in Instagram stories and within which they will appear filters developed by emerging artists.
As well as a growing community of creatives who have decided to take advantage of the Facebook home software, important businesses have also decided to ride the wave; realities like Adidas, Disney Mickey Mouse, Kylie Cosmetics, Off-White have published their filter that can be used by followers.
If you too want to start developing filters, all you have to do is go to the download page.
First steps in the software
Once downloaded and installed, all you have to do is launch the program on your computer.

Upon opening you will find yourself in front of a series of sample effects that will allow you to better discover the software and become familiar with it. Once you feel ready you just have to click on the "Create Project" button at the bottom right.

At the heart of it you'll find the real-time effects simulator that lets you see how the filter works as you progress with your project. To its left, the “Scenes” section containing the elements of the project, the “Layers” and the “Assets”, that is, the imported elements. On the right, however, you will find the panel from which to control the various properties of the elements that will make up the filter.
Bottom left, of fundamental importance, are the three icons arranged vertically: the first, representing a phone, allows through the Spark AR Player app, downloadable on Android and iOS, to test the filter developed on your smartphone simply by connecting it via cable at the PC; the second and third icons are used respectively to export the project for publication and import 3D elements from the online library.
Posting the filter on Instagram

To publish the filter you created, all you have to do is go to the Spark AR Hub page and click on "Load creative effect" at the top right and follow the wizard.
Once the filter is loaded, it must be approved by Facebook before it can be published. Usually this happens in a time ranging from 2 to 5 days.
Doubts or problems? We help you
If you want to stay up to date, subscribe to our Telegram channel and follow us on Instagram. If you want to receive support for any questions or problems, join our Facebook community.


