Have you ever transferred photos to your PC and after a while you don't remember where they were stored? Or do you have an external hard drive and don't feel like searching for them manually? Fear not, in this guide we will see how to allow Windows to view all the photos on our PC.
Preliminary information
We always recommend doing an installation through one 100% genuine and original license, this is to avoid data loss or hacker attacks. We are aware that purchasing a license on the Microsoft store has a high cost. For this we have selected for you Mr Key Shop, a reliable site with free assistance specialized in in your language, secure payments and shipping in seconds via email. You can check the reliability of this site by reading the many positive verified reviews. Windows 10 licenses are available on this store at very advantageous prices. Furthermore, if you want to upgrade to the latest versions of Windows operating systems, you can also purchase the upgrade to Windows 11. We remind you that if you have a genuine version of Windows 10, the upgrade to the new Windows 11 operating system will be free. Also on the store you can buy the various versions of Windows operating systems, Office packages and the best antivirus on the market.
Find all photos manually
Windows is usual file our files in different places on the PC, for example archive the images in the “images” section. Sometimes, however, the files are saved in other sections, as happens in the case of Dropbox, which tends to save in a special folder. In addition, also depending on the type of transfer, the files you want to upload to your PC will end up in different folders; for example, if you usually download photos from the Internet, they will not end up in the "images" section, but in the "download" folder. So, if these folders aren't too full, just start looking inside them.
Find all photos using Windows
Windows provides a trick Quick to search for different file types - we're talking about File Explorer.
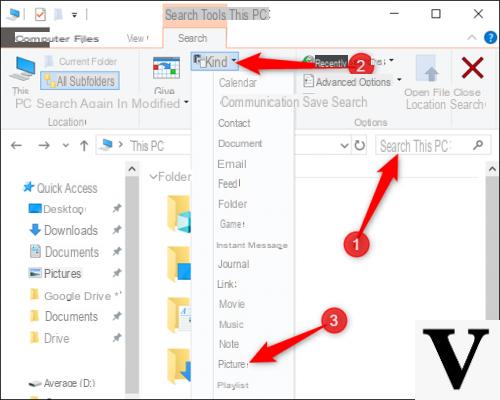
First, open "File Explorer" and select the location where you want to search; it will also be possible to search the entire PC by selecting the item "What PC".
You can also search in a Hard Disk or in a folder as in the example below, where the C: drive has been selected.
After choosing where to search, you will have to click on the search box located at the top right. Once clicked, the search form will appear at the top, here select the "type”Of files you want to search. In our case, just the images.
Once this is done, all the photos on your selected unit will appear, from the system ones up to the latest additions. The search will show you files of the type JPEG, PNG, GIF and BMP, which are the most commonly used formats.
For example, here are all the images found in the C: drive that we had selected:
Once you have identified the photo you were looking for, just select it and press the right mouse button to bring up the menu, where you have to click on "file path”To open the folder where the image is contained.
Once you have found all the photos you were looking for, you can then move them to a new folder or to an external storage drive, hoping not to lose them again.
Other useful articles
- How to become an administrator of the Windows 10 PC
- How to lighten Windows 10
- How to disable Windows 10 firewall
Doubts or problems? We help you
Remember to subscribe to our Youtube channel for videos and other reviews. If you want to stay up to date, subscribe to our Telegram channel and follow us on Instagram. If you want to receive support for any questions or problems, join our Facebook community or contact us on Instagram. Don't forget that we have also created a search engine full of exclusive coupons and the best promotions from the web!


