Do you need to edit some photos on a computer that is not yours, on which there is no software installed for this purpose, and you don't know how to get out of this situation? Don't worry, I think I have what is right for you: online services to edit photos directly from the browser.
Yes, you read that right! In today's guide, I'll walk you through come modify photo online easily, through free services that you can use comfortably through the program you usually use to surf the Net (eg Chrome). You should know that there are several tools of this type, which allow you to edit and correct the most common defects in photos, such as red eyes and low light, without installing programs or plugins on your PC.
Isn't that great? All you have to do is simply pay attention to the tips that I will point out to you in the next chapters, so that you can perform all the changes on your photos easily and directly from the web! If you are ready to start, I just have to wish you a good read and, above all, a good time!
Index
- How to edit photos online for free
- How to change photo size online
- How to change photo background online
- RemoveBG
- Edit Photos For Free
How to edit photos online for free
If you want a complete online tool for editing your photos, in the next chapters I will point out some that can surely satisfy your needs. I warn you that these tools are equipped with advanced tools and you will almost feel like you are using professional editing software, such as Photoshop (although obviously there are not many of the most advanced features of software of this kind).
Photopea

Among the online tools you can use for modify photo online for free, I report you Photopea. It is an advanced editor that does not require any registration to be used. It is supported through advertising banners but, by registering an account Premium, with costs starting from $ 9 / month, you can remove the latter and also enable the access functionality to the last 60 changes made on your project (the free tool allows you to access only the last 30).
To use Photopea, reach its official website and, if the service menus are not already translated into British, fix it immediately by selecting the item cityno from the menu More > Language, in high.
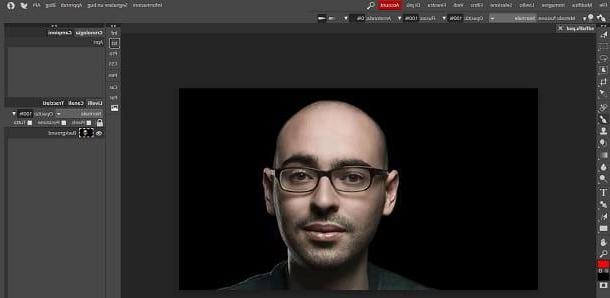
Now, on the main Photopea screen, tap on the item Open from computer, in order to upload the photo you intend to work on. After importing the image into Photopea, you can apply any changes you see fit.
Specifically, you can find different selection tools, stamps, brushes and text boxes in the toolbar on the left. In the right sidebar, however, you will find the different management panels, such as the levels or the history of the actions performed.
For each tool you will use, an additional bar will appear at the top, through which you can further customize some parameters of the same. I also point out the possibility of finding additional features through the menu bar located at the top (for example the tab Window, Filter o Image).
When you are done working on your photo, to export it to your PC, click on the items above File> Export As and choose one of the image formats that are shown to you. In the screen that you see, you will then have to set the export parameters and press the button Save, to download a copy of your project.
I also point out the possibility of exporting your project in PSD, in order to work in Photoshop later: you have to reach the items File > Save with PSD from the top menu and that's it!
Pixlr

Another useful online photo editing service that's just as reliable as the one I showed you in the previous chapter is Pixlr. In fact, this service offers several tools: Pixlr E, which is a very advanced photo editing tool, and Pixlr X, which instead is a tool with fewer tools available, useful for amateur editing.
They do not require the installation of any add-ons, as they are technology-based HTML5. They are then available Pixlr Editor e Pixlr Express which require, however, Flash Player enabled on the browser (I told you about it in this guide of mine).
Since the use of this component will soon be completely abandoned by web browsers, in this chapter, I will tell you about Pixlr E, the most complete solution offered by this online service. Furthermore, I warn you that all Pixlr tools are free but, by signing up for a subscription at the cost of $ 3,99 / month, you can access a library that offers thousands of overlays, icons, stickers and decorated fonts.
To use Pixlr E, all you have to do is go to its official website and, in the section you see, press the button Open Image, to upload the photo to edit from your PC. You can also use the key Load URL, in case you want to edit an online photo of which you have the URL.
After importing, you will be shown the main interface of the service. All the tools you need are located in the bar located on the left. In the right sidebar, however, you will find the panel related to levels of the project and the chronology of the actions performed.
In case you need to add filters, adjust the image or manage the layers, you can find all the related features in the menu bar located at the top. When you are done working on your project, you can export it very easily.
To do this, click on the item Fillet at the top and, in the menu that is shown to you, choose the option Save. Once this is done, in the panel you see, select the export parameters (extension, quality and size) and press the button Download.
How to change photo size online
Do you want change the size of a photo online? Nothing simpler! You will find everything you need in the next chapters, in which I will point out some useful solutions for your purpose.
iLoveIMG

A useful free online tool that allows you to change the size of a photo is iLoveIMG. In its free version, it allows you to upload images that do not exceed 130MB and to process up to 15 images at the same time. By signing up for a free account or signing up for a subscription plan (at the cost of 6 euro / month) it is still necessary to submit to some limitations (of a technical nature), but to a lesser extent.
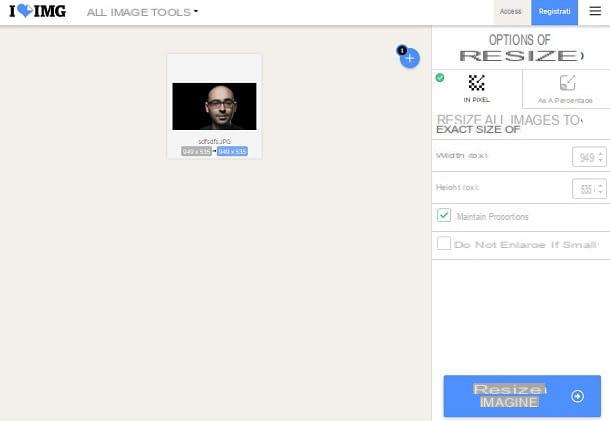
iLoveIMG has several tools to edit images but, in case you simply want to resize a photo, you can do this using the appropriate tool available at this link. On the page that is shown to you, then press the button Select Pictures, to upload the photo to resize from your computer. Alternatively, you can use the icons alongside to import an image from Google Drive o dropbox.
On the next screen, choose if you want to resize the image by changing the number of pixels (In Pixel) or by setting a predefined percentage value (In Percentage). In case you have to choose to resize the photo by adjusting the pixels, make sure there is a check mark in the box Maintain Proportions.
When there is fatto, premi sul tasto Resize Images, located at the bottom right, and then click the button Download Resized Images, to follow the download of a copy of the photo on your computer. By clicking on the icons on the side, instead, you can import the edited photo on Google Drive o dropbox.
PicResize

Another useful online tool you can use to resize photos is PicResize: it is completely free and allows you to upload photos with a maximum size of 100MB in the supported formats BMP, GIF, JPG / JPEG and PNG. I also warn you that the images are kept for 20 minutes on the server (to give you time to download them) and then be automatically deleted.
To use PicResize, go to its official website and, in the screen that is shown to you, press on the item Search, to open the dialog screen through which you can upload your photo. To import an online image to which you have the link, click on the item From the URL; to upload multiple images at the same time, instead, select the tab Multiple images.
Once this is done, press the button Continue editing the image, to access the image resizing and editing tools. All you have to do then is reach the section Resize Your Image and use the drop-down menu to choose one of the predefined options.
In case you want to enter the pixel values of the length and height of the image, choose the option Custom Size from the drop-down menu and enter, then the values in the fields below. Then scroll down the page and, in the section Save eat, choose the format and quality of the output file.
Once this is done, all you have to do is press the button I'm done, Resize my image, to complete the changes. At this point, in the new page you are viewing, click on the button Save To Disk, to download a copy of the photo to your computer.
How to change photo background online
You have a photo you want from remove the background? In this case, I can recommend some online services that allow you to perform this operation easily, automatically, thanks to artificial intelligence.
Remove.bg

An online service that can be useful for you to change the background of your photos is RemoveBG, available for free for processing low resolution images. In fact, in case you want to work on high resolution photos (up to 12 Megapixel), you will need to purchase a subscription plan, with prices starting from 9 euro / month.
The tool offered by RemoveBG allows you to automatically remove the background of the image, leaving only people's faces. It is quite reliable and turns out to be one of the best solutions out there.
To use this service, go to its official website and press the button upload Image, to import the photo. Well: you don't have to do anything else! The tool will automatically remove the background of the image and a preview of it will be available in the appropriate box.
In case you want to add a background by choosing a predefined template or uploading a photo from your PC, simply press the button Edit. You can choose whether to set a photo as wallpaper (Photo) or a solid color (Color). When you are done, press the button Download, to get a copy of your work on your computer.
Edit Photos For Free

In addition to the tool I told you about in the previous chapter, you can also rely on Edit Photos For Free, a completely free solution that allows you to manually remove the background of an image.
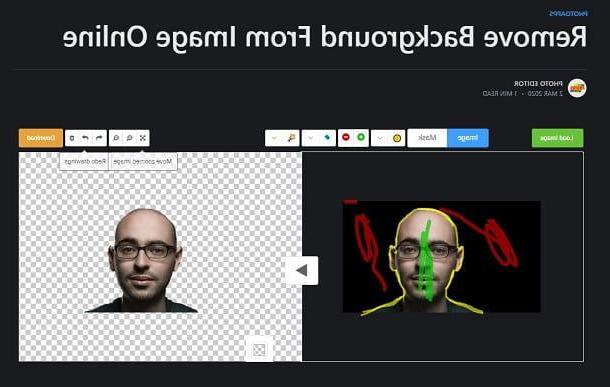
To use Edit Photos For Free, go to its official website and press the button Load Image, to import your photo. At this point, a preview will show you a preview of the image in the area below: now, all you have to do to remove the background from the image, is to press the button with the yellow ball, in order to draw a line on the element to be cut out.
This phase is the most important one because only if you are precise can you get satisfactory results. To finish, therefore, press ongreen dot icon and then on that of red dot, respectively, to add and remove elements of the photo. You don't need to be precise, just roughly color the area to keep and the area to be erased.
If you make any mistakes, you can also use the cleaning tool, via theeraser icon. When there is fatto, premi sul tasto Play, in the center of the two boxes, to preview your work. If you are satisfied, press the button Download, to take a copy of the photo.
How to edit photos online


