To use any Windows PC it is obviously necessary to create a user account. In fact, when we talk about a “Windows user”, we can refer to both a offline user (administrator or standard) can be used exclusively to access the services offered by the computer, both to a online user, therefore equipped with all the privileges offered by the world of Microsoft: OneDrive, Outlook, calendar, Office app, synchronization between devices, OneNote and much more.
As you have surely understood, today we are going to see how create a new user on Windows 10, differentiating the two types just analyzed.
Preliminary information
We always recommend doing an installation through one 100% genuine and original license, this is to avoid data loss or hacker attacks. We are aware that purchasing a license on the Microsoft store has a high cost. For this we have selected for you Mr Key Shop, a reliable site with free assistance specialized in in your language, secure payments and shipping in seconds via email. You can check the reliability of this site by reading the many positive verified reviews. Windows 10 licenses are available on this store at very advantageous prices. Furthermore, if you want to upgrade to the latest versions of Windows operating systems, you can also purchase the upgrade to Windows 11. We remind you that if you have a genuine version of Windows 10, the upgrade to the new Windows 11 operating system will be free. Also on the store you can buy the various versions of Windows operating systems, Office packages and the best antivirus on the market.
Create user with Microsoft account
Obviously, for each user, it is recommended to have at least one Microsoft account capable of managing all the online operations performed on the PC. This can be created both on the official website of the aforementioned company and directly from computer settings.
- Click on the button "Start" lower left
- Continue with “Settings"(Gear icon)
- From the screen that appears, choose the item "Account"
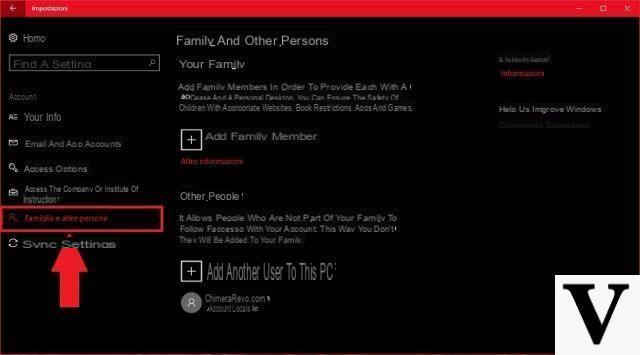
- From the left sidebar, select "Family and other users"

- Choose the option "Other users" and then "Add another user to this PC"
- Click on the item "I don't have this person's login information"
- Enter an existing email address to be associated with the Microsoft account (or create a new one by clicking on "Create a new email address")
- Add a secure password
- Complete all the required fields and continue with "Forward"
- Wait for the verification code that will arrive by email, enter it and finish with "Forward"
At this point, the Microsoft account will be created and can be used both for the use of the PC and for all the online services offered by the same company.
Create offline user
The second type of user, also called "local", is useful when you want to create a space dedicated to a single person, in order to access only their information on the same PC shared with other users. As anticipated, this user can be "Administrator" (able to change any computer setting) or “Standard"(With functions limited by the administrator).
Standard
Let's start with the account "Standard", that is the one chosen by default by Windows when creating new users.
- Click on the button "Start" lower left
- Continue with "Settings" (gear icon)
- From the screen that appears, choose the item "Account"
- From the left sidebar, select "Family and other users"
- Choose the option "Other users" and then "Add another user to this PC"
- Click on the item "I don't have this person's login information"
- Continue with "Add a user without a Microsoft account"
- Enter the user name and a secure password and finish with "Forward"
The account "Standard" it will then be created and ready to be used.
CEO
Finally, we conclude with the administrator user, who it can only be created by a previously created administrator user (the first PC configuration account is always administrator, so it will exist anyway).
Before we begin, let's specify that a account can only be converted to "Administrator", for this reason, it will first be necessary to create a “Standard” account and then be modified as explained below.
- Click on the button "Start" lower left
- Continue with "Settings" (gear icon)
- From the screen that appears, choose the item "Account"
- From the left sidebar, select "Family and other users"
- Choose the option "Other users" and select the user "Standard" to convert
- Continue with "Change account type"
- From the option "Account type", to choose "Administrator" and conclude with "OK"
How to remove an account from your PC
In case you want to remove any account created, just follow these simple steps using one of the "Administrator" accounts, since the "Standard" one will not have the privileges to do so.
- Click on the button "Start" lower left
- Continue with "Settings" (gear icon)
- From the screen that appears, choose the item "Account"
- From the left sidebar, select "Family and other users"
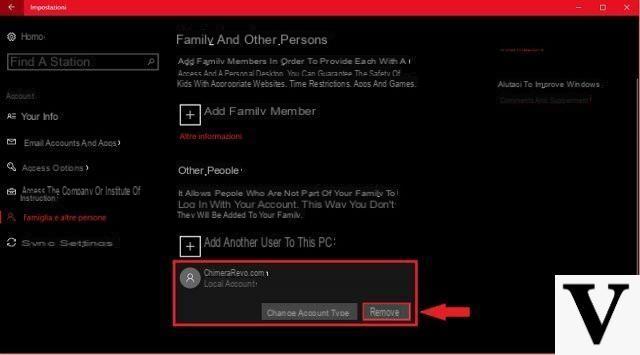
- Choose the option "Other users" and select the user to delete
- click "Remove" and confirm with "Delete account and data"

But be careful, by removing the Microsoft account from the PC that can also be used online, you will only delete its presence from the PC, while however, the account will remain usable elsewhere and possibly re-configurable on the same PC.
Doubts or problems? We help you
Remember to subscribe to our Youtube channel for videos and other reviews. If you want to stay up to date, subscribe to our Telegram channel and follow us on Instagram. If you want to receive support for any questions or problems, join our Facebook community or contact us on Instagram. Don't forget that we have also created a search engine full of exclusive coupons and the best promotions from the web!


