Here we go again, have you accidentally deleted pictures from your iPhone and don't know how to recover them anymore? In these situations it is easy to lose control and give up even just trying a miraculous recovery. Fortunately, the Cupertino company has seen fit to include a sort of on iOS "trash can", which can really represent the definitive solution to this problem.
In addition to the section "Recently eliminated", which we will analyze in a few moments, however, there are third-party software and applications used precisely for the recovery of the aforementioned files. In this article we will therefore try to understand what are the best, if not unique, ways to try to bring back deleted photos from iPhone and iPad.
Use the "Recently Deleted" section
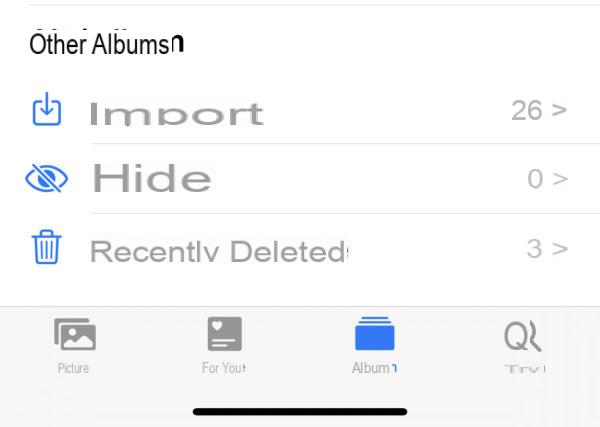
The application "Photo Gallery" of iOS, starting from its eighth version, has a very special album that can literally save all your shots. This is identified as "Recently eliminated" and aims to replicate the functionality of the macOS or Windows recycle bin. Once clicked on the button "Remove" in fact, the photos will be automatically transferred to this special folder, where they will remain for about 40 days. In case you still have time, we therefore advise you to immediately take a look at the procedure below.
- Open the app "Photo Gallery" your iPhone or iPad
- Access the section “Album” bottom right
- Go down and click on "Recently eliminated"
- Select the photo concerned and conclude with "Recover" bottom right
Recover iPhone photos using iCloud
The same folder "Recently eliminated", just seen above, it can also be viewed and managed from the iCloud website. The latter represents the online storage service developed by Apple itself and, as such, is activated by default on all iPhones and iPads. However, in the event that the function should be disabled for some reason, we invite you to activate it in the following way, to be sure to have an automatic saving for future photographs taken.
- Open the app "Settings" your iPhone or iPad
- Continue with your account name at the top and then with "ICloud"
- click "Photo Gallery"
- Activate the toggle "ICloud Photos"
Once this is done, all the images in the gallery will be synchronized with the aforementioned account and can also be viewed on a PC.
- Log into the website by entering your Apple ID credentials “icloud.com”
- Choose the app icon "Photo Gallery"

- From the column on the left, click on "Recently eliminated"

- Select all the photos to be brought back to the gallery and conclude with "Recover" top right

Unfortunately iCloud allows free storage of only 5GB of data and for this reason it may be necessary to expand the available space. The best alternative to remedy the problem "Out of space" è "Google Photos", an application owned by the Mountain View company, with the same options, but with unlimited image storage.
Purchase third party software
If all this fails to bring your shots back, the only way to try everything is to rely on third-party services, specially developed for iPhone and iPad photo recovery.
In fact, among the best proposals we find “EaseUS Mobi Saver”, which will be able to analyze the entire device and recover a lot of data that we had long believed irrecoverable. The EasuUS app is compatible with both macOS and Windows and can be downloaded in its trial version from the official website of the same company. Unfortunately, however, we warn you right away that to recover the deleted images you will need to switch to the version "Pro" da 59,95 $. It must also be specified that it is not certain that the aforementioned software will be able to find the desired photos. For this reason we invite you to first do a free scan of the device with the trial version and only after having viewed the desired contents, proceed with the purchase of the full version.
Once the application has been downloaded and installed on your PC, all that remains is to connect the iPhone or iPad to the same machine and proceed as follows.
- From the column on the left, select the item "Recover from iOS Device"
- click "Scan" to analyze the contents present and deleted

- Once the scan is complete, select all the albums below “Photos/Videos” from the left column
- Search and select the photographs concerned
- Conclude with "Recover" bottom right

Eventually, it will also be possible to activate the tick on "Show only deleted items" above and search for items only among those actually deleted.
Prevent with cloud services
Before concluding the article, we want to share with you a method for prevent data loss and therefore avoid finding yourself in this situation again. Obviously everything goes once again to the cloud services, which allow you to perform an automatic backup of all the items added inside. Here are some of the best proposals in this field.
- Dropbox: it doesn't need much introduction. With an account Dropbox Basic you will have available 2 GB of free space to store any type of file, including images.
- Box: bitter rival of the previous service, it offers very similar operation and good performance. Free space this time goes up to 10 GB.
- Google Photos: we have already talked about him previously. Allows you to archive a unlimited amount of photos in high quality using your Google account.
- Mega: another great alternative that offers automatic image backup. This time, with a simple registration, you will have ben 50 GB of space.
Doubts or problems? We help you
If you want to stay up to date, subscribe to our Telegram channel and follow us on Instagram. If you want to receive support for any questions or problems, join our Facebook community. Don't forget that we have also created a search engine full of exclusive coupons and the best promotions from the web!


