Browsing through the drawers of your desk, you found an old CD, abandoned for who knows when, containing files and data from an era (that of optical media) far removed from today's technology, composed mainly of memory cards, USB sticks and super-capacity portable hard drives. Intrigued by the content of this small "historical" find, you tried to open the disk on your computer ... but, between a smile and the other, you realized that you didn't have the faintest idea of how to reach your goal on the computer. your disposition, as you belong to a later era than the infamous CDs and are not that used to using one.
Without getting discouraged and seriously intent on completing your small business, you therefore opened Google in search of a guide that could teach you how to manage "diskettes" through your computer, ending up on this tutorial of mine. Well, you made the right choice, since I really believe I can help you: in this guide, in fact, I will show you how to open CD on PC, so as to be able to view its content quickly and easily. The procedures illustrated below are valid for both computers with Windows operating systems and for Macs. Finally, it will be mine to explain how to proceed if the CD player connected to the computer is "blocked", so that you can easily extricate yourself from the most serious situations and avoid the risk of damaging the player or the CD "stuck" inside.
So what else are you waiting to get started? Take a few minutes of free time for yourself, make yourself comfortable and read very carefully everything I have to explain on the subject: I'm sure that, once you have finished reading, you will be perfectly able to view the contents of the disk, perhaps taking a good leap. among the memories of the time. Having said that, there is nothing left for me to do but wish you good reading and, above all, have fun!
Index
How to open a CD on the PC
The first aspect I want to deal with concerns the opening of CDs on computers equipped with Windows and on systems MacOS. In both cases, I will show you how to behave both in the management of audio CDs (i.e. those that contain music tracks in an uncompressed format and which can also be read by older car radios), and in the management of data CDs (i.e. those in which they are stored files and folders, just like they were small external drives).
Before continuing, however, you must make sure that a CD player is installed on your computer or notebook (which is not at all obvious, since on the most modern devices the optical reader is absent): on a fixed computer, the reader should be positioned in the front part of the itself, hidden in some cases by a protective door and easily recognizable by the presence of the button to extract the trolley. Often, the CD player is also identified by the wording CD o DVD and labels relating to reading / burning capabilities (ROM, RAM, RW and so on).
As for laptops, however, the optical reader should be positioned on one of the side shells, and is recognizable by the presence of a small raised button (to be pressed to open the trolley) and by the indications regarding the type of device supported. and any burning capacity.
It should be noted that on some laptops, the optical reader may not have the opening button: in this case, it is sufficient to exert a slight pressure inwards on the door to activate the “snap” opening. Other computers, on the other hand, may have a simple "slot" designed for the insertion of CD / DVD / Blu Ray, recognizable both by size and by the words placed in its correspondence.
How do you say? Does your computer not have an optical reader, or is the one already present so old that it has completely stopped working? In that case, the quickest solution is to bet on a external burner, connectable to the ports USB present in your computer and can read and burn all common types of discs (CD, DVD and, on some models, even Blu Ray).
In this regard, I suggest you read my buying guide to external burners, in which I have provided you with all the necessary information on the characteristics of these devices, on the best models available on the market and on how to connect to your computer. Trust me, it's so worth it!
Windows
Now that you're certain you have a working CD player, it's time to take action and understand how to open CD on PC equipped with Windows operating system.
After turning on the computer, identify the door of the reader / burner, press the button for remove the carriage and gently place the CD on the sliding part (which should be positioned outside), taking care to orient the “drawn” part of the CD (the one containing the label, the manufacturer's name or any other information) upwards; if you have a side-opening reader, you need to make sure the label faces away from the cart. Follow the same instructions also for optical readers not equipped with a trolley but with an insertion slot.
Once the disc has been correctly inserted into the player, wait for Windows to recognize it and proceed in a different way, depending on the type of media (audio CD or data CD) that you find yourself managing.
Audio CD
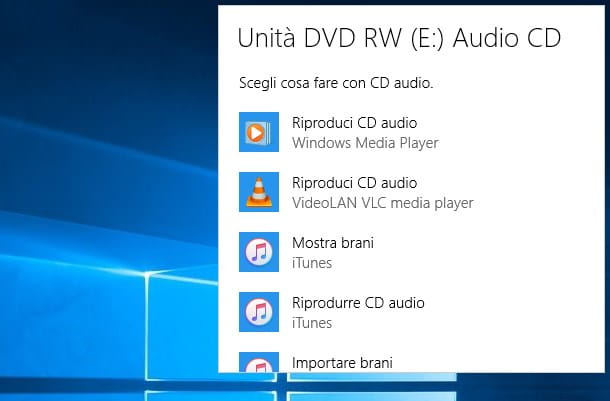
If the disc in your possession is a Audio CD, after inserting it into your computer, you should see a notification at the bottom right (on Windows 10), on which you must click to view the window AutoPlay containing the options for opening the disk (the choice will also affect the subsequent disks of the same type that will be connected). If, on the other hand, you are using an older version of Windows, you should see the aforementioned window directly in the center of the screen.
Anyway, all you have to do is select the program you intend to use to listen to the music stored on it (eg. Windows Media Player) from the AutoPlay screen, click the button OK and wait for the songs to start playing. On Windows 7 e Windows 8.1, you can avoid storing the default program by unchecking the box Always do this for audio CDs: in this way, the selection window will be shown again the next time you insert an audio CD.
Note: If you want, you can manually change the autoplay options. open the menu Start clicking on the flag-shaped icon located in the lower left corner of the screen, calls up the control panel (by typing, if necessary, the name of the program in the search bar) and go to the sections Hardware and Sound> Change default settings for media and devices. Use the drop-down menus attached to the new window displayed to choose the operation to perform when inserting an audio CD.
AutoPlay (ie the “automatic” disc reading feature) is not active on your computer, so you can't see any of the windows we talked about earlier? No problem, you can still access the contents of the audio CD via File Explorer/Explore Resources.

How? Simple: double-click the icon PC / Computer question resident on the desktop, identifies the icon relating to the inserted audio CD (eg. CD RW (E :) Audio CD drive) and right click on it. At this point, you can view the selection window seen previously by clicking on the item Open AutoPlay ... located in the proposed menu, or directly start playing the songs through your favorite program, by selecting the appropriate reference item (eg. Play with Windows Media Player).
Alternatively, you can choose to activate AutoPlay again by following the instructions I will give you later in this guide.
Data CD

If you are not dealing with an audio CD but need to manage a Data CD, things change slightly: once the media is inserted into the player, wait for the appearance of the insert notification balloon (on Windows 10) and click on it to display the window AutoPlay (suitable for choosing “automatic” content playback options). On Windows 8.1 and Windows 7, you do not have to perform this step, as the selection screen appears automatically.
In any case, from the available options, choose the item Open folder to view files e pulsing sul pulsating OK to be able to open the contents of the disc inside File Explorer, so you can navigate it exactly as you would with a "common" folder.
If you are unable to see the AutoPlay window because the feature is disabled, you can still access the contents of the disc via File Explorer/Explore Resources: Double-click the icon PC / Computer question placed on the Desktop, identify the data CD among the available options, right click on it and select the item apri/Expand from the proposed context menu.
Note: if the disc launches an automatic procedure during insertion (e.g. an installation program) but you are interested in its content and not following the instructions proposed, close the automatic program without hesitation and follow the instructions shown above. indeed to view the files saved on the disk via File Explorer/Explore Resources.
If you want to activate AutoPlay and display the operation selection screen, you can go to Control Panel> Hardware and Sound> Change Default Settings for Media and Devices, put the check mark next to the item Use AutoPlay for all media and all devices and confirm your choice by pressing the button Save, placed at the bottom of the window.
MacOS
Almost all newer Mac models do not have a burner - so if that's your intention open CD on PC with macOS, you will need to get an external one (taking care to check compatibility with ports USB Type-C), following the tips I gave you in the introductory section of this tutorial.
Once you have obtained this device, connect it to the Mac via the USB Type-C port, then start the operating system and wait for the reader to be correctly recognized by macOS and, therefore, by the Finder. At this point, all you have to do is insert the disc into the burner and follow the following instructions to correctly manage the Audio CD or Data CD.
Audio CD
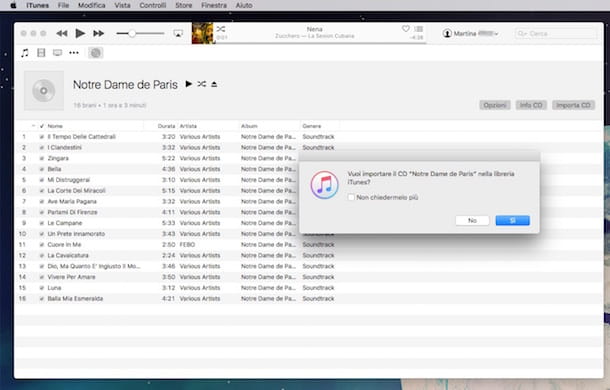
If you entered a Audio CD, the simplest way to reproduce it is by using iTunes, the media player included “standard” in macOS. If properly configured, the latter should automatically start playing the songs, once the disc is correctly known by the system.
Otherwise, start the program by pressing the icon in the shape of music note annessa there Dock bar and presses the icon in the shape of "diskette”Located in the upper left part of the program.
At this point, a window should appear asking you if to import all the tracks on the CD or not on the computer (by converting them to AAC format and saving them on the hard disk): once you have made your choice (you can ignore the operation by pressing the No), you can immediately start playing the disc by clicking on the button Play located at the top of the iTunes window, or selectively play one or more tracks, choosing them from the central section of the program.
To learn more about copying audio CDs via iTunes on Mac, I suggest you read my guide on how to copy audio CDs, in which I have explained to you in detail the steps to be taken to be able to copy songs from a CD correctly. audio to the Mac memory.
Data CD
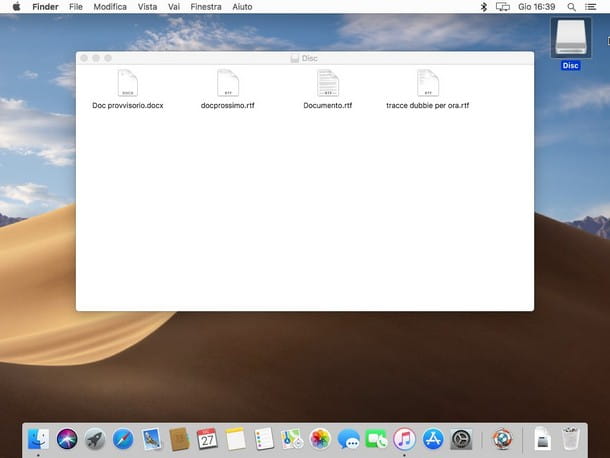
If the disc you have is a data CD, just insert the CD into the drive and wait for the Finder to recognize it automatically: when this happens, you should see a "diskette" icon appear on your desktop. To explore the contents of the CD, simply double-click on this icon and wait for the Finder to open.
Alternatively, you can access the contents of the disc by opening the Finder directly from the Dock bar (l'icona a forma di smiling face) and click on the item relating to Data CD, placed inside the section Positions, in turn attached to the left part of the window that opens on the screen.
Note: Generally, activating a CD / DVD in macOS is completely automatic. If you are unable to read the disc, check the direction of insertion into the player, clean the surface in contact with the carriage using a soft, dry cloth (so as not to cause scratches) and reinsert the disc into the player. If even this solution does not have the desired result, try inserting a different CD: if the latter is correctly recognized, it is very likely that the original disk is irreparably damaged. If not, you can try to reset the CD player parameters by resetting the NVRAM / PRAM, as I explained to you in my dedicated tutorial.
How to open a locked CD player
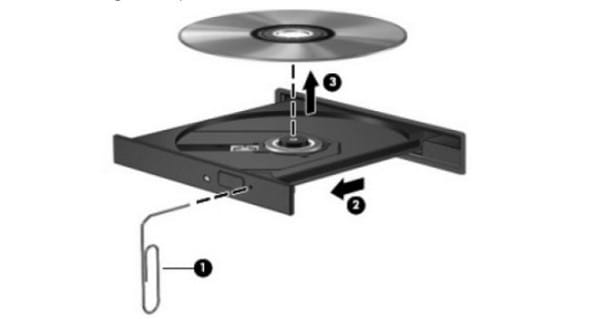
Your PC's player or burner no longer opens, so it's impossible for you to insert any CD or take out a previously inserted disc? In this case, you can intervene directly on the player to try to get out of the way, without damaging the disk or the peripheral.
The first thing you need to do, therefore, is restart your computer and press the open button again before the operating system is even started: if the "block" is due to continuous attempts to access the contents of the disk (which, probably, would be damaged or unreadable), the trolley should open immediately . If, on the other hand, this procedure does not have an effect, you must manually open it, using the appropriate release device.
To do this, first of all armed with a thin and pointed object (such as a needle, an "open" paper clip or a toothpick), carefully observe the CD player connected to the computer and look for the small hole for manual opening, usually located near the trolley opening button.
When you have found it, insert the pointed object into the hole and push it gently, so as to trigger the manual release system of the carriage: in this way, you can easily extract the disc previously stuck inside it.
Note: On some older desktop computer readers, the cart's manual opening hole is located on the side of the cart. To reach it, you need to remove one of the side panels of the case (usually the one opposite the support for the motherboard).
If the CD contained in the player should seem unreadable or cause a new cart crash, I suggest you take a look at my guide on how to open damaged CDs, in which I have collected all the methods and programs to attempt to recover files stored on Badly burned, unreadable or scratched CDs and DVDs.


