You are about to load up Facebook photos of a party you organized the other night, but you want some acquaintances you forgot to invite to the party not to see them? Have you added new people to your Facebook friends list but don't want them to see some photos uploaded to your profile? Don't worry too much, it can easily be prevented from displaying.
Maybe not everyone knows, but Facebook includes a feature that allows you to choose who to view our posts, including photos. Just select the album or photo you want to prohibit or restrict viewing, select the desired privacy settings and that's it. If you want, you can even create custom lists and specifically choose the users for whom your shots should not be viewable.
The whole procedure requires very few clicks to be completed (or very few "taps", since it can also be done from smartphones and tablets) and can be applied to both new photos uploaded online and photos already posted on the social network. Would you like to know more? Well, then read on and find out how to hide photos on Facebook thanks to the information you find below. I bet you will be amazed by the simplicity and speed with which you will be able to obtain the desired result!
▶ ︎ Hide photos on Facebook on upload | Hide photos already uploaded to Facebook | Hide photos in which you are tagged on Facebook
Hide photos on Facebook upon upload
Be vuoi scoprire how to hide photos on Facebook As you upload new photos or albums to your profile, take five minutes of free time and follow the directions below. I assure you that this is really a breeze!
From computer
If you want to upload photos to Facebook via your PC, connect to the main page of the social network and click on the box first Write something here located at the top center and then on the button Photo / video .
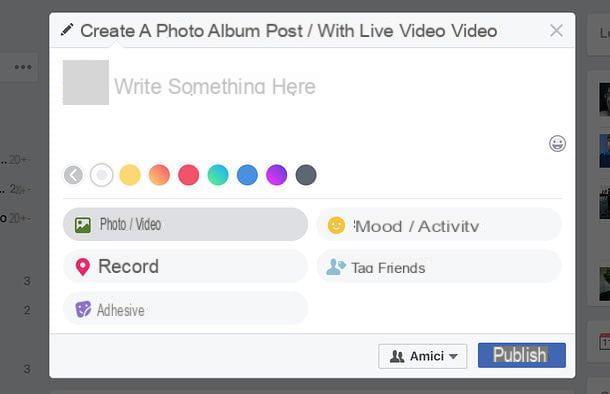
Then select the images you want to upload to your profile, expand the drop-down menu related to privacy settings located at the bottom right (by default the option should be selected Friends) and choose one of the options available in the latter.
- All - to make the photos public, therefore visible even to those who are not your friends on Facebook.
- Friends - to make the photos visible only to your friends on Facebook.
- Friends except - to make the photos visible to all your friends on Facebook except for the people you will then select in the box that will open.
- Only me - to make the photos visible only to you.
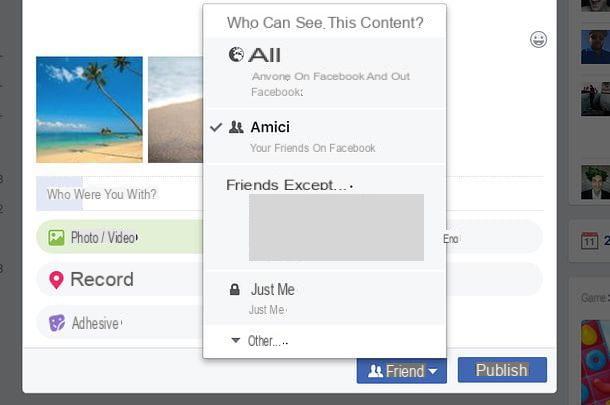
By clicking on the item Other and then Show all, you will also see other options appear within the drop-down menu for privacy settings.
- Specific friends - to show the photos only to a small circle of friends that you will specify using the box that will open after selecting the option.
- custom - to create a personalized list of people who can see the photos or who must be prohibited from viewing them. By selecting this option, a box will open in which you can specify the names of the people (or lists of friends) who can access the photos (field Share with these people or lists) and the names of the people to be blocked from viewing the photos (in the Do not share with these people or lists). You can also specify whether to allow images to be viewed by friends of the people tagged in them. People tagged directly in the photos will still be able to access them.

- Area of [your city] - to share photos only with those who reside in the surroundings of your same geographical area.
- Family members - to share photos only with your family members classified as such on Facebook.
- [List Name] - to allow only people you have included in one of your friends lists to view photos. If you don't know how to create a friends list, just go here and press the button Create a list.

After selecting your preferred privacy settings, click on the button Public and the photos will be posted on Facebook with the viewing permissions you set just now. Facebook will remember these settings, so before publishing a new post on the social network, be sure to reset the privacy level to Friends or on another option you want (the drop-down menu to use is always the same).
How do you say? You would like to upload a whole Photo album on Facebook but you don't know how to set the viewing rights? Nothing easier. Select the box Write something here Facebook, click on the tab Photo / video album located at the top and select the images to be included in your album.

At this point, fill out the form that is proposed to you with all the information relating to the album (title, geographical location, etc.), if you want to add new photos or videos to the collection by pressing the button Add multiple photos / videos and set the album privacy level using the drop down menu located at the bottom left. The options available are the same as described above for uploading single photos.
Give smartphone and tablet
If you want to upload photos to Facebook using your smartphone or tablet, start the official app of the social network and press the button Gallery present in the box What are you thinking about? (the one where you write posts). Then select the photos to post and press the button end which is located at the top right.
At this point, expand the drop-down menu related to privacy settings located at the top left (by default the option should be selected Friends) and, in the screen that opens, select the privacy setting you want.
- All - to show the photos to everyone, even non-friends.
- Friends - to show photos only to friends.
- Friends except - to show the photos to all friends except some that you are going to select.
- Some friends in particular - to show the photos only to some friends that you are going to select.
- Only me - to make the photos visible only to you.

To bring up options such as those related to family to people who live nearby or at friend lists that you have previously created, first presses on the item Other and then Show all. Finally, press the buttons end e Public (top right) and your photos will be posted on Facebook making them visible only to the audience you have selected.
Your privacy settings will be remembered by Facebook, so before posting new photos, videos or status updates, remember to expand the privacy settings drop-down menu and select the audience to which the content you are about to post is visible.
How do you say? Desires create an album and adjust its privacy settings? Nothing easier. Open the Facebook app, press the button Gallery present in the box What are you thinking about? and select the photos to include in the album. Then press the button + Album located at the top left, select the option for create an album and fill out the form that is proposed to you with all the required data: title, Description, place etc.
Then select the privacy settings menu (by default it should show the wording Friends) and select the audience you want to make your album visible to. Finally, press the buttons Save e Public (top right) and your album will be posted online.
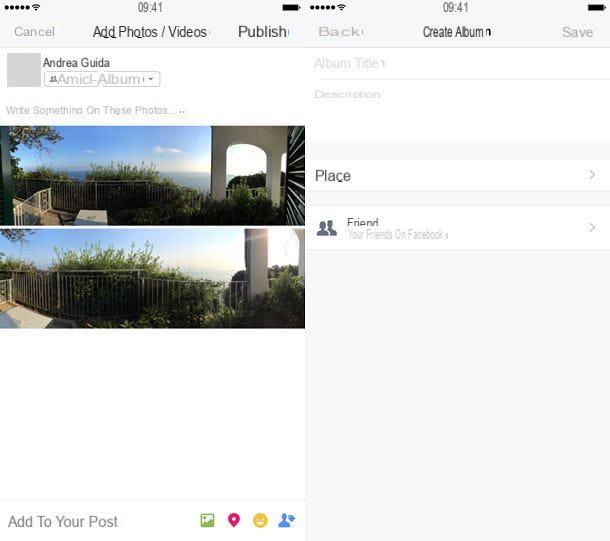
If you don't find the privacy settings menu on the album creation screen, go back to the post publishing panel and use the classic drop-down menu related to privacy settings which is located at the top left (as explained above for the publication of the individual images).
Hide photos already uploaded to Facebook
If you want to hide photos that you have already posted on Facebook, locate them in the social network and proceed as I am about to explain.
From computer
If you are acting as a PC, connect to the main Facebook page and click on you don't know located at the top right. On the page that opens (your personal profile page on the social network), click on the tab Gallery located under the cover image and select the item Your Photos.
At this point, locate the photo for which you intend to change the viewing permissions, click on its miniature, expand the drop-down menu related to privacy settings located at the top right (next to the date of publication of the image) and select the item Edit post privacy from the latter.
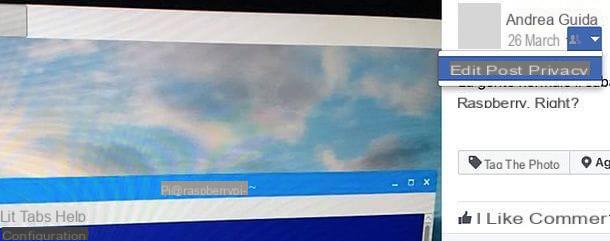
The Facebook post referring to the selected photo will open. To change its privacy level (and thus the privacy level of the photo it contains), expand the drop-down menu related to privacy settings which is at the top left (next to the post's publication date) and choose the privacy setting you prefer the most, for example Friends o Friends except.
To view the complete list of privacy settings available for the post, click on the item first Other and then Show all. You can take advantage of all the privacy profiles mentioned above in the procedure relating to new photos published on the social network.

If you want to hide all the photos contained in a given album, proceed in this other way: connect to your page personal profile on Facebook, select the tab Gallery located under the cover image and click on the item Album present on the page that if you press.
Now, locate the album for which you want to change the privacy settings, expand the drop-down menu related to privacy settings located at the bottom right of the album box (it should have a little man or a globe icon) and select the privacy level you want (eg. Friends o Friends except) from the menu that appears. To view the complete list of available settings, first click on Other and then Show all.
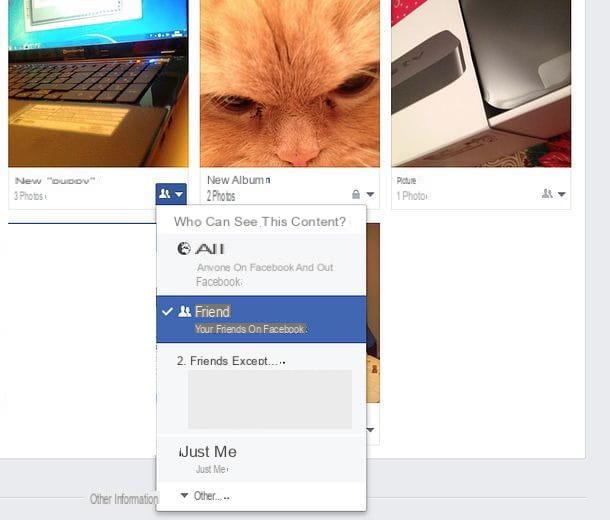
Note that albums created by Facebook by default, such as Uploads from mobile o Profile pictures their privacy level cannot be changed: it is only possible to change the privacy level of the individual photos inside them.
Give smartphone and tablet
If you prefer to act from a mobile device, you can change the privacy level of your photos on Facebook by opening the official app of the social network and logging into your personal profile. If you don't know how to access your profile page, just "tap" on your profile photo in the box What are you thinking about?.
At this point, select the tab Gallery which is located just below the box with your personal information, then go to Uploads and select the photo you want to "hide". Once the image is displayed in full size, make a long "tap" on it, select the item Edit post privacy (o Change the privacy of the news) from the menu that appears and select the level of privacy you want to assign to the shot by selecting it from the screen that opens (the options available are always the same).

If you want to change the privacy level of an entire album, do this the other way: open your page personal profile in the Facebook app, select the tab Gallery located under the box with your personal information and go to Album.
Then select the album for which you want to change the privacy settings, press the button (...) che si trova in alto a destra e seleciona la voce Modification from the menu that appears. If you are using an iPhone, instead of the button (…) you will find the button directly Modification. At this point, select the privacy settings menu and choose the option you prefer most from it (eg. Friends except).
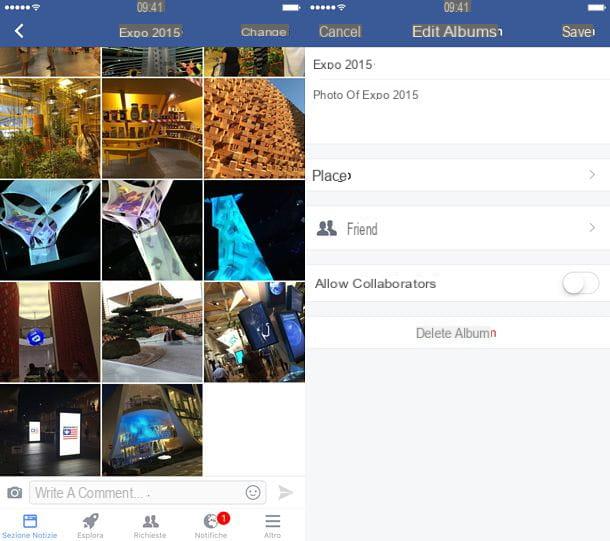
As well as on desktop, it is not possible to change the audience of default albums such as Uploads from mobile o Profile pictures.
Hide photos in which you are tagged on Facebook
Whenever a friend tags you in a photo, is it automatically posted to your Facebook diary? Don't despair. You can set the social network so that the photos (and more generally the posts) in which you are tagged are not automatically posted to your diary.
To change the settings related to this kind of post from PC, connected to this Facebook page, click on the item Want to check posts where friends tag you before they show up in your Timeline? and set its drop-down menu to Yes.
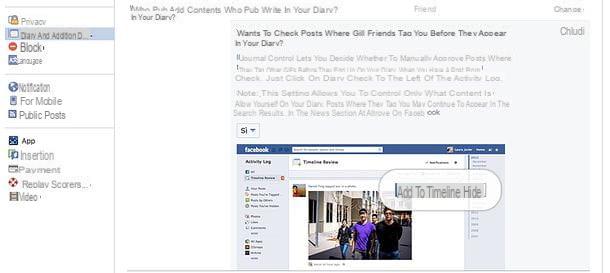
On smartphones and tablets, you can make the same change by pressing the button ≡ of the Facebook app and going to Account settings if you use Android or on Settings> Account Settings if you use iOS.
After that you have to go up Dario and adding tags > Want to check posts where friends tag you before they show up in your Timeline? and set the option Yes in the screen that opens.
From now on, every time you are tagged in a photo or post, you will receive a notification and can decide whether to display that content in your diary or not. Happy?
How to hide photos on Facebook


