Recently, your boss decided to put you in charge of managing a large amount of data, asking you to organize everything in a database. After carrying out some research and understanding theoretically how it all works, you have finally decided to put the acquired knowledge into practice. But you are aware that you do not have the faintest idea of how to create a database in a simple way, without complicating your life between command lines, complex programs and strange system configurations, although you have already designed its structure: in this regard, you would like some useful tips to start your work properly.
Very good! I am happy to inform you that you are in the right guide at the right time: below, in fact, I will show you the most useful and simple software dedicated to the creation and management of entire databases, so as to allow you to organize your data using mouse and keyboard and without having to use dozens and dozens of text commands to learn by heart. Don't worry: even if you are not very knowledgeable on the subject, after learning the basics, a little patience and a bit of practice will be enough to acquire the speed necessary to make the time available to you more productive.
So what else are you waiting for to get started? Make yourself comfortable in front of the computer, take a few minutes of time for yourself and read very carefully what I have to say about it: I'm sure that, at the end of this guide, you will be able to choose the solution that best suits your case and to put it into practice just like a real professional. Having said that, I just have to wish you good reading and good work!
Index
- Preliminary information
- Create a database with Access
- I will create a database with Excel
- I will create a database with LibreOffice
- Create an SQL database
Preliminary information
Before we get to the heart of the matter and show you how to create a database, it is good to make some concepts clear and, above all, some key terms concerning its structure: it is essential to fully understand them to become familiar with databases, as well as to understand in detail what is explained in the following sections of this guide.
- SQL - is the most used language ever for the management and creation of relational databases, that is, structures that can contain one or more tables, even connected to each other, dedicated to the management of small or large amounts of data.
- Database - is the word that defines an archive of data, simple or complex, which can be organized, manipulated and interrogated using common methods.
- Table - Is a set of lines e column which contains a set of homogeneous elements (i.e. of the same type) within a database. Columns, also called fields, indicate the property of the elements: each column corresponds to a specific property. The rows, on the other hand, define a precise data belonging to the table.
- Entity - is the technical definition assigned to the elements that are part of a table.
- Cell - is the intersection of a row with a column, which identifies the value assigned to it.
- Record - is the set of properties that define a specific entity of the table. In other words, a record corresponds to a row in the table.
- Primary key - is that field of a table that uniquely identifies each element. In fact, you can see the primary key as a unique property of a specific object: for example, thinking about an inventory of remote controls, the primary key could be their serial number.
- Query - is the main database manipulation operation. There are mainly two types of queries: selection (also called queries) and queries for handling. The latter, in turn, can be append / delete (to insert new data or delete obsolete ones), update (to change the value of the fields of a record) and creation queries (allow you to create new tables starting from selection query results).
- Report - it is the operation of showing in "readable" language the data generated by one or more queries, sorted and cataloged according to precise parameters.
- Report - it is a link that associates two different tables, not necessarily containing elements of the same type, useful for linking them and thus facilitating the creation of reports, queries and other manipulation operations. Considering for example two tables, Teachers e Courses, you can create the relationship from left to right you have (teacher holds course), and from right to left the report held by (course held by a teacher).
Create a database with Access

Microsoft Access, if you haven't heard of it already, it's the database management solution included in the productivity suite Office, which allows the creation and management of databases with the help of buttons and windows, and without the need to remember long and complex commands in specific languages, such as SQL.
If you intend to give this program a chance, start by installing Microsoft's suite on your computer - if you don't already have it, you can get it by using the instructions I gave you in my tutorial on how to download Office.
Once setup is complete, start Access by calling it from Start menu di Windows (accessible by clicking on the flag icon located in the lower left corner of the screen) or from the folder Applications of Mac, click on the icon Blank desktop database, type in the box provided the name to be attributed to the database and then press the button Crea.
At this point, Access creates, by default, a database containing a single table with a single field, called ID, and set as primary key: if you wish, you can rename it by right clicking on it and selecting the item Rename field give the purpose menu.
You can choose the data type to be assigned to the chosen field by clicking on it and then selecting the card Fields from the top of the Office screen; always from the same section, you can assign other attributes to the chosen field (Obligatory, Unique o Indexed), assign it a default value, an expression (or calculation on other fields), and so on.
To add fields to the table, click on the item Click to add placed inside the Access table and assigns a value to each field simply by selecting it with the mouse and typing the desired content into it.

To add tables to the database, run and save queries (Query) is Masks, you can take advantage of the card Crea placed at the top of the Office screen; if you need to specify relations between tables, impose addictions between objects, perform redundancy analysis and other specific operations, you can use the section Database tools.
If you need more information on how to take advantage of this software, I urge you to consult my guide on how to use Access for further clarification on this.
I will create a database with Excel
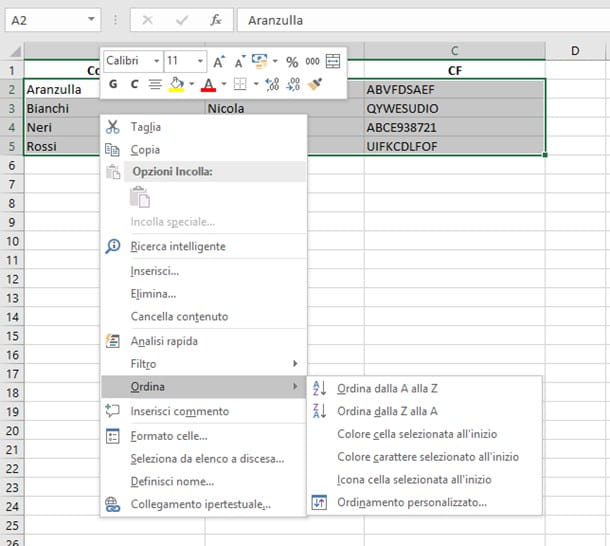
Do you think Access is a great solution for database management, but a little too complex for your needs? Do you simply need to manage a fair amount of data, with the ability to sort it and carry out targeted searches among it? If so, you can take advantage of Microsoft Excel, the program dedicated to spreadsheets included in the Office suite: if you have not already installed it, you can proceed by following the instructions that I pointed out to you in the previous section.
Once the suite setup is complete, launch Excel recalling it from Start menu Windows (the flag icon located in the lower left corner of the screen) or from the folder Applications di MacOS e pulsing sul pulsating Blank workbook. At this point, use the row number 1 of the worksheet to set the field titles (e.g. cell A1 for Name, B1 for Surname, C1 for Tax ID and so on), and use the following lines to create the various database records: if for example you wanted to create a record relating to me, you should enter in A2 the text Saviorin B2 in C2 my tax code, and so on.
Once you have completed the worksheet with the necessary data, you can start treating it as if it were a table in a database: to sort based on a simple criterion, click on the cell A2 (since row 1 is "dedicated" to the names of the fields) and drag it to the last cell at the bottom right, then do click destroy on column by which you want to sort (eg column A), position the mouse on the item Order in the contextual menu proposed and choose the criterion most congenial to you. If you wish, you can customize the criteria using the voice Custom sorting ....

To carry out the operations of search query (in jargon search query), you must instead make use of the so-called "filters": to do this, select the entire worksheet as I explained earlier, do click destroy on a point in the selection, move the mouse over the item Filter placed in the new context menu and choose the most appropriate item for your case (eg. Filter based on the value of the selected cell.
In this way, only the first row of the table is made visible and, in correspondence with each cell, small icons in the shape of a arrow o filter: click on the icon in the shape of filter and use the box marked with the magnifying glass to search for it.
Now that you know how to manage a small database, are you going to discover Excel in detail and learn how to use it perfectly? Read carefully my guide on how to use Excel: you will discover numerous aspects of this program that will surely come in handy.
I will create a database with LibreOffice

LibreOfficeAs you surely know, it is one of the most used free Office alternatives. It is a complete office suite that includes, among other things, a complete program for managing databases: this software is called Base and allows you to create a database and manage it with very simple procedures. If you don't have LibreOffice yet, download it by following the instructions I gave you in my guide on how to download Office for free.
Before starting to work with Base, however, you will need to install the software Java on your computer, if you have not already done so: connect to this Internet page, select the version of Java that best suits your operating system, download and start the installation file and proceed by following the simple instructions on the screen.
Once the Java installation is complete, launch LibreOffice Base recalling it from Start menu di Windows, from the folder Applications di MacOS or from the main menu of yours Linux distro, tick on Create a new database in the first start window, click on the button NEXT, set the check mark on the items Yes, register the database and so on Open the database for editing, premium pulsating end, assign a name to the new database and save it through the proposed panel.
At this point, it's time to create the first database table: click on the button Table placed in the left part of the program, then on the item Create table in outline view ...: Double-click the cell immediately below the entry field name to assign a name to the first field of the table, then repeat the operation on the cell field type to define the type of data it will contain.
Using the bottom panel, you can refine the details related to the field: for example, you can force its filling by choosing Yes in the drop-down menu Typing required, set its lunghezza and default value using the appropriate boxes. Repeat this for all the fields that define your table.
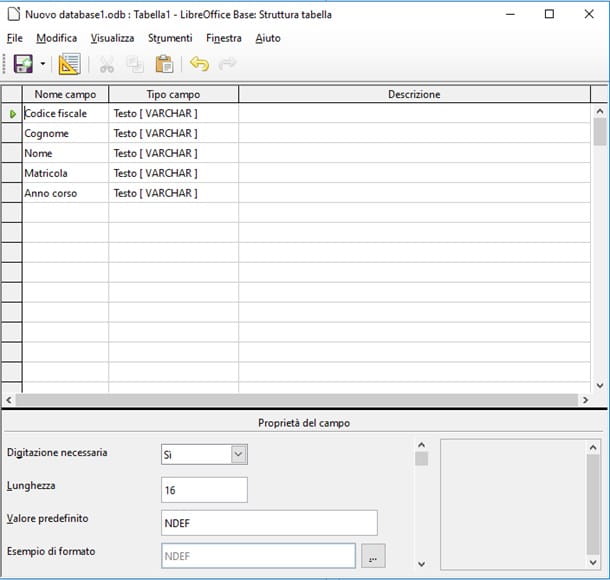
You can set the primary key of the database by clicking on the small gray rectangle placed next to the chosen field and selecting the item Primary key from the menu that appears. At this point, save the table by pressing the button in the shape of floppy disk located at the top left: assign a name to the table in the window that appears, press the button OK.
Once the table is complete, close the structure view by clicking on X that appears at the top of the window: to insert the records into it, do Double-click on his name, placed inside the box Table, and fill in the records simply by typing the values in the appropriate fields.

Once the first table is created, all you have to do is fill the database with everything you need. The great strength of Base, however, lies in the simplicity of its wizards: within the sections Searches, Form e Relationships, reachable via the buttons located on the left of the program screen (in the Database box), it is possible to access practical wizards for creating Query, formula e report. I can guarantee you that, at least for the first uses of the program, they will be really useful!
Finally, if your database has multiple tables linked together, you can create relationships using the section Relations reachable via the menu Tools> Relations. Always remember to save your database at regular intervals by clicking on the button in the shape of diskette located at the top of the main Basic screen.
Create an SQL database

If you do not intend to use any particular program and instead want to learn how to design a database using a mouse and keyboard, but with the opportunity to understand in detail what happens "behind the scenes", then I recommend that you turn to a solution such as XAMPP.
To be clear, XAMPP allows you to transform your computer into a real one server SQL, so you can create and manage simple or complex databases simply using the browser installed!
In reality, even the programs seen previously make use of variants of SQL, however they are structured in such a way as to "hide" the language as much as possible and allow the user to operate through windows, buttons and menus.
Using XAMPP, on the other hand, it is possible to build the structure of tables and entire databases using a Web application, phpMyAdmin, graphically more "spartan" than what has been shown so far but extremely detailed: in this way, it is possible to use text boxes, menus and buttons, however it is at the same time possible to view what is happening "behind the scenes", imparting, if necessary , even manual controls.
Don't worry, using these tools is not as difficult as it seems: XAMPP can be installed and configured in a few simple steps, either on Windows that of MacOS: all you have to do is stick to the instructions I'm about to give you!
Ready to get started? Very well: first of all, connect to the XAMPP website and, if you have a Windows PC, pigia sul pulsating XAMPP per Windows placed in correspondence with the item Download.
Once the download is complete, double click on the file you just downloaded, press the button Yes, pigia sul pulsating Next, make sure there are check marks next to the items Server & Hosting, Apache, MySQL, Program Languages, PHP e phpMyAdmin and click on the button Next twice in a row. Finally, uncheck the box Learn more about Bitnami for XAMPP and presses the button twice again Next. During the procedure, the Windows firewall may ask you to add an exception for Apache: when the dialog box appears, click on the button Allow access.
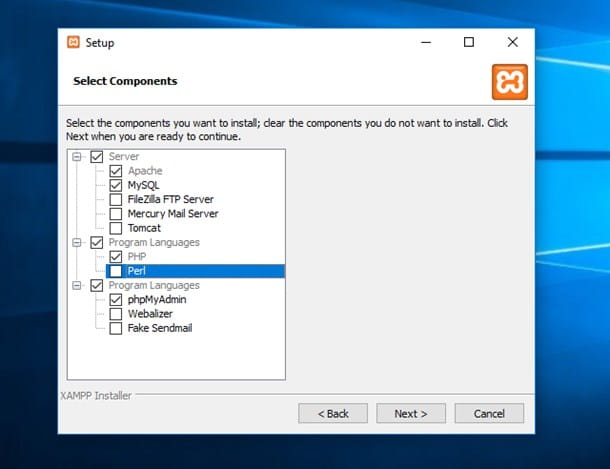
Once setup is complete, check the box Do you want to start the Control Panel now?, click on the button Finish to start the XAMPP control panel immediately, put the check mark under the flag of the United States (the one on the left) or under the flag of germany to choose the language of your interest and presses the buttons Save e OK.
Once this is done, press the button Start at the form Apache, wait for the service to start correctly (the word “Apache” will be colored green), repeat the operation for the module MySQL and, if necessary, press the button Allow access when the warning screen appears Windows Firewall.

If, on the other hand, you have a Macclick on your button XAMPP for OS X present on the main page of the software website and wait for the download to complete, then open the dmg package just downloaded, drag XAMPP to the folder Applications macOS and open the latter, then right-click on the software icon and select the item apri to start it avoiding macOS restrictions for applications from non-certified developers (this is only necessary at first start).
Now, in the main screen of the XAMPP administration panel, press the button Start and wait for a green ball at the item Status. Then select the tab Services and make sure the options Apache e MySQL are active, otherwise click on them and press the button Start. Then choose the Network tab, select the option localhost: 8080 e pulsing sul pulsating Enable.
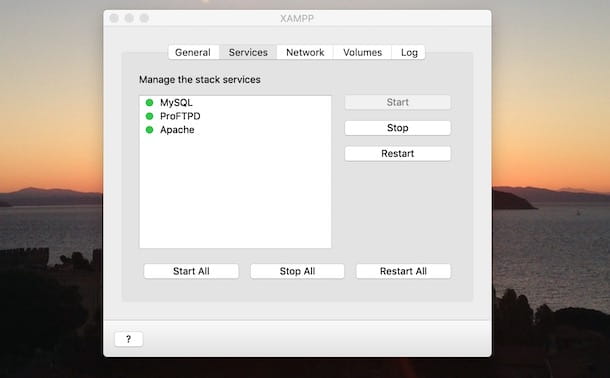
Once all the services have started correctly, open the browser you usually use to surf the Internet, type the address http://localhost/phpmyadmin in the address bar and press the button Submit keyboard: in the future, you will also need to access this page to manage your database, so I recommend that you add it to your browser's favorites.
To create a new database, click on the entry New present in the sidebar on the left and type the name to be assigned to the database in the field Name of the database, then choose the item utf8_general_ci give menu to tendin Character encoding e pulsing sul pulsating Crea: after a few seconds, a new empty database will be created (which you can always access from the left side panel).
Once this is done, you can create the first database table by typing its name in the text box Full name, specifying the number of fields in the appropriate text box and pressing the button Run.
In the new screen that appears, you can define the structure of the table fields. Then type the name of the field in the first box on the left, choose the data type and its maximum length (or range of values) in the fields provided, specify (if desired) a value default in the relevant field, leave the character encoding intact (it is inherited from the main table) and fill in the following boxes with the most appropriate values for your table.
Once the main parameters have been set, click on the button Save and then on the board Structure, located at the top: from there you can define further details of the table fields, including setting the primary key and of indices, with the ability to add new fields, delete them and modify them as you see fit.
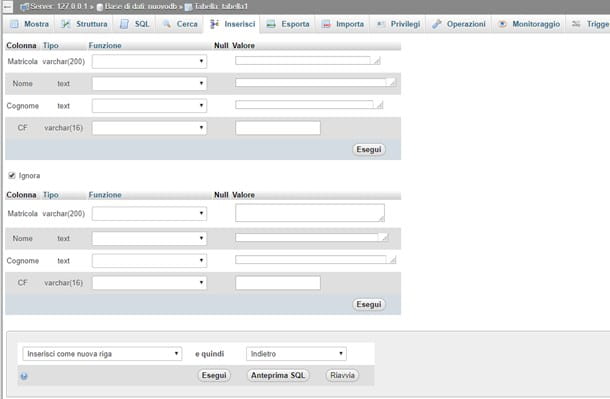
The main phpMyAdmin screen contains everything you need for database management: you can create new ones record (i.e. assign a value to the fields) through the tab Inserisci, carry out search queries using the form Search, carry out import and export operations using the appropriate cards, issue manual SQL commands using the card SQL and finally, define gods trigger (i.e. operations carried out automatically upon the occurrence of certain events) through the card of the same name.
But wait, are you telling me that the solutions I have shown you so far have not met your expectations? No problem! Without hesitation, take a look at the database programs guide I have prepared for you - I'm sure you'll find everything you need there.


