Google Camera is the camera application available on Google Pixel and Nexus smartphones, but thanks to manual installations and porting it can also be installed on numerous other Android smartphones. In this guide we are going to find out how to have it and use it on your device.
Before leaving, however, we must specify a couple of details: being in most cases of porting or modified versions, ie adapted apps, not all features (such as HDR +) are compatible with any Android smartphone (or tablet); given the wide variety of models on the market, it can also happen that you can't get it to work, that the app is unstable or that you have to manage a bit between the various settings. Let's proceed, then, and let's find out how install the Google Camera in smartphones Xiaomi, Samsung, Huawei, Sony, Honor, OnePlus, LG, Nokia, HTC, Motorola and other brands.
How to install Google Official Camera
The Google Camera is pre-installed on the Google Pixel 2, Pixel 2 XL, Pixel 3 and Pixel 3 XL and is compatible, albeit with a few less features, even with the first generation Pixels and Nexus equipped with Android 7.1.1 Nougat and later ( at least for now).
If you are the owner of these models you can find the application on the Google Play Store (badge below) or alternatively, if you are in a hurry for updates, you can manually download the APK (always the official version) from APKMirror (link).
How to install Google Camera on other devices without root
The basic prerequisites for installing the latest version of the Google Camera there are two:
- have a smartphone with a processor Qualcomm Snapdragon (there are also ports for different processors but much less optimized or in any case back in development)
- check the level of your Camera2 API using the free "camera2 probe" application, there are in fact 4 levels:
- legacy systems costs, base not enough
- limited, some functions yes but still not enough
- full, the right level to be able to install the Google Camera via apk
- level_3, with some additional features as well
With the first two levels it will be necessary rootare the device and manually add the necessary camera2 API by modifying the build.prop, definitely more uncomfortable, risky and invasive than the simple installation of an APK. In this case you can consult the our previous guide for the Google Camera (LINK), but we do not take responsibility for the operations because with the wrong action you could compromise the entire device.
La Google Camera then it varies from device to device, so it is up to you to find the right version for your device, but we provide you with the two main points of reference in this regard:
- one is obviously XDA, certainly very thorough and with lots of user feedback (obviously in English), but as a forum it can be a bit difficult to follow the situation and the latest updates;
- the second is a site called Celsoazevedo.com where a user takes care every day to add the best builds for the main devices: you will find a section dedicated to developers where you can see which devices they cover and one where there is a guide to use, to understand how to act.
Once you have chosen the version of Google Camera suitable for your device, simply download the APK, enter the Download section, click on the downloaded file and manually install it on your device: that's it!
How to install Google Camera on other rooted devices (not recommended)
In case your smartphone does not fully support the requirements we talked about above (in particular the 2 and 3), you can try to install a modified version of the Google Camera with the permissions of root and the flash from recovery modified (such as TWRP). To do this you first need to unlock the bootloader of your smartphone (you can take a tour on our forum to get more precise instructions on this), in some cases going to invalidate (temporarily or permanently) the official warranty offered by the manufacturer.
The following procedure uses SuperSU, but you are free to use other methods for root permissions. After installing a modified recovery (TWRP is used here):
- download the latest SuperSU zip at this address;
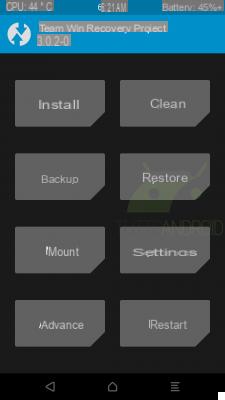
- restart the device in recovery mode (usually power key + volume down, but not always);
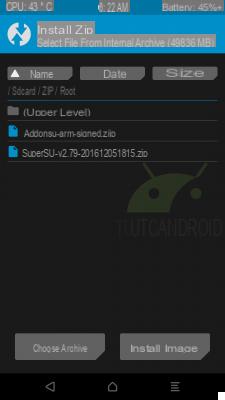
- click on "install" as in the screen below and select the SuperSU zip;
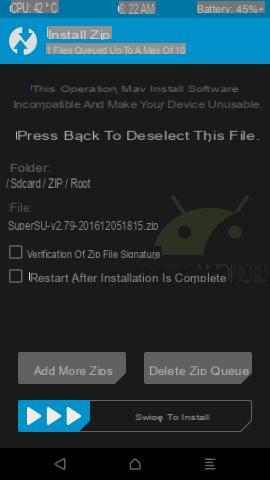
- swipe to the right required to confirm the zip flash;
- now click on "restart system";
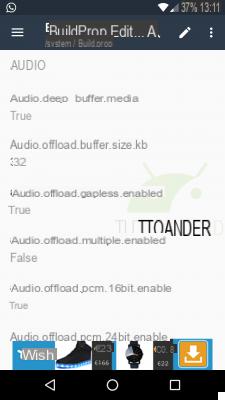
- download the BuildProp Editor app (link to the Play Store), or other similar applications;
- launch the app and grant it root permissions;
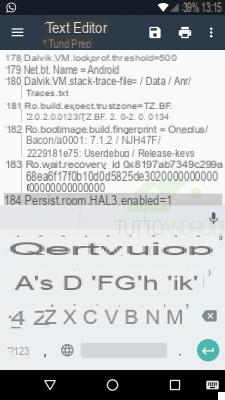
- select the item at the top right (edit), scroll to the bottom and write “persist.camera.HAL3.enabled = 1 ″;
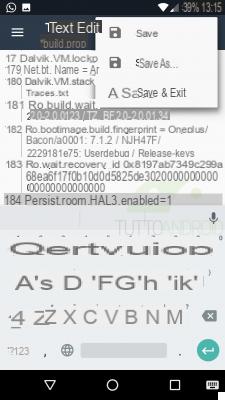
- click on the save symbol and at the top and select “save & exit“;
- restart your phone.
Now you should be able to download the modified APK of the Google Camera choosing from those we have already talked about above (link). In case you have problems with the upside-down images of the front camera you can fix it with the GCam Tool app.


