Many VPN software allow you to connect to secure servers located all over the world. If this option remains simple, it is also possible to connect very easily to a free VPN server by configuring a connection directly in Windows.
The usefulness of virtual private networks is well established. For businesses, they make it possible to create secure connections between several terminals, sometimes located hundreds or even thousands of kilometers away. But for the common man, this is the go-to option for change IP address, bypass censorship ou safe surfing without running the risk of their data being intercepted by third parties. This can happen very easily, for example, when connecting from a public wifi access point.
- To read also : What is a VPN: definition and explanations
There are many VPN clients that offer a simple interface and allow easy connection to VPN servers. Among them are free VPNs with little or no restriction. Nevertheless, the best solutions also pay off, with most of the time test servers that can be limited to the duration or volume of download.
If you still prefer configure a VPN connection manually in Windows and without software, the possibility exists and it is done without great difficulty. There are many free servers that you can connect to.
Configure a VPN connection on Windows 10
With Windows 10, you can do it in a few clicks, as long as you have the address of a server, but also the identifiers to connect to it in order to forward your traffic. The system supports 4 protocols: PPTP, L2TP/IPsec, SSTP, et IKEv2. Before any configuration, you will need to find the address of a VPN server.
Several sites offer free servers. To find it, you can search Google. Ex: " free vpn server "Or" free VPN servers ". For our example, we will look for a server on the site vpnbook.com. It offers a small list of free VPN servers.
In the PPTP tab on the site's home page, choose a VPN address and remember the username and password (the latter is changed regularly. Check back in case you can no longer connect ).
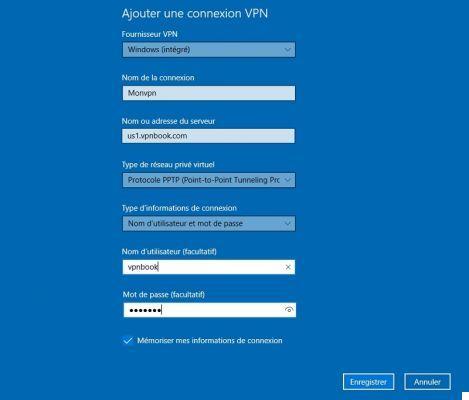
To configure a connection in Windows, you have to go to settings> Networks and Internet> VPN. Click on "Add a VPN connection".
On the following page, fill in the information as follows:
- VPN Provider : Select the “Windows (Integrated)” option.
- Connection name : Name the connection as you see fit. Ex: "Monvpn".
- Server name or address : Put here a server address retrieved from your provider. Ex: us1.vpnbook.com.
- Virtual private network type : Choose the corresponding type of VPN. In our example, it is a PPTP type VPN.
- Types of connection information : Username and password.
- USERNAME : Enter the server user name. In our example: vpnbook.
- Password : enter the server password.
- Check the box "Remember my connection information" then click "Save".
Your VPN is now configured and bears the name assigned to it (Monvpn). Click on it and press the "Connect" button and you're done. If the connection does not pass, choose another address. (With vpnbook, US servers are often the most stable).
To modify the configuration (change server, insert a new password, etc.), click on “advanced options” next to the “connect” button, then on “modify”.
Finally, check if you are well connected to the VPN network. To do this, just check if your IP address has changed. Open your browser and go to www.monip.org.
- To read also : VPN and Proxy: What are the differences?


