The latest version can be downloaded:
- On the official website: KoyoteSoft
- Sur CCM : Free Video Converter
Free Video Converter
Installation
WARNINGS: Koyote Free Video Converter editor offers third-party software during installation (toolbar, etc.). Although safe for the computer, this software may collect data about you. Remember to uncheck the box (es) related to this software during installation.
On the Koyote site, browse the left menu and select FreeVideoConverter then click "Download".
Select "Save File".
Exit the site.
Go to the folder where your downloads are made.
Double-click on the software executable and click on "Run" (then "Authorize" if you are under Vista) so that the software installation starts.

- Choose the language that suits you, then click "Next".
- Read the terms of use, validate if it suits you and then click "Next", otherwise cancel the installation.
- Uncheck both options unless you are interested, then click "Next".
- Choose the path to install the program. Select "Next".
- If you are satisfied with the name of the shortcut in the Windows Start menu, select "Next."
- Check / uncheck the boxes that interest you, in all cases the executable will be at the level of the folder where you installed the program.
Click on "Next".
Validate the installation if you are satisfied with the elements on the screen. Otherwise, use the "Back" key to go back and change your choices.

The software is now installed .
Check or uncheck the box if you want to run the software or not and click "Finish".
Discovery and handling
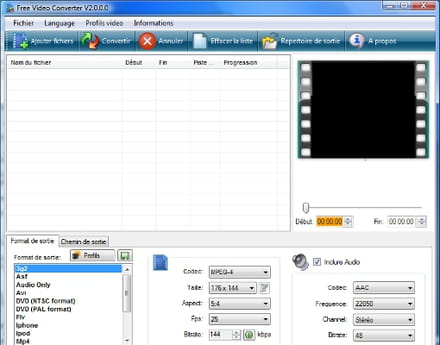
You are now on the software menu if you launch it right away.
Otherwise, to launch it later, choose one of the shortcuts selected when setting up Free Video Converter or find the path of the installation folder (here: C: program filesfree video converter).

We will now look at the possibilities of settings:
First, indicate to the program the folder where the videos reworked by Free Video Converter will be put.

General profiles without any adjustment to be made are saved by default within the program.
Choose "video profiles" then for example here we will choose a video format for a mobile phone device.
You will then notice that the video stream settings change.

In most cases, the default software configuration allows the intended hardware to play the converted video without problems.
Conversion
Let's talk about serious things :
Let's try to convert a video.
We will perform the example manipulation of converting a video taken by a cell phone (3gp format) to an mp4 format for a PSP.
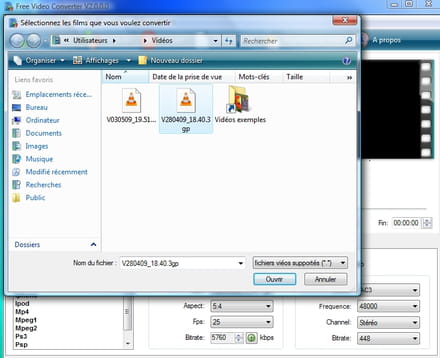
Push the button "Add files"
Find on your computer the folder where your 3gp video is stored. Select it and click "Open".

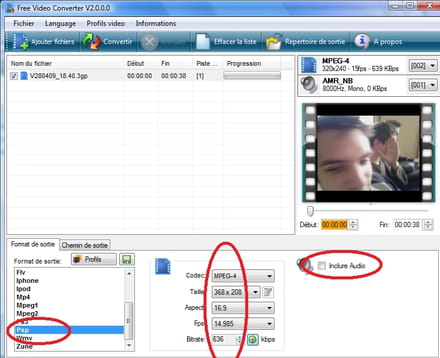
Your video now appears in the software's conversion listing.
Click once on the file name to see Additional Information around the screen preview on the right. The audio and video codecs are displayed and you can thus note the exact characteristics of the video made by your laptop which you could use to reverse convert a video for it.
You can also see the time of the video, these values can be modified with the arrows, if for example during the conversion you would like to remove the beginning presentations or the end credits. This reduces the size of the video so that it can be saved to disk. Click on the time for the box to color and tap the arrows for these settings.

So now we select the output format. Here we want to create a video for the PSP and the software allows it. [Note: the direct choice "PSP" is often problematic, so I recommend the "mp4" choice. If you see that the video results in an empty file, select the appropriate format directly from the menu (ie here mp4) rather than choosing one of the hardware shortcuts (ie here PSP)].
Now let's take a look at the codecs:
we choose MPEG-4 because it is the format used by the PSP of our example.
The size is the most appropriate compared to that of the screen as well as the aspect, the small tab of parameters allows to choose an ideal combination. The best for the size is to look at the characteristics I told you about previously at the top right of the window, and not to deviate too much from them.
It is the same principle for Fps (frames per second) where it is always advisable to convert with equal or lower values. It must be considered that the quality of a photocopy will never be as good or more beautiful than the original piece for logical reasons, it is the same for videos.
Still in the same diagram, vary the bitrate by clicking on the "+" and dragging the mark if necessary.

It will be the same principle for the settings of the codec audio.
After all the settings have been made, check that the file is well checked and click on "Convert".
The progress of the conversion is displayed below the video preview.

You can create a selection of videos to convert to the same format by clicking "Add files", or uncheck a video whose change you are no longer interested in.
Click on "Clear list"to reset the list of video to convert.
You have direct access to your converted videos using the "Output directory".

You can look for software updates in the "Information"then" Update ".


