Is your Mac getting slower and slower? Do a big cleanup to free up storage space by removing files and apps that clutter it up unnecessarily and restore it to its youthful vigor.
Do you have the impression that your Mac is dragging itself more and more, that it reacts weakly to each request? Do not think about the outage right away: it is quite normal for a computer's performance to deteriorate a bit over time, especially because applications and the operating system tend to be running. more resource intensive. However, a generalized slowdown usually has another cause, very classic: the saturation of the storage memory, that is to say of the hard drive or the main SSD of your Mac, which prevents it from functioning normally. A big cleaning is enough to restore it to its former vigor. You can get started very easily - and regularly! - with the tools integrated as standard in macOS, but also use specialized tools for more delicate tasks.
Why does a Mac get slow?
Whether it's a Mac or a PC, any computer uses two types of memory: RAM (RAM) and storage memory (hard drive, SSD, USB key, Flash card, etc. ). They differ in their capacity, their speed of "reaction" and their way of withholding information that is entrusted to them.
Random access memory is temporary working memory that houses everything the processor needs to function, namely the operating system (macOS in the case of a Mac), applications, and the items you open (documents, images, web pages, etc.). It is very fast, but of "small" size (from 4 to 16 GB in general) and therefore limited. Above all, it loses its content as soon as it is no longer supplied with electricity.
Storage memory is retention memory. Large in size (typically from a few hundred gigabytes to several terabytes), it holds everything you store (operating system, applications, and personal files) in a durable manner, even without a power supply. But it is slower than RAM, even though the chip technology used on SSDs is significantly faster than the magneto-mechanical technology used on traditional hard drives.
These two types of memories are complementary. When you turn on your Mac, part of the macOS system is copied from storage to RAM to function. Ditto each time you launch an application, it goes from storage memory - where it patiently waited its turn - to RAM to be used. As you launch the apps you need and the tasks you ask them to perform, RAM fills up. And when it is full, it uses part of the storage memory to temporarily offload certain lower priority tasks (using the so-called swap technique). For example, if you open a lot of tabs in your browser, then that large Excel table that you haven't touched for half an hour may very well be put to one side. This explains the little display hesitation that sometimes occurs when you return to an application that you had neglected for a long time.
As you can see, this is where the bottleneck lies: if there is no more room in the storage memory either, the Mac is lost. He spends his time transferring small bits of data from one memory to another as needed and ultimately spends more time making these transfers than looking after your business! Not to mention that if the storage memory is really full, you will not be able to save anything and you may therefore lose your work in progress.
This is why it is imperative to always keep sufficient space in your storage space, to carry out exchanges with the RAM. In general, we recommend that you leave at least 10% of the total capacity available (for example, 25 GB on a 256 GB SSD). This is a minimum because macOS sometimes has a lot of free space to download and install "big" updates (like Big Sur).
Of course, your Mac's storage memory fills up over time depending on the apps you install, the documents you create, the photos and videos you accumulate, and more. It's simple, you can never have enough! But in addition to the items that you keep consciously, therefore voluntarily, your Mac's disk also keeps files that are no longer needed (applications that you never use, obsolete documents, files forgotten in the Recycle Bin, etc.). Worse, in addition to the data you store on purpose, the system and applications generate a multitude of temporary files (including "buffers" and "caches" for web browsers). Some are supposed to be erased automatically, but most remain and clutter up the storage memory. In short, even if you use your Mac "normally" and "wisely", it will eventually grow heavy and slow. This is why it is essential to clean it regularly, before a total clogging.
How to check storage space on a Mac?
Before embarking on a big cleanup, you first need to determine if your storage space clutter is the cause of your Mac slowing down. Fortunately, macOS knows how to establish a very precise state to help you see clearly.
- Click on the apple menu, at the top left of your screen and select About this Mac.

- In the window that appears, click the tab Warehousing. A simplified graph gives you at a glance the filling rate of your Mac's storage (internal and external disks, as long as they are active). After a few seconds of calculation, the bar is split into colored areas corresponding to the main categories of stored data. : Photos, Documents, Applications, etc. If the area is not large enough to contain the name of the associated category, hover over the color with the mouse to reveal an information bubble.

- Click on the button Manage for more detailed information in a new window which also gives access to cleaning tools.
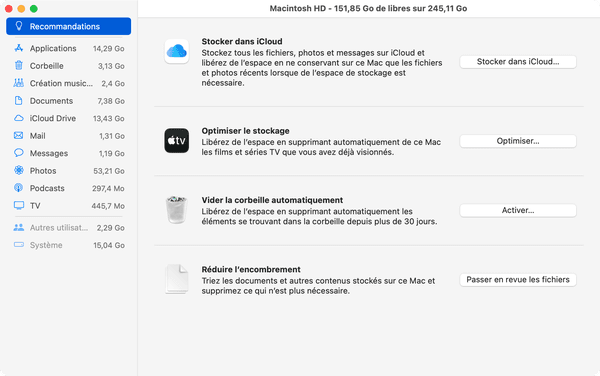
- In the storage management window, the left column indicates the space occupied by different categories: Applications (the software installed on your Mac, the Basket (all files put in the trash, but not yet deleted), Musical creation (the audio files of the Garage Band application), Documents (all files distributed throughout the storage space, including downloaded files, but not photos and videos managed by the Photos application), iCloud Drive (files saved on the online storage service linked to your Apple account), Mail (all emails, including attachments, received and sent by the macOS Mail application, but not messages managed by other email applications, which are included in the Documents category), Messages (messages sent and received via the macOS Messages application, with images attached), Photos (all photos and videos managed by the application to the macOS Photos application), Podcasts (audio recordings downloaded with the Apple application), TV (videos downloaded with the AppleTV app, purchased from the iTunes Store or through an Apple TV + subscription). The last three categories detailed in this column are grayed out, which means that you will not be able to act on them directly from this window: Other users (data linked to other user accounts created on your Mac, and which you obviously cannot delete in their place), System (all elements related to macOS, sensitive in essence) and Other (tote category that contains everything that is not stored elsewhere). The space occupied by the latter can vary enormously, especially if you are using Time Machine, the Mac's built-in backup to an external drive feature. This may seem counter-intuitive, but it involves the use of a sometimes significant portion of your internal storage space by saving files useful for the backup that we cannot detail here. Rest assured that said: macOS manages everything automatically and will free up this space if it needs it, without losing your data which is therefore saved on the external drive.
This very detailed inventory allows you to have an overview of what is encumbering your disc before you embark on a big cleaning.
How to empty the Mac Trash?
The first item to clean up on a Mac is the Trash! It is too often forgotten, but it contains files that remain on the disk until it is emptied. It's the easiest and fastest way to free up storage space. You can empty it in several ways, and even automatically.
- Right click on recycle bin icon located in the Dock, and choose Empty the trash in the menu that appears.

- Left click on recycle bin icon in the Dock to display its contents, then click the button Empty, located at the top right of the window that appears.
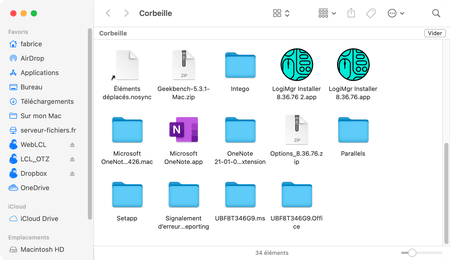
- In both cases, a confirmation window is displayed in the middle of the screen. Click on the button Empty the trash to validate.

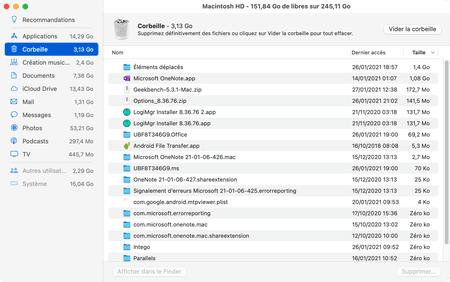
- Another method, more refined, to empty the Trash: go through the storage management window of your Mac (via the Apple menu, see above). In this window, click Basket in the left column. You can then decide to delete only some of the larger files by selecting them and then clicking the button Remove, at the bottom right. Or simply empty it completely using the button at the top right.
- To avoid having to think about the Recycle Bin, you can also ask your Mac to automatically empty it regularly. To do this, click on the section Recommendations at the top left of your Mac's storage explorer window, then click the Enable opposite the mention Empty the trash automatically.
-
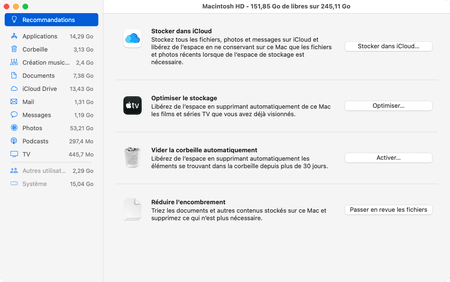
- Confirm your choice with a click of the button Send in the window that appears.
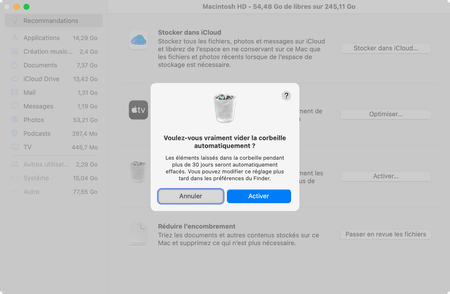
- From now on, any file that has been in the Recycle Bin for more than thirty days will be automatically deleted without asking your opinion. A practical way to not let the Recycle Bin swell while still having enough time to catch up with a file deleted by mistake. Of course, do not activate this function if the automatic deletion makes you uncomfortable.
How to delete large files on a Mac?
The storage space management window makes it easy to save space on the Mac disk.
- Open the storage management window as explained above.

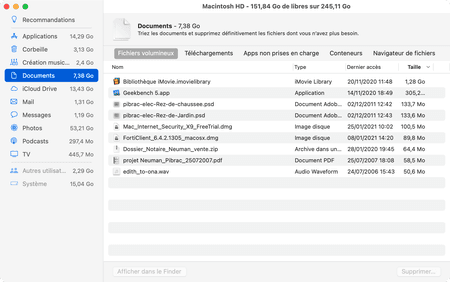
- Then click on the section Documents in the left column. In the main area of the window, you will easily spot the largest files. They are ordered by default in descending order of size. If not, click on the column Size to come back to it. Click on the other column headings to sort the list according to the name files, their type or data of their last opening (Last access). Find a large file that you no longer need? Select it then click on the button Remove lower right.
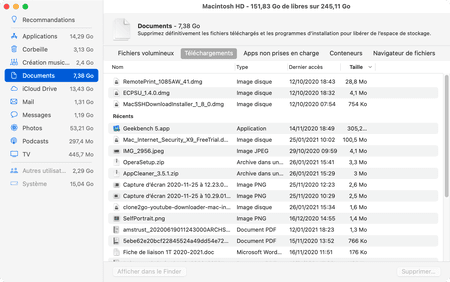
- Each time you download a file from the Internet, regardless of the browser used, it will be nestled by default in the aptly named Downloads folder. It's practical, but we often forget that it exists and suddenly it fills up little by little until it occupies several gigabytes. To easily clean it, click on the tab Downloads in the section Documents from your Mac's storage explorer window. The list will then show all the files in the Downloads folder on the Mac, which you can sort by size to get rid of the larger ones first. Do not hesitate to consult the whole list: there are surely other files lying there for a long time, like for example old versions of software installer (the files which end in .dmg or .pkg) which you do not need. no longer need and that you can always download again if necessary. And probably in more recent versions.
How to remove unused apps on Mac?
It's not just documents, photos, and other videos that take up space on a Mac's drive - applications too. Especially if some are unused ... To erase them, you can again go through the storage management window. But we recommend that you take a look at our How to Clean Apps Clean on Mac, which will show you how to really remove them completely and save even more space.
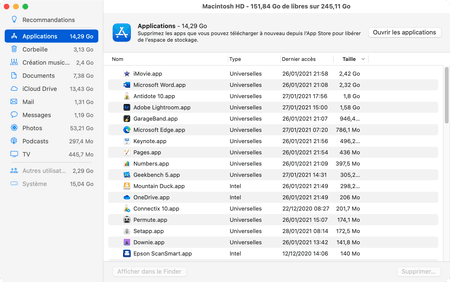
- Open the storage management window as explained above. To see all the apps installed on your Mac and find out which ones take up the most space, click on the section Applications in the left column. They appear there by default in decreasing order of size. To delete an application, select her name in the list, then click the button Remove lower right.
How to manage the space occupied by iCloud Drive?
iCloud Drive is Apple's online storage service (via the Internet), equivalent to the famous Dropbox. If you activated it during the installation phase of your Mac or later, via System Preferences, iCloud Drive synchronizes the content of two folders on your Mac with the online storage space linked to your account Apple. Of course, the behavior of iCloud Drive has an impact on your Mac's storage space.
This service can indeed work in two different ways: either you store all the files and folders on your Mac identically, which you also entrust to iCloud Drive, or you operate in so-called "optimized" mode, in which case you leave the make sure that macOS erases the least used files from your Mac to make space on the disk if necessary. Of course, these files stay safe in your online space, and macOS takes care of retrieving them from the Internet on demand if you double-click them. These files are identified by the small cloud icon next to their name: if you can see it, the file is no longer on your Mac, but online.

-
To see the space occupied by iCloud Drive, open your Mac's storage explorer window as explained above, then click on the section iCloud Drive in the left column. By default, it does not display a list of files stored in this Finder accessible folder.

- To change the behavior of iCloud Drive, click the Apple menu, then System Preferences.
- In the preferences window, click on the icon Apple ID

- Click on the section iCloud in the left column, and finally on the button Options, opposite the iCloud Drive line.
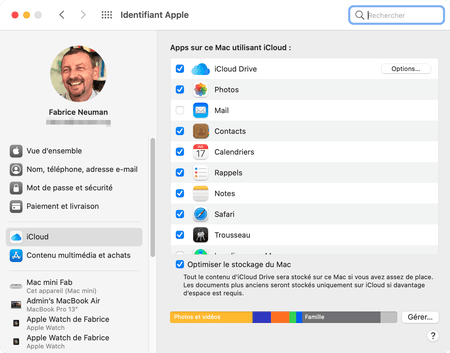
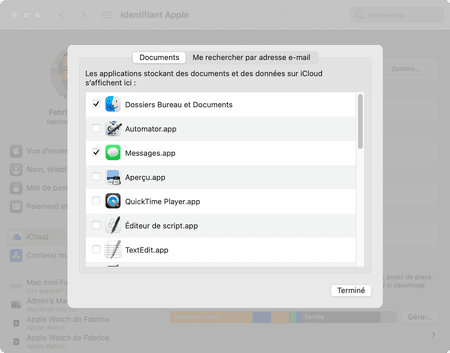
- In the window that opens, check or uncheck the box Office and Documents Folders to activate or deactivate the synchronization of these folders. Then click Finished.
- In the previous window, click on the box Optimize Mac storage to allow macOS to securely erase cloud files from the Mac. Uncheck this box if you prefer to ensure that all files stay both online and on the Mac, which will take up more space.
How do I clear temporary files and caches from a Mac using OnyX?
In addition to the data that you store on your Mac on purpose, the system and some applications generate files that you do not have direct access to, but which can take up a significant amount of space. These are mainly temporary files (also called "buffers" or "caches"), created especially by web browsers, which can accumulate over time. These are also the files that sometimes cause the Other category to explode, which can be viewed in the storage information window of your Mac.
There are many specialist apps that offer cleaning tools to get rid of it. Some, like Clean my Mac, Mac Washing Machine Secure X9 or CCleaner are not free, but also available in trial version to get an idea. But one of the most effective in this area is completely free: OnyX, from Titanium Software. Let's face it, this application should be used with all the necessary tweezers. First, you must install the version intended for your version of macOS without fail. Then, you must be patient: most of the operations that you will ask OnyX require several minutes, even tens of minutes on an older machine equipped with a classic hard drive rather than an SSD. So be patient and do not interrupt the operations in progress.
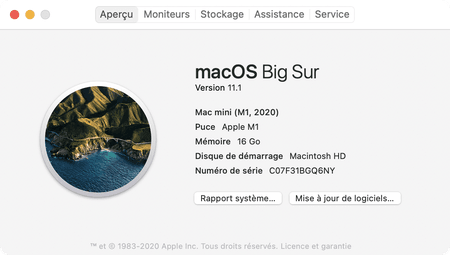
- First of all, check the version of macOS installed on your Mac. To do this, unroll the apple menu And click About this Mac. The version of the system installed on your Mac is clearly indicated in the information window.
- Using your web browser, download the version of OnyX that matches your version of macOS.
Download OnyX on CCM
Download OnyX from the Titanium Software website

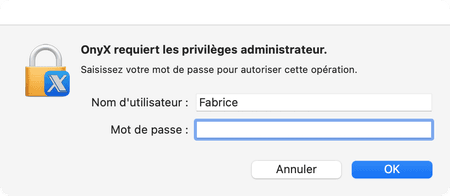
- After downloading, install OnyX. You will need to type in your account password to grant the application administrator rights and thus empower it.
- Once OnyX is launched, click on the tab Maintenance up.
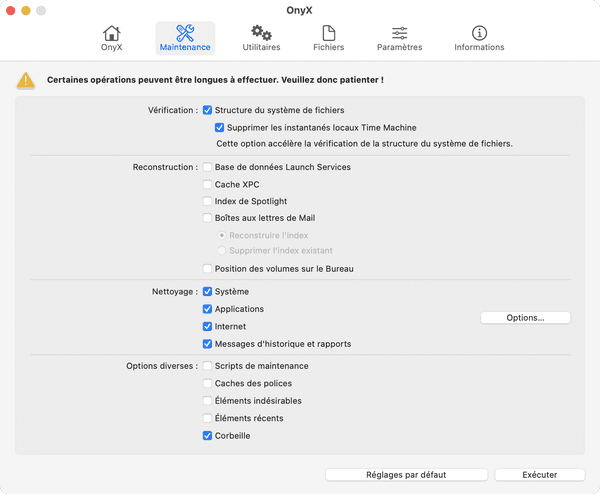
- Then check the boxes for the cleaning and optimization functions: File system structure et Delete local Time Machine snapshots in the Verification section, System, Applications, Internet et History messages and reports in the Cleaning section, and eventually Basket et Unwanted elements in the Miscellaneous options section.
- For your information, System is the system files that your Mac doesn't need and that you can safely erase; Applications to the buffers of applications you have used, particularly related to audio processing and Java; Internet with numerous data linked to your visits (browsing caches, history, forms, cookies); and History messages and reports to diagnostic data generated by both applications and the system (not really useful on a daily basis).

- To avoid erasing too many things, including the usernames and passwords you use to connect to online services, click the button Options ..., to the right of this section, to refine the cleaning. In the list that appears, you can check everything except the box Forms information. Otherwise, you will have to retype your usernames and passwords which will no longer be memorized ... Click on OK when you are done to return to the main window.
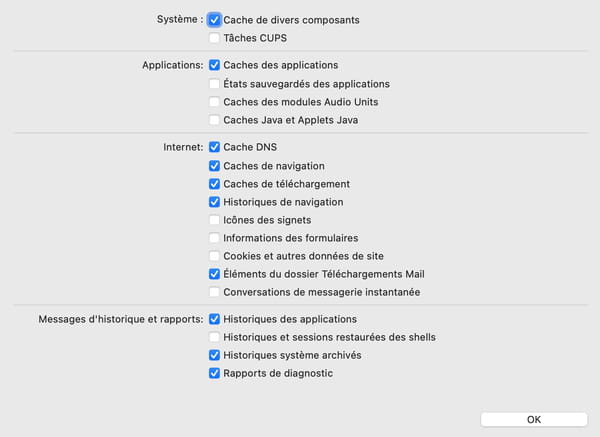
- When all the cleaning options are set, click on perform at the bottom right. A window tells you that the Mac will restart automatically when the operation is complete. Then all you have to do is compare the space occupied on your Mac before and after.
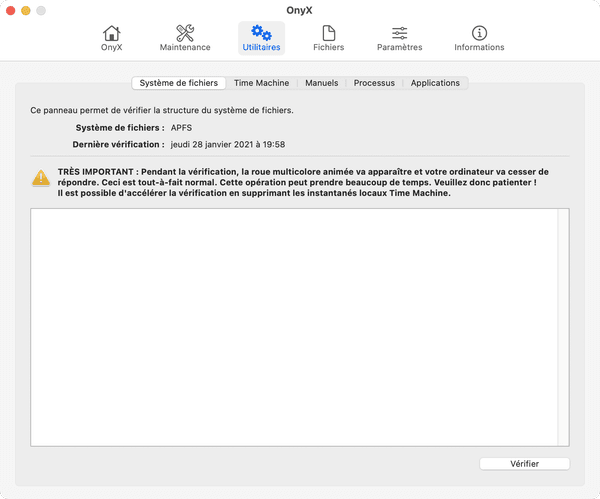
- After cleaning, if you want to go further in optimizing your Mac, click on the tab Utilities. In the subsection File system, you can run a global check of the structure of files and folders saved on the Mac. The operation is long - you will have to wait again - but it can detect anomalies and make your Mac more responsive by correcting them.
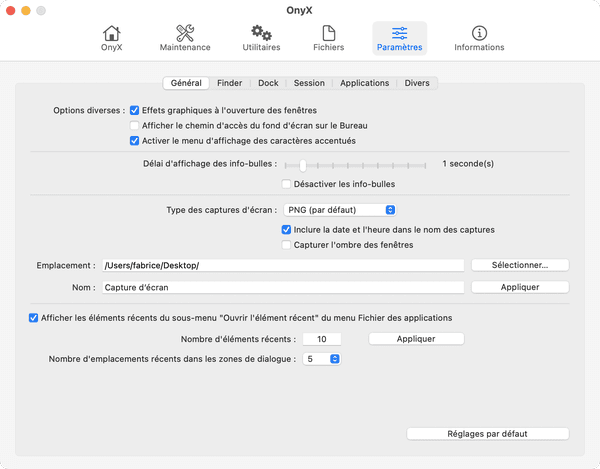
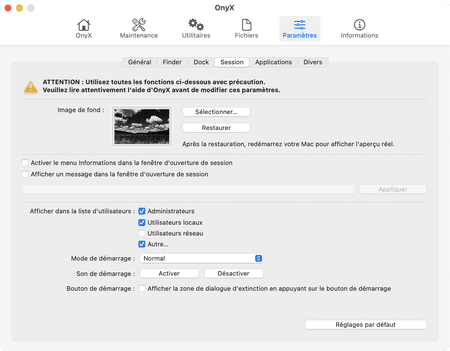
- OnyX also allows you to modify hidden macOS settings via the tab Parameters, which is full of settings that would take too long to detail here. Note that you can, for example, change the default name for screenshots and avoid including window shadows, modify certain items displayed in the Finder menus, modify the behavior of the Dock, enable or disable the Mac startup sound, re-enable the font smoothing feature that has disappeared from Big Sur, etc. In short, a great toolkit for "tuning", which will delight those who like to have a "custom" Mac.
- OnyX warns you when certain actions need to be handled more carefully than others. That said, always remember to back up your Mac before embarking on overly extensive optimization operations. In the event of a crash, you will at least recover your Mac as it was before: even slow, it will be more useful than if it does not work at all!
Contents Reasons for the slowdown Check the storage space Empty the Recycle Bin Delete large files Delete unnecessary applications Manage the space occupied by iCloud Drive Delete temporary files ...


