For some time now you have been dedicating yourself to Photoshop, Adobe's hugely popular photo editing program. Gradually, you are learning how to use its countless functions to retouch your photos and complete jobs of various kinds. Today, for example, you would like to add a new "piece" to the knowledge of this software and, specifically, find out how to write in Photoshop.
Well, if that's the case, I guarantee you that being able to take advantage of Photoshop's tools that allow you to add text to photos is anything but complicated: you just need to know how to move. If you want, I can explain how to do it both in the classic desktop version of the program and in its mobile and online version (through a solution that is not developed by Adobe, but which can still be useful for you).
So, are you ready to get started? Yup? Great! Come on: make yourself comfortable, take all the time you need to concentrate on reading the next lines and, more importantly, try to put into practice the indications I am about to give you, so as to be able to write with the various Photoshop tools without the slightest problem. Happy reading and have fun!
Index
- How to write on photos Photoshop
- How to write in Photoshop from smartphones and tablets
- How to write in Photoshop online
How to write on photos Photoshop
Let's go into the heart of the article, seeing immediately how to write on photos with Photoshop. Below you will find explained how to write plain text with formatting, how to write in a circle, how to write on a path and more, so that you have a complete picture of the possibilities available to you.
How to write text in Photoshop

First, let's see how to write text in Photoshop using the special tool for inserting the writings present in the program.
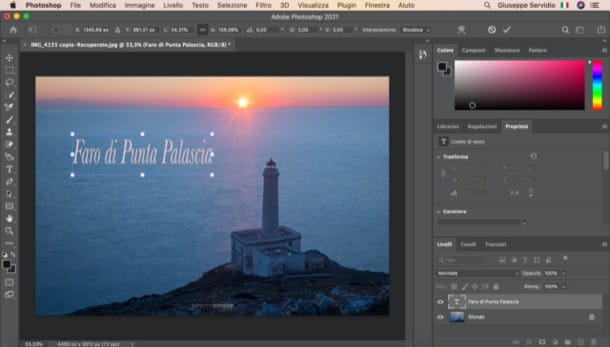
After opening the project you are working on in Photoshop, the first step you need to take is to select it Text tool from the toolbar on the left, by clicking on the icon T. Alternatively, you can call up the tool in question simply by pressing the key T on the keyboard.
Next, click where you want to insert the text and start typing the words of your interest. To format the text you entered, use the menus at the top. Using the first menu, for example, you can select the writing font (ex. Arial, Times New n, Verdana, etc.). Through second menuinstead, you can select the item Italic to write in italics on Photoshop or that Sting to write in bold (when these are available for the font used), while with the third menu you can select the font size.

By clicking on the square, you can access the box Color picker (text color) to choose the color of the text: once you have selected the color variant of your interest, click on the button OK to apply the changes.
In case you want to move the entered text to another point in the workspace, select the text layer of your interest in the Photoshop layers panel (on the right), calls him Move tool program (the icon of the cross located in the toolbar on the left) and, while holding the left mouse button down on the text of your interest, drag the mouse cursor to the point where you want to place it.
In case you are unable to move the text, the layer is obviously locked: to unlock it, click on the icon padlock present on the right of the level in question and repeat the steps indicated above.
If, on the other hand, you intend to apply transformations to the text, perhaps to alter its shape and appearance, you can make use of a special function integrated in Photoshop, which is useful for this purpose. After selecting the text layer of your interest, open the menu Modification and select the item Free transformation.
After that, move the cursor to one of the squares appeared along the perimeter of the text and, holding down the left mouse button, drag the cursor in order to obtain the desired result. By holding down the key Shift while carrying out the operation in question, the writing can be enlarged or narrowed without constraints.

Do you want to apply a fill effect or a pattern to a writing? Nothing simpler! To succeed in the operation in question, after selecting the text layer of your interest, open the menu Subscription, select the voice New fill layer and click on your voice pattern.
In the window that opens, make sure that the checkbox is present Use previous layer to create clipping mask (otherwise you do it) and click the button OK. In the box Pattern fill shown on the screen, select the motif you want to apply to the text using the appropriate menu (if you want to create a new pattern o care one that you already have ready, you can do it by clicking on the icon of roller visible by opening the menu relating to the patterns included "as standard" in Photoshop and selecting the appropriate item).
Next, define theangle and ladder relative to the pattern with which you want to fill the writing, using the appropriate menus, and click on the button OK or come on Submit on the keyboard to apply the changes.

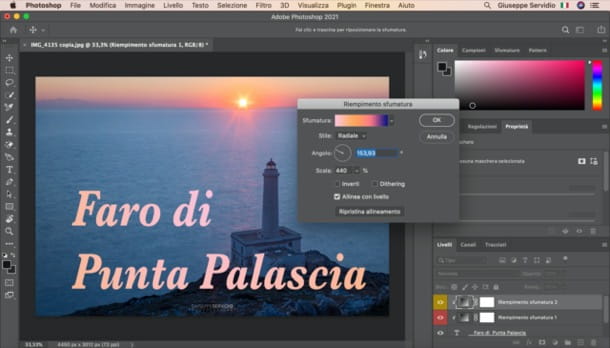
If, on the other hand, you intend to apply a gradient to the text, after selecting the text layer on which you intend to act, go to the menu Layer> New Fill Layer> Gradient Photoshop (above), check the box Use previous layer to create clipping mask (if necessary) and, after choosing the colore that you want to use for filling the writing - through the appropriate menu -, click on the button OK.
In the opened box, access the menu Shade and select the shade of your interest from the predefined motifs, or create your own newby clicking on the appropriate button. Remember to click on the button OK to save the changes made.
Through the box Gradient fill, you can also customize it style,angle and ladder of the gradient. Again, once you have made all the necessary changes, click on the button OK per salvare i Cambiomenti.

Do you want apply a drop shadow to the lettering? This too is a very simple operation to implement. To do this, after selecting the text layer on which you intend to act, go to the menu Layer> Layer Style> Drop Shadow or Layer> Layer Style> Inner Shadow (depending on the shade you want to apply) and adjust, using the special sliders visible on the screen, theopacity distance size and other features of the shadow effect. After these changes, remember to click on the button OK to apply them.
How to write in a circle in Photoshop

You would like to find out how to write in a circle in Photoshop? I guarantee you it's super simple - all you have to do is create a circle and write around it with the use of Photoshop's text addition tool.
First, then, call up the tool Ellipse from the Photoshop toolbar and, while holding down the key Shift on the keyboard, draw a circle. Next, call it back Text tool from the Photoshop toolbar, move the mouse cursor over the edge of the circle you have drawn and, when you see the symbol of a wavy dashed line on the slider itself, click.
At this point, the most is done. You just have to type in the writing of your interest and eventually remove the circle you drew previously (just select the level of the shape in question and press the key Canc/Backspace on the keyboard). If you want, format the writing by customizing the font, the size of the character, etc., following the instructions I have already given you in the previous chapter.
How to write on a Photoshop path

Do you want to know how to write on a Photoshop path? The procedure to follow is quite similar to the one I showed you earlier in the chapter on how to write in a circle. In this case, however, instead of drawing the circle, you have to draw a path and write on it.
First, then, recall it Line tool from the Photoshop toolbar (if you don't see it, right click on the last geometric shape you used) and draw the path to write on. Once this is done, he calls it back Text tool from the left toolbar, hover the mouse cursor over the edge of the path you have drawn and, when the symbol of a appears wavy dashed line at the cursor itself, click where you want to insert the message and type the text of your interest.
Subsequently, if you want, you can delete the path you drew by selecting the relative layer and pressing the key Canc/Backspace on the keyboard. To format the text, on the other hand, you can use the special menus at the top, as I explained to you in the previous chapters.
How to write in Photoshop from smartphones and tablets

Are you intent on write on Photoshop from smartphone and tablet? Well, some of Photoshop's mobile transpositions - like Photoshop Express (Android/iOS/iPadOS) e Photoshop per iPad - allow you to do this in an extremely simple way.
Su Photoshop Express, for example, to write on a photo just import it into the app and call up the appropriate writing tool. After installing and starting the app and selecting the photo of your interest, scroll down the menus, press on T and select one of the available styles.
You can change the example writing by doing double tap on it and modifying it from the box that opens (remember to press on the item end to save the change). To customize the font, colore andalignment of the text, on the other hand, just click on the corresponding tabs and make the necessary changes using the appropriate menus.
For more information on using the Photoshop apps mentioned above, I refer you to reading the tutorial that I have dedicated entirely to them.
How to write in Photoshop online

If you want write in Photoshop online, know that you don't necessarily have to contact Photoshop on the web, which is only available to Creative Cloud subscribers (I told you about it in detail here); you can also use some third-party online services.
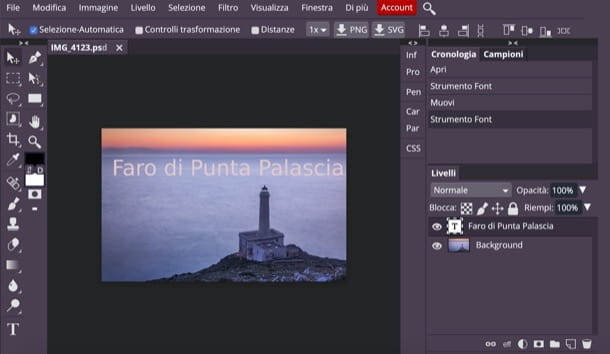
The solution I suggest you use in its place is Photopea: an HTML5 online service that works without registration and without installing plugins in the browser. It's free, but I would like to point out the possibility of subscribing to a $ 9 / month subscription, which eliminates the (non-invasive) advertising present in the free version of the service.
To use it, go to its main page and eventually translate the Photopea interface in 2022no, selecting the item 2022th from the menu More > Language, up. Next, import the photo you want to write on, selecting it by voice apri from the menu Fillet.
Next, click on the icon of T located on the left, click where you want to insert the text and type the message of your interest. To change its font, font size, color, etc., double-click on it, so as to select it, and use the menus at the top.
In case you want to add fill effects or shadows, you can use the menus Layer> New Fill Layer> Gradient Fill / Pattern Fill or Layer> Layer Style> Shadow / Inner Shadow, depending on the effect you want to achieve.
As you can see, the service is very reminiscent of Photoshop, so you shouldn't have any problems using it if you've read the previous chapters of this guide.


