You have set yourself the goal of learning how to use AutoCAD, the famous CAD drawing software developed by Autodesk, to cultivate your passion in design and technical drawing? Or are you thinking of pursuing a major in engineering design that requires a basic understanding of AutoCAD and have realized that it would be best to delve into the subject before venturing into this venture?
Well, if you are looking for a guide to teach you how to use AutoCAD from the beginning, let me tell you that you just found it. In fact, in this tutorial of mine you will find all the details and suggestions to start using the famous technical drawing software, available in a few minutes and without having any previous basis.
I'll quickly explain how to download AutoCAD for free and how to install it, then introduce you to the basics of technical drawing. You will see that it will be easier than you think. If you're ready to get started, just sit back and read the next few chapters. I just have to wish you good reading and, above all, good drawing!
Index
- Minimum requirements
- How to download and install AutoCAD
- How to use AutoCAD
- How to use AutoCAD on mobile
Minimum requirements

Before going into the guide to install and learn how to use AutoCAD, it is good that you know the minimum requirements necessary to properly run the famous CAD drawing software. As you may know, vector drawing requires good computing power and therefore a good processor, an adequate amount of RAM memory and a compatible GPU (graphics card).
In addition to understanding if your computer hardware is compatible with AutoCAD, you must also evaluate the financial aspect: Autodesk offers a completely free one-month trial of the software (on Windows and macOS) and up to 7 days of free trial of the app mobile (for Android and iOS / iPadOS). Then it requires a paid user license which is approximately € 2.200 per AutoCAD and 500 euros for AutoCAD LT (the "lightened" version dedicated solely to 2D drawing).
The best suggestion I can give you is to take advantage of the free trial period and evaluate if AutoCAD is the software for you; then, if you deem it appropriate, at the end of the trial month you can proceed with the stipulation of an annual or monthly subscription. A computer subscription also licenses the AutoCAD mobile app.
That said, let's see in detail what are the minimum requirements to be able to properly run AutoCAD on your PC. The latest version of AutoCAD can be installed on Windows 8.1 a 64 bit or in any version of Windows 10 a 64 bit. A processor of at least is required 2.5GHz but a CPU would be preferable multi-core for at least 3.0GHz.
In order to better manage the drawing tools and open projects are required at least 8GB of memory RAM, but for an optimal experience they are suggested 16GB. The video card must be compatible with DirectX 11 and be equipped with at least 1GB di virtual memory (suggested 4GB). Finally, the AutoCAD installation will take up approximately 7GB of disk space: make sure you have some available before continuing.
If you use a Mac, you can install AutoCAD on any macOS version equal to or later than 10.13 High SierraEven macOS 11 BigSur. On Macs with Apple Silicon chip (Eg. M1), the program works in compatible mode via emulation Rosette 2. They are required at least 4GB of memory RAM, even though the recommended optimal amount is 8GB. Finally, any video card natively installed on Macs is compatible.
If after checking all the minimum requirements you are sure you meet them, then let's not waste any more time and proceed with the AutoCAD installation guide.
How to download and install AutoCAD

To start this experience, the first thing you will want to know is how to download and install AutoCAD, therefore, in this chapter I will illustrate where to download the free trial version and how to install the software on your computer.
Go, therefore, to the official AutoCAD site and click on the item DOWNLOAD THE FREE TRIAL VERSION located under the red rectangular button. In the pop-up that overlaps the screen, choose the option AutoCAD and then click on the red button NEXT located at the bottom of the popup. You will be presented with some necessary requirements, so click the button again NEXT.
Now, from the drop down menu I will use this software like choose the item A business user to access the trial software. A new drop-down menu will become available below, from which you can choose the language in which to run the software (presumably 2022th), then you can click the button NEXT.
Now you need to login with a Autodesk free account, then enter yours email address and yours Password and click NEXT. If you don't have an Autodesk account, instead, click on the item CREATE ACCOUNT just below the blue button and create an account (completely free) by filling out the form that is proposed to you.
After logging in, you will be asked to provide some additional information, for example Postal code, telephone number, company name. Fill in all the fields without fear (Autodesk protects the privacy of users who register) and click on the button BEGIN DOWNLOAD.
Once the download is complete, if you use Windows, double-click the executable file obtained and if you were asked to unlock Windows Defender during the procedure, click on Yes; then click on the button Installation that you find at the bottom right. On the next screen you have to accept the license agreement by choosing the option Accept located at the bottom, then you need to click the button NEXT.
Now wait for the program to download everything necessary for AutoCAD to work (depending on the speed of the connection in use, it could take a few minutes or a few hours). At the end of this process, the AutoCAD version you have chosen will be installed on your computer and you will find the new AutoCAD icon on the desktop (an A with a red background).

If you use a MacInstead, open the .dmg file got it, start theexecutable contained within it, check the box relating to condizioni d'uso, or forwardselect il destination disk, go again forward and wait for the setup to finish. In short, as usual, just follow the simple instructions on the screen and you're done (even if it may take a few minutes for the procedure to be completed).

At this point, the procedures to follow to learn how to use AutoCAD on Windows e how to use AutoCAD on Mac they are equivalent.
Therefore, start the program via the icon on the Windows desktop or in the macOS Launchpad. After a small pre-loading phase, enter your credentials account Autodesk to make the login and then click the red button START THE TRIAL VERSION. If you have a code to activate the license, you can enter it after clicking on the button License already available? located at the bottom right.
If you have any doubts or something is not clear to you about the AutoCAD download and installation process, I suggest you read my complete dedicated guide, in which I explain in detail how to download AutoCAD for free.
How to use AutoCAD
Now that you have finally managed to install the famous Autodesk software, all that remains is to roll up your sleeves and start drawing. In the next chapters I will show you the basic functions of the program, essential to learn step by step how to use AutoCAD.
How to work in scale in AutoCAD
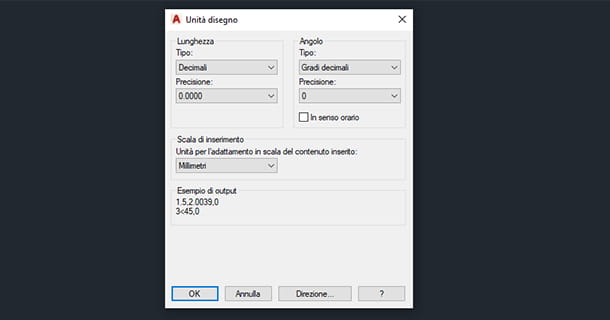
To get started on the right foot, you need to define right from the start what type of ladder you want to draw with. If you want to design in millimeters, centimeters or meters, you should define it from the beginning so as not to get confused later. So let's see right away how to work in scale in AutoCAD.
First create a new document by clicking on the menu (A)> New you see at the top left. A File Explorer window will open: click on the triangle located next to the button apri e scegli l'opzione Open without template - Metric.
Now go to the menu (A)> Drawing Utilities> Units to set the insertion scale and choose theunit of measure you want to draw with from now on. THE Millimeters they are one of the more conventional units.
How to make a plot in AutoCAD
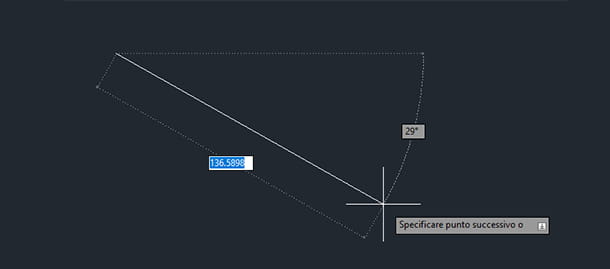
At the base of every shape, plan, wiring diagram or architectural project is the tool No crew, it will therefore be the first tool that I will teach you to use. You will find explained below how to make a plot in AutoCAD.
On a new drawing pad, click on the first icon representing a line and it's called No crew, located at the top left. Then click on the sheet, then move the mouse cursor in the direction you want to extend the path. Type a specific measurement on the keyboard (for example 1000, to determine 1.000 millimeters, or 1 meter), press the key Tab on the keyboard (the two arrows in opposite directions) and type again a measurement for the angle expressed in degrees, then press the key Submit to confirm. Alternatively, click a second time to manually determine the length and skew angle of the path.
As you will notice it's not over, you can continue with a third point and articulate your path in multiple directions and in different sizes to create a shape. Press the button Esc on the keyboard to finish your path. The entire newly created shape represents a compound path.
The latter is not a block. If you want to move or resize the entire shape, you will then have to select each segment individually, by clicking on each of them, or by holding down the mouse click and surrounding the shape with the selection box, being careful not to include unnecessary tracks.
If you want to draw with perpendicular segments, press the key F8 on the keyboard: you will see that the line will orient itself only perpendicular to the point created. If you want to remove this feature, press the key again F8. Then use the scroll wheel on your mouse to perform one zoom-in o zoom-out of drawing and drawing more comfortably.
How to cut an intersected line in AutoCAD

When you draw a floor plan or the diagram of a mechanical system, you will certainly find yourself intersecting multiple paths in order to more faithfully represent the project. But some track positions are not essential, on the contrary, they are in excess, which is why I will explain to you in this chapter how to cut an intersected line in AutoCAD.
First, type the word on the keyboard Size, then press the button Submit, without worrying about having to click somewhere. A strong point of AutoCAD is that keyboard commands are always accepted, as long as there is not already a command in place.
After pressing the Enter key, you will notice that the cursor will change shape into a tiny square: if you place it over an intersected path, it will change into a Red X. Then click on the portion of the path and it will be removed. Convenient, right?
How to make a polyline in AutoCAD

The difference between one No crew and Polyline is that any shape you create with a line will never be a single object, but a compound shape and you will have to select each segment with repeated clicks to be able to select it entirely. A shape created with a polyline will turn out to be a single block, selectable with a single click. So let's see how to make a polyline on AutoCAD.
To get started, select the button Polyline, located at the top left of the toolbar; then click on the sheet and move the mouse cursor in the direction you want to extend your polyline. Remember that for convenience you can specify the unit of measurement by typing a specific length directly on the keyboard.
Draw the shape you need and, when done, press the button Esc on the keyboard. If you select it by clicking on a segment, you will notice that the entire block will be selected.
How to make a polygon in AutoCAD

It often happens that you have to create shapes that are nothing more than polygons, so instead of using the Line or Polyline tool it would be much more convenient for you to draw a polygon or a series of polygons. So I'll explain below how to draw a polygon on AutoCAD in two simple clicks.
If you want to draw a rectangle, you will find the appropriate button called Rectangle, at the top left of the program toolbar. Once selected, you can specify the base and height dimensions simply by typing the units on the keyboard; for example, type 40 and press the button sending, then type 20 and press the button again sending. You have thus obtained a rectangle with a base of 40 millimeters and a height of 20 millimeters. If you want to draw a polygon with multiple sides, select the tool Polygon from the triangle next to the button Rectangle.
Now, before clicking on the drawing pad, specify how many sides your polygon should have, by typing the number on the keyboard followed by pressing the key Submit (Eg 3, to make a triangle), then click anywhere on the sheet to set the center of the polygon.
Finally, from the drop-down menu that is proposed to you, specify if you want it to be Inscribed in the circle or Circumscribed around the circle. Move the mouse cursor to size the polygon and then click to create it.
How to use layers in AutoCAD

The best way to draw neatly is to separate the drawing into Layer (Levels) and assign a specific layer to each object in the drawing. To give you an example, in a floor plan it is very important to draw the walls in one layer, the electrical systems in one layer, the plumbing systems in another layer, the doors and windows in an additional layer and so on. This mechanism helps you to distinguish a set of specific elements from others. Below you will therefore find explained how to use layers in AutoCAD.
The principle is very simple: you just have to create a new layer by clicking on the button Layer properties, located in the top center of the toolbar. Then click the button with the plus symbol like a star to create a new layer and type the name that you want to assign (eg. window frames, Muri o Electrical system).
Create as many levels as you need this way. If you want to delete one, you can click on the icon with the Red X. Then close the layer properties window by clicking on X placed in the upper corner.
To include a drawing in the correct Layer, at this point, just choose the layer from the drop-down menu located at the top center and start drawing. If you forgot to do this or started drawing on the wrong layer, don't worry - select all forms you want to move to the correct layer, after selecting them carefully change layer from the drop-down menu and you will see that the selected shapes will be automatically included in that specific layer.
When the design starts to get complex or rich in elements, it may come in handy hide temporarily the layers that you are not interested in and then make them visible later. To do this you have to click on the layer icon with the bulb, always located in the top center near the other tools of the Layers. If you want to draw without modifying elements of other layers, you can block those layers by the Layer button accompanied by the symbol of padlock.
How to make a block on AutoCAD

I blocks they are complex drawings or groups of paths and shapes that make up a single virtual object, that is a block of elements. Working in blocks is very useful as it makes it easier for you to select multi-paths or sets of objects, in fact the result is that you just need to click to select multiple compound paths. Let's not waste any more time and see immediately how to make a block on AutoCAD.
First of all you have to create your design or the set of shapes that you would like to become a single mobile and scalable object (for example a piece of furniture, a valve or a boiler). Once this is done, carefully select all the paths that make up your drawing and click on the button Crea located in the top center of the toolbar. A window will open in which to specify the Block name (enter the most appropriate name for you): once done, click on the button OK.
An alternative way to create a block is to select all segments to fit into the block, right click, choose items Clipboard> Copy from the context menu, right click again and choose items Clipboard> paste as block from the menu that opens. This will create the exact copy of the selection, but as a single group.
How to explode a block on AutoCAD
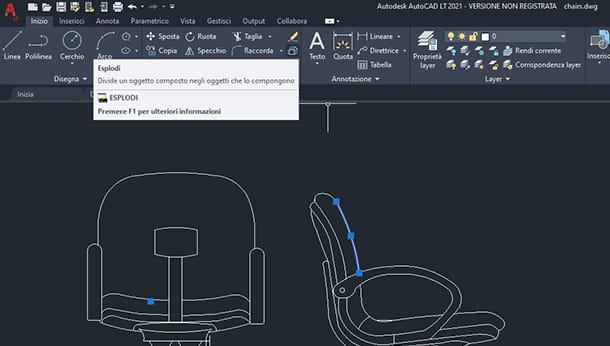
If you have created a block incorrectly or just want to ungroup a block to edit or reshape it, know that you can ungroup any block by returning it to its original state, which is a compound multi-path. In this chapter I will show you therefore how to explode a block on AutoCAD.
This step is very simple: click on the block you want to break down. Once selected, all you have to do is click on the button Explode located at the top left of the toolbar. You will then be able to individually select all the segments of the newly decomposed shape.
How to use AutoCAD on mobile

If you love mobile devices and travel often or just want to work on the go, know that there is a full version of AutoCAD per Android e iPhone/iPad. At this point you are wondering how to use AutoCAD on mobile? Without mouse and keyboard?
Nothing could be simpler, you must know that using AutoCAD on mobile is exactly like using AutoCAD on any PC with Windows or Mac. The only difference is that you will have to use either a pen (possibly active, more precise) or fingers to draw.
You can find the app in the appropriate section of the Google Play Store if you have an Android smartphone, or in the App Store if you have an iPhone or iPad. I also suggest, based on your financial possibilities, to evaluate the purchase of a nib and a keyboard to work more comfortably even on mobile devices.
See offer on Amazon See offer on Amazon See offer on Amazon See offer on Amazon See offer on AmazonIf you want to deepen the subject, I suggest you read my dedicated and complete guide, in which I explain in detail how to use AutoCAD for free even on Android and iOS / iPadOS mobile devices.


