Have you downloaded a program or game in ISO format from the Internet and don't know how to view its content on your computer without first having to burn it to a blank disk? Don't worry, there is no need for expensive paid solutions. In fact, you can turn to one of the many tools at no cost (or in any case available in a free trial version) for unpack an ISO file available for Windows and macOS.
They are all very easy to use even by those who, a bit like you, do not consider themselves a great expert in terms of information technology and new technologies. In most cases these are resources used to explore and extract the contents of compressed archives (those in ZIP, RAR format, etc.), while in others they are programs specially designed for the purpose in question.
Still on the subject, for completeness of information, it will also be my concern to explain to you how to mount the ISO files, so that, in addition to being able to explore their content, you can use them just as if you had burned them and the relative CD. / DVD is inserted in the player connected to the PC. But now just chat and let's take action. I wish you, as usual, happy reading and I wish you the best of luck for everything. Are you ready?
Index
Unpack an ISO file
You need unpack an ISO file but you don't know how to do it? Then use the tools for Windows e MacOS that you find indicated below and put into practice the relative instructions for use, I can assure you that it is much simpler than you can imagine. Happy reading and good "work".
7-Zip (Windows)

If you are using a PC with su installed Windows, the first of the useful resources I want to tell you about is 7-Zip. Haven't you ever heard of it? No? Strange, it's very famous. In any case, there is no problem, let's fix it right away. It is one of the best free programs for managing compressed archives available for Microsoft operating systems. Thanks to it, it is possible to open any type of archive (ZIP, RAR etc.) and image files of CDs and DVDs having the possibility of extracting the contents in any folder.
To use it, the first step you need to take is to connect to the 7-Zip website and click on the item Download placed next to the wording 64-bit x64 (if you use a 64 bit) or next to that 32-bit x86 (and you use a 32 bit). When the download is complete, open the .exe file obtained and, in the window you see appear on the desktop, click on the button Si and on that install. Finally, press the button Close.
At this point, you need to associate the ISO file format with 7-Zip so that the CD and DVD image files will automatically open with it. To do this, search 7-Zip File Manager in Start menu and open the relevant link.
In the window that opens, select the item options from the menu Instruments at the top, to access the panel with the program settings. Then select the file format ISO by clicking on it, so that theprogram icon, and click on the buttons Apply e OK per salvare i Cambiomenti.
If you see an error message appear when trying to associate the ISO format to 7-Zip, start 7-Zip File Manager with administrative privileges, by right-clicking on the relative link in the Start menu, choosing the items More> Run as administrator Give the menu if you want to press the button Si in the window that appears on the desktop.
You are now ready to unpack an ISO file with 7-Zip. You can do this simply by double clicking on the image file to open, selecting the elements present in it and dragging them to any position. The duration of extracting files from an ISO image depends on the size of the elements to be extracted and the power of the PC in use. In general, however, it only takes a few minutes even for medium / large files.
IsoBuster (Windows)

Another program you can turn to to unpack your ISO files is IsoBuster. It is a popular operating system tool Windows thanks to which it is possible to recover data from damaged CDs and DVDs and which is inclusive of numerous features for managing files in ISO format, such as the operation covered by this tutorial, the creation of images from CDs and DVDs and the conversion between main image formats to ISO / TAO / BIN / CUE / IBP / IBQ. It costs $ 39,95, but you can download it as a free trial version that works for 30 days. In this case, the only thing to consider is that to extract the ISO files you need to buy the license.
To download IsoBuster on your PC, go to the program's website and click on the button Download IsoBuster. When the download is complete, open the .exe file obtained and, in the window that appears on the screen, presses the buttons Si, OK e NEXT (for four consecutive times). He then completes the setup by pressing the buttons Install, end e Si.
Then start the trial period of the trial of the program by clicking on the buttons Si e Register later in the window that appears on the desktop. At this point, click on the menu Fillet at the top left, select the option Open image file from the menu that opens and select the reference ISO file.
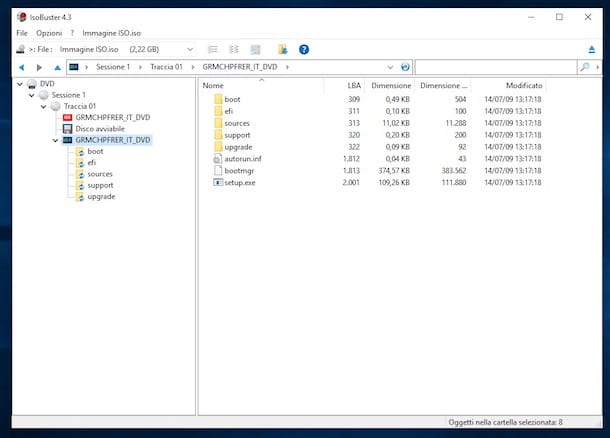
After completing the above steps, you will see the contents of the ISO file in the right part of the program window. To unpack it, drag the elements of your interest out of the software window and drop them in the position you prefer.
The Unarchiver (macOS)

Are you using a Mac? If so, you can extract an ISO file using The Unarchiver. This is a free application for MacOS which allows you to explore and unpack compressed archives (ZIP, RAR etc.) and ISO, BIN and EXE files (Windows executables), all in an incredibly simple and fast way.
To download it, visit the relevant section of the Mac App Store Online, click the button See the Mac App Store and, in the "real" window of Mac App Store that opens on the desktop, click on the button Ottieni / Installa. If necessary, authorize the application download by typing the Password of your Apple account or via touch ID (if you have a Mac equipped with this component).
Once the download procedure is complete, right-click on the icon of the ISO file to unpack and select the items Open with> The Unarchiver from the menu that appears. By doing so, the data contained in the ISO file will automatically be extracted into a folder that will be created in the same path as the image file.
Keka (macOS)

Another software for MacOS which you can use to unpack an ISO file is cake. It is an application that, similar to The Unarchiver, allows you to extract all the main image and archive formats quickly and quickly. It's free and it's open source. Note that it is eventually available in a paid version on the Mac App Store (costs € 3,49) useful to support the work done by the developers.
To download the free version of Keka, go to the program's website and press the button Download. Once the download is complete, open the package .dmg proceeds, drag theKeka icon in the folder Applications macOS, right-click on it and select the item apri from the menu that appears, in such a way as to open the program going to circumvent the limitations that Apple imposes on applications from non-certified developers (an operation that must be performed only at the first start).
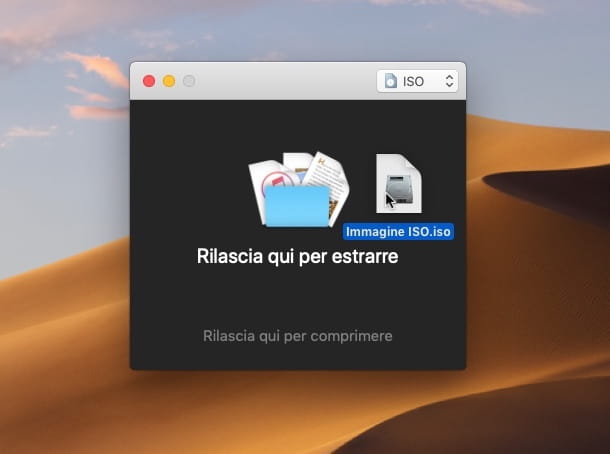
Once the software window appears on the desktop, drag it over to the item Release here to extract, the ISO file you want to unpack and wait for the extraction procedure to start and complete.
Then indicate the location on macOS where you intend to extract the image file and click on the button Extract. Afterwards, all the files present in the ISO image will be saved in a specific folder in the location specified above. Done!
Mount an ISO file
Are you interested in unpacking an ISO file in the sense that you would like to access the content of an image file as if it had been burned onto a CD or DVD inserted in the player connected to your computer but you don't want to do the operation in question? Then use the resources for mount the image files that you find indicated below and follow the relative instructions for use. It is much easier than you might think.
Default ISO File Manager (Windows)

You are using a PC with su installed Windows 10 or Windows 8 / 8.1 and do you need to mount an ISO file? If so, I'm happy to let you know that you don't need to download and install absolutely anything on your computer. In fact, you just need to use the default ISO file manager of the System.
To use it, you have to, very trivially, right-click on the ISO file icon and select the item Monta from the context menu that opens. Alternatively, you can double-click the icon of the ISO file of your interest.
In both cases, a window will open on the desktop afterwards File Explorer with the content of the image just mounted inside. Easy, right?
Utility Disco (macOS)

Also on MacOS, to mount your ISO files, you can use the default tool for managing image files and discs, internal and external, connected to your computer. It is about Disk Utility and to use it you don't have to download and install absolutely anything on your computer.
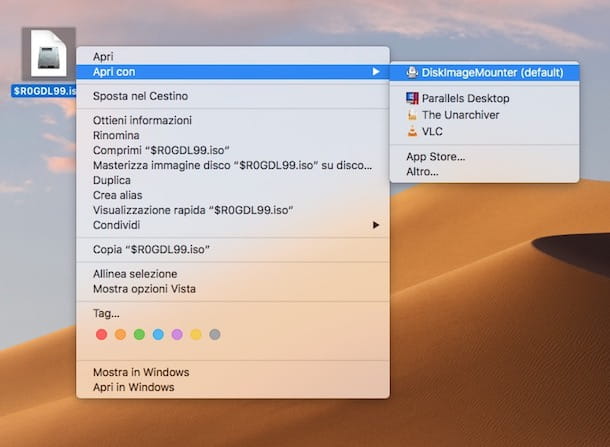
To use it, just right-click on the ISO file icon and select, from the context menu that opens, the item DiskImageMounter. Alternatively you can, very simply, double-click on the image file you are interested in going to act on.
In both cases, subsequently, the ISO file will be mounted on the Mac and you can then access its contents through the window that will open on the desktop. A real child's play!
WinCDEmu (Windows)

Didn't the tool already included in Windows to mount ISO files convince you in a particular way or are you looking for a valid alternative? So, the best suggestion I can give you is to put it to the test WinCDEmu. It is an open source and free tool, which allows the management of image files on a PC. In fact, it allows you to mount the contents of the ISO files on virtual drives that can then be opened as if they were real floppy disks.
To download WinCDEmu on Windows, connected to the program's website and click on the button Download twice in a row. When the download is complete, open the .exe file obtained and, in the window that appears on the desktop, click on the buttons Si, install e OK. Now launch the Windows Start menu and select the program WinCDEmu Settings, to choose the language 2022th.
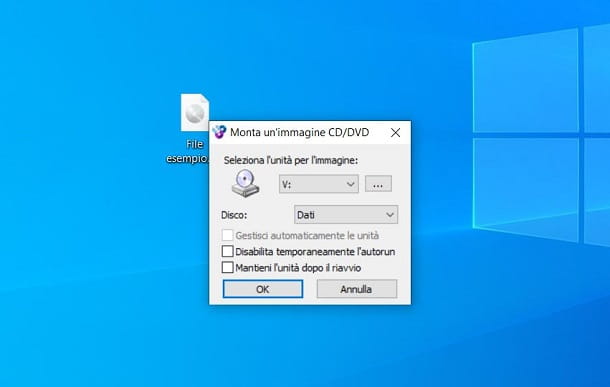
Now, to mount the ISO file, right-click on it and, in the context menu, choose the item Select a drive and mount the image. In the box that is shown to you, click on the button OK to view the contents of the ISO file in File Explorer. To "unmount" the ISO file, on the other hand, in File Explorer, right-click on the name of the virtual drive and choose the item Eject.


