You would love to have some privacy on your PC. It is not possible for all friends, upon entering your room, to peek through the folders on your computer. We need to put a stop to this! In this regard, let me give you a little hint: to protect your privacy and keep your documents safe, you could protect your folders with a password. How do you say? The advice sounds great to you, but you don't have a clue of how to put the password to a folder? Don't worry… I can provide you with all the explanations you need.
With today's guide I will in fact show you, step by step, how to create an encrypted container in which to keep all the data you want to hide from prying eyes. This container will look like any file, an anonymous document, and only you - who know the password to open it - will be able to view the files inside. The procedure to follow? Simple, safe and free. On both Windows and macOS. Doesn't that sound great to you? In the second part of the guide, then, I will also be able to suggest some useful solutions to protect folders with passwords on smartphone tablets, if you are interested in this.
If you are really interested in finding out what needs to be done to be able to put the password to a folder, I suggest you take a few minutes of free time, settle down comfortably in front of your computer and concentrate carefully on reading this tutorial. I am sure that, in the end, you will be able to tell yourself more than satisfied and that if necessary you will also be willing to explain to your acquaintances in need of a similar "tip" how to succeed in the enterprise. So, ready? Yup? Very well, let's roll up our sleeves and get to work immediately!
Index
- How to put the password to a folder on PC
- How to put the password to a folder on smartphones and tablets
How to put the password to a folder on PC
Let's see first how to put password to folder on PC. Below you will find explained how to do it on Windows (using a third-party application) and on macOS (using a system function useful for the purpose).
How to put the password to a folder on Windows
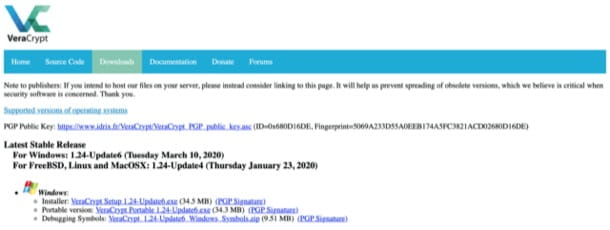
If a PC is used Windows and you are interested in password protecting a folder, I highly recommend you rely on VeraCrypt. It is a completely free and open source encryption software that has taken the baton of TrueCrypt, a very popular multi-platform program whose development ceased in 2022.
To download VeraCrypt on your PC, click here, in order to connect to its website and then presses the link Download which is at the top and, on the page that opens, click on the link VeraCrypt Setup x.xx–Update-x.exe, placed in the section Windows. Wait a few moments for the program to download to your computer, then start the .exe file obtained and click the button Yes.
Accept, therefore, the conditions of use of the application by placing the check mark next to the item I accept the license terms and complete the setup by clicking in sequence on Next twice consecutively and then on the buttons install, OK, Finish e No.

Now that you have completed the installation of the program, to put the password to a folder (or, rather, to create an encrypted virtual volume), you must first start VeraCrypt by double clicking on its icon that has been added to the desktop and translate its interface in 2022no by going to the menu Settingsby clicking on the item Language, selecting the2022th in the window that opens and then clicking on the button OK.
Then click on the button Create a volume... to start the creation of your encrypted archive in which to insert the files to be protected, put the check mark next to the item Create an encrypted container file and click on NEXT to go to the next step. Then select the option Volume VeraCrypt standard, pig sul sul bottone NEXT and click on the button Select file... to select the folder in which to save your encrypted archive and assign it a name, then click on the button Save.
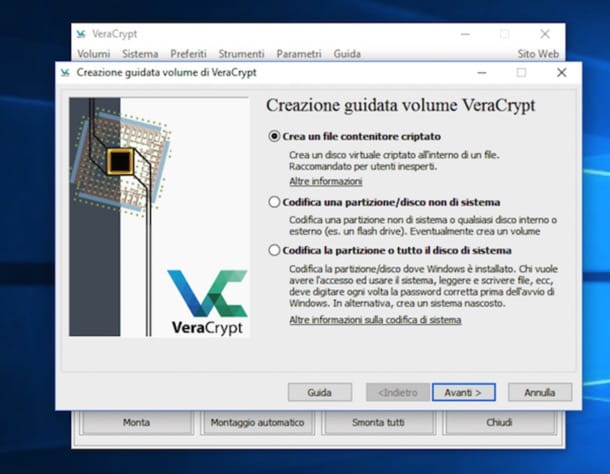
When done, click NEXT, choose the encryption algorithm to use for your volume (also leave the default setting on: BEA at the section Coding algorithm e SHA–512 at the section Confusion algorithm) and keep going. Then set a maximum space limit for the archive that will have to contain your files (in KB, MB o GB) and click the button once again NEXT.

Now you have to set the password to use to access your "folder": create one that is difficult to guess, perhaps consisting of more than 15 characters containing numbers and special characters, and keep it in a safe place ... if you forget it you will no longer be able to access to your precious data! Once you have entered and confirmed the chosen password, click on the button NEXT for the umpteenth time.
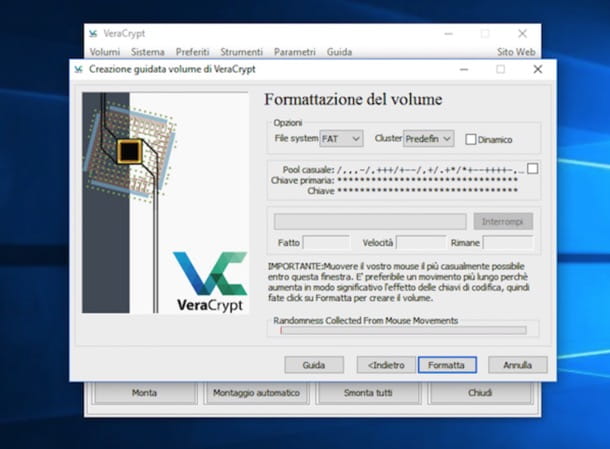
As a last step you have to choose which one file system use for the encrypted volume in which you are going to store your files: if you intend to protect videos, ISO images or very large archives, which weigh over 4GB, choose NTFS; otherwise leave the setting on FAT:. If you want to create a volume that can be used not only on Windows but possibly also on macOS, without having to face the limit of 4GB per file, opt for the file system exFAT.
Once you have selected the file system that best suits your needs, click on the button Format and, to complete the creation of your encrypted archive, first click on the button OK and then Logout.
At this point you can finally say you are satisfied: you have managed to complete the whole procedure to put the password to a folder and now you have an encrypted archive at your disposal in which you can store files of all kinds to protect them from eyes and "clicks" prying. Well done!
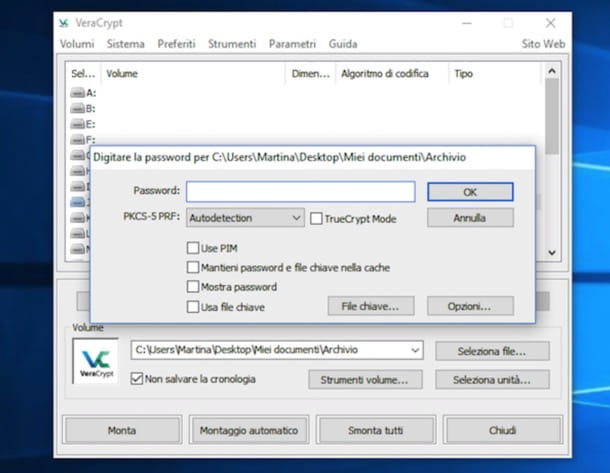
To access your "secret" volume, all you have to do is select one of the available drive letters (eg. J:), click on the button Select file... which is located at the bottom right and select the encrypted archive you created earlier.
Next, you will need to press the button Monta, type the password to access the volume by entering it in the field next to the item Password: and click on the button OK. If you entered the exact keyword, in the sections Computer resources, computer or What PC Windows (the item may vary depending on the version of the operating system in use). By doing so, the virtual drive icon created by VeraCrypt will appear and you will be able to manage the data inside your encrypted archive as if it were a USB key or any external hard drive.

When you have finished using your private "folder", go back to the main VeraCrypt screen, select the drive letter you "mounted" previously and click on the button Disassemble to make the volume disappear from the PC.
How to put the password to a folder on Mac

VeraCrypt, the program I told you about in the previous lines is also available for MacOS, consequently you could use it in the same way as already seen on Windows PC to put the password to a folder on Mac (taking into account that the version for macOS is in English and to work it requires an add-on, called FUSE). More info here.
In reality, though, you might as well do without and use Utility disco, the application included "standard" in all versions of macOS that allows you to manage disks and their partitions in an extremely simple way. The trick - if we want to define it that way - is to create an encrypted disk image and store all the files you want to protect inside it. You understood perfectly well: on Mac it is possible put the password to a folder without programs third-party.
If this solution interests you, proceed as follows. To begin with, start Disk Utility by clicking on its icon attached to the folder Other of Launchpad. Alternatively, you can open Disk Utility by going to the folder Applications and then double clicking on the tool icon or searching for the application using Spotlight.
Now that you see the Disk Utility window on your desktop, click on the entry Fillet located in the upper left part of the menu bar and then select the item New image and then that Blank image... and set the drop-down menus in the window that opens as follows.
- At the entry Dimensions: indicates the maximum size that the archive must reach (choose it according to your needs).
- At the section Format: select Mac OS extended (journaled) (Or even APFS, depending on your preferences).
- At the entry Partitions: select Single Partition - Apple Partition Map.
- At the entry Picture Format: select Sparse Bundle disk image.
- At the entry Encoding: select Codifica 128-bit AES.

Now, type the Password to use to encrypt the disk image in the fields Password e Verifica and click on the button Select. Then enter the name you want to give your volume in the text field Save col nome: e Name:, choose the location on your Mac to save everything via the menu Located in: and click on the button Save. Finally click on the button end.

Once you have completed all the procedure to put the password to a folder, or rather to create an encrypted disk image, to view its contents and modify it (i.e. add other data to it), all you have to do is open it with a simple double click, type the password you previously set in the appropriate field next to the item Password: attached to the window that is shown to you on the desk and press on OK.

To "unmount" the volume, click on the symbol Eject located next to its name in the Finder sidebar. Did you see how simple it was to encrypt a folder with Disk Utility?
How to put the password to a folder on smartphones and tablets
I conclude this guide by explaining to you how to put the password to a folder on smartphones and tablets. Below you will find explained how to succeed on the main mobile platforms: Android and iOS / iPadOS.
Android

You have a device Android? Well, in this case, to protect a folder with a password, all you have to do is install a file manager that has the folder encryption functionality (if you have not already done so), recall the feature in question and create a password to protection of the documents contained in the folder of your interest.
One of the best file managers you can use for this purpose is Solid Explorer File Manager, which costs 2,99 euros, but can still be tested for free for 14 days. Let's see how it works.
After installing Solid Explorer on your device, tap the button Following, to scroll through the information sheets that illustrate the features of the app (or, if you prefer, salta the initial tutorial, by tapping the appropriate button), check the box I accept the license agreement and press on the item Done, to continue.
Now, grant Solid Explorer the necessary permissions to function correctly and close the welcome message by clicking on the button OK present in the box that appeared on the screen. Then locate the folder you want to protect and keep your finger pressed on it. Now, tap the button (⋮) located at the bottom right, select the item Crypt from the appeared menu and, finally, create the password with which to protect the chosen folder, writing it in the fields Password e Repeat the password; then tap on the item Crypt, per salvare I modified it.
If your device has a fingerprint reader, you can even decide to use your fingerprint to access the contents of the folder of your interest, by placing a check mark on the appropriate wording, before encrypting it.
From now on, to access the encrypted folder it will be necessary to enter the set password. Did you see how easy it was to use Solid Explorer File Manager? If you want to learn more about the topic and want more information on how to protect a folder on Android, read the tutorial I published on the subject.
iOS / iPadOS
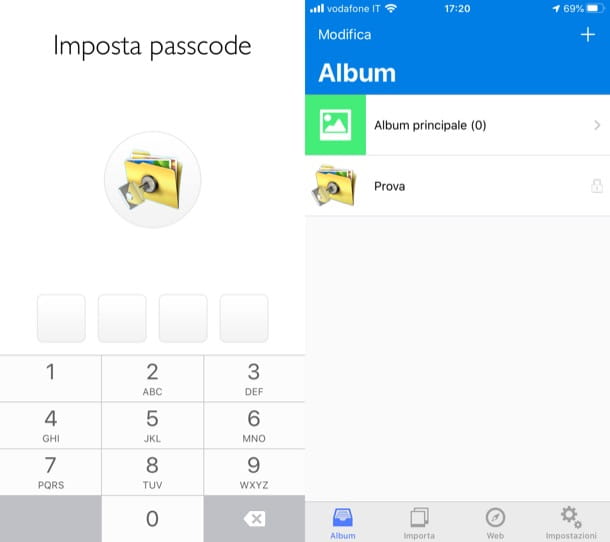
You would like to know how to password protect a folder on iOS / iPadOS? Well, in this case, although it is not possible to obtain this result exactly - the Files app that allows you to manage files and folders on Apple portable devices does not have this feature - you have various alternative solutions to turn to: use aapp to create password protected vaults, create encrypted notes in theapp Note and block access to apps using the function Usage time. Let me tell you about all these solutions.
To create password protected vaults, I recommend using Private Photo Vault, an app through which it is possible to create “software safes” in which to hide private photos and videos. After installing and starting the app on your device, tap the button Start e poi premi sul pulsating Set passcode: create, therefore, a secure password with which to protect your private photos, typing it twice consecutively.
Then press on the item Creation, provide a backup email address using the text field that appeared on the screen and then presses the button Concluded. Now, tap the button NEXT twice in a row, he presses the buttons I agree e Accept everything and continue and start using the app.
To create a new private album, press the button capacitor positive (+) lead located at the top right (in the screen Album), give a album name and possibly set a Password with which to protect access. Next, tap the button Crea placed at the top right and that's it. To insert content into the album in question, tap his name, type the Password possibly set to protect the latter and answer OK notice appeared on the screen.
Next, tap the button capacitor positive (+) lead located at the bottom right, select the way to import the photos of your interest (Photo archive o Camera) and, after selecting them, wait for them to be loaded. To access any content saved in the app, you will then be asked to enter the passcode set during its configuration (the request will be made even if the app is not actually closed). Interesting, right?
Do you want to password protect notes? It is also possible to do this: just take advantage of the special function integrated in theapp Note. After starting the latter, locate the note you are interested in, keep your finger pressed for a few seconds on hers title (or make a decisive tap on it, if your device is equipped with 3D Touch) and select the item Protect note in the opened menu. You just have to type the Password with which to protect the content of the note, in the appropriate text field, and finally tap on the item OK.
Do you want to prevent access to the apps installed on your device? Thanks to the function Usage time it is a doable thing. To use it, go to Settings> Usage time> Use the "Usage time" code and sets a four-digit numeric code (twice in a row).
Successively, recati nella sezione App limitations, tap on the item Aggiungi LIMITATION OF USE, type the code set up earlier and search for the name of the apps you want to block (eg. Fillet), and then select them. Next, tap on the item NEXT, set the timer for the app usage limit to 0 pray and 1 min (which is the minimum allowed), confirm the operation by pressing on the item Add And that's it. To block access to selected apps, then launch them and wait for the minute to pass.
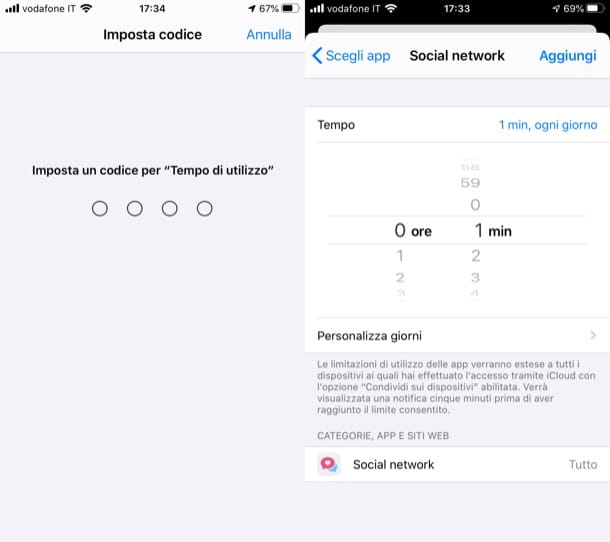
If you have second thoughts, go back to Settings> Screen Time> App Restrictions> [Category], type il code currently set, tap on the item Eliminate limitation and confirm your intentions by tapping the item again Eliminate limitation in the opened menu.
In any case, if you really want to deepen the subject in detail, take a look at my guide on how to hide files on iOS, to better evaluate what to do.


