You just bought a smartphone W and you don't know how to open the back cover to insert the SIM? Are you having problems with the battery, the display or some other component of the mobile phone and do not know how to solve? Then you have come to the right place at the right time, because in this guide of mine I will explain to you how to open Wiko, so as to solve all your problems.
Going into more detail, in this guide I will show you how to open the rear housing of Wiko smartphones, where the battery, SIM and external memory reside, and how to open the phone to repair any malfunctioning hardware components. In the latter case, I will explain how to carry out a repair personally or with the help of the official service center.
Be careful: if you have no idea what you are doing, you could cause serious damage to your smartphone, should you decide to take action on the repair yourself. Rely on official or authorized service centers to avoid the risk of reducing your mobile phone to a simple paperweight. Having made this clarification, you just have to start reading this guide immediately, so as to learn all the tips and suggestions I have prepared for you. Happy reading and, above all, a good job!
Index
How to open Wiko
If you have recently purchased one Wiko smartphone, you can use the precautions that I will show you in the following paragraphs to remove the back cover and access the battery and the SIM and SD compartments.
Remove the cover

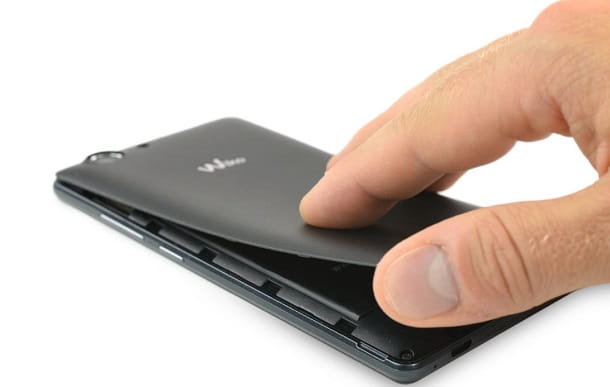
For some, remove the back cover of a Wiko smartphone it may be a not-so-simple operation. In fact, these have an interlocking back cover that can only be removed by exerting pressure on a specific point of the body.
What I recommend is to consult the instruction manual of the Wiko smartphone, which was provided to you upon purchase, inside the box. Leafing through the pages, you will learn about the specific point to remove the cover, based on the model of mobile phone in your possession.
Alternatively, you can look closely at the side edges of the device to spot a small one groove: after you have found it, just exert pressure on it with a common plastic card, a pick or with your thumbnail. Keep the smartphone screen facing your left hand while applying this pressure, to prevent the body of the smartphone from accidentally falling to the ground.
After doing this, the back cover will begin to release. At this point, continue to leverage by moving along the entire edge of the smartphone, in the opening you just opened between the cover and the smartphone. If you have correctly performed the steps I have indicated, you will have successfully removed the cover on the Wiko smartphone. It was easy, wasn't it?
To reposition the cover in its original state, just fit it back into the body of the mobile phone, taking care that there is no opening left along the entire edge of the device.
Remove the battery

Thanks to the steps I indicated in the previous paragraph, you removed the back cover of the Wiko phone, so as to access the compartment battery. To remove the latter, I advise you to exert a slight pressure on the groove on its edges, dragging it with your finger out of the compartment.
In this way, you have removed the battery from the Wiko smartphone to access some information, such as the IMEI code, or read the model name on it to replace it, in case it is damaged.
In the latter case, I recommend that you enter the model name in the Google search engine or on e-commerce websites, such as Amazon.com, to purchase the original product or a compatible one.
To insert the battery again, follow the reverse process of what I indicated in the previous lines for its removal.
SIM and SD installation

After removing the battery, you can access the compartment SIMs., inserting it into the metal housing that you find in the upper section, just above that of the battery. There may be a second compartment to insert the second SIM card, which you can find next to the main one or on one of the two sides of the smartphone.
The compartment microSD, unlike that of the SIM, it is independent from the battery, so as to be able to remove and insert the external memory in the Wiko smartphone freely, through the compartment in the side section. I advise you to read the instruction manual or the technical data sheet of the device to check the maximum size of the microSD that you can install.
How to open Wiko to fix it
If your aim is to run one personal repair on a Wiko smartphone, without contacting a service center, I advise you to read the following paragraphs, in which I will show you the instructions to follow to reach your goal.
Check the validity of the guarantee

The first thing to consider is whether the legal guarantee of the Wiko smartphone is still ongoing. If so, I recommend that you allow an authorized service center to carry out maintenance on the device, to avoid that you, through a "do it yourself" repair, can cause irreparable damage such as to compromise the correct functioning of the device.
You can check the status of the legal guarantee by checking the date of purchase on the receipt or invoice. As indicated by the manufacturer itself, the warranty has a duration of 24 months from the purchase. During this period, you can take advantage of Wiko support for free, until the term has expired.
If you want more information on the warranty of Wiko devices and on which interventions the assistance is free, I suggest you reach and consult the official website of the French company.
Find the equipment and spare parts

If you have decided to try your hand at the “do it yourself” repair of the Wiko smartphone, it is necessary that you have the necessary equipment and spare parts to replace the defective ones.
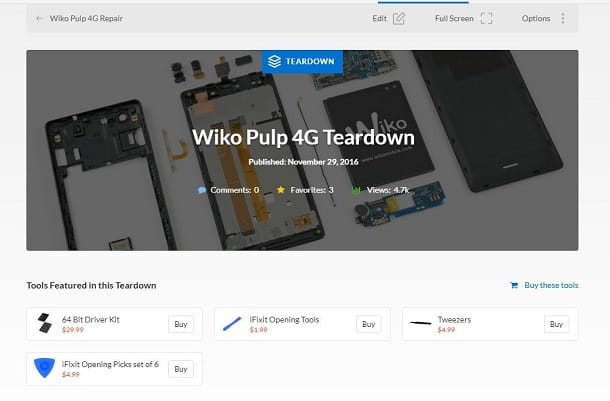
To do this, I recommend you among the many Web portals used for this purpose iFixit, where you can find many tips and tricks on the disassembly and replacement of components for smartphones and tablets. Inside you can find illustrated guides or videos that explain in detail some procedures to carry out the repairs accurately.
Even if the section relating to Wiko smartphones is not full of guides like those of other manufacturers, I still recommend that you take a look at it. In case you do not find what you need, consult the forum, to get in touch with experts, in order to find a specific solution to your problem.
If you have found information regarding the repair you need to perform, you will need to obtain recommended tools and replacement parts. In this case, you can directly rely on the virtual shop on the site of iFixit or consult e-commerce websites, such as Amazon, to find everything you need.
To give a practical example, for the opening of a Wiko Pulp 4G You will need a screwdriver kit (such as the iFixit kit with 64 bits), tweezers, a pick and an opening tool to separate the case from the rest of the device.
Prepare the device and the work surface

If you have everything you need, it's time to prepare your Wiko smartphone to run it disassembly of the various components. First, turn off your device by pressing and holding the off button for a few seconds and pressing on the voice Switch off, in the screen that appears on the display.
At this point, if you've applied one film o a protective cover, it must be removed to prevent it from hindering repair operations. Then remove the back cover to access the battery and SIM. To do this, I suggest you read this previous paragraph, where I told you in detail about this topic. At this point, extract the battery SIM card and any microSD.
Now, prepare your work area by placing your Wiko smartphone on a flat surface that is clean and well-lit. Also use a soft cloth or protective mat to work on, to prevent accidental falls during disassembly from damaging components.
How to repair Wiko

At this point, it's time to do the Wiko smartphone repair. To do this, as I have already mentioned before, consult the website of iFixit to find the solution to your problem, relying on the guides present or the advice given to you through the forum. If you missed the links I provided on this topic, I suggest you reread this dedicated paragraph.
In any case, I advise you to consult the forum section, in case some steps are not clear to you during the disassembly phase and wait for the response of the experts. If you want, however, to consult other platforms for the resolution of your problem, I suggest you to view the numerous videos on YouTube, which show how to perform the disassembly and repair operation on specific Wiko smartphone models.
To do this, simply log into YouTube and type the terms in the search bar at the top repair [Wiko smartphone model] (Eg to repair Wiko Jerry). You can also search in English, using the terms repair [Wiko smartphone model], in case you do not find what you are looking for in the 2022na language.
I recommend that you choose the guides that propose operations that you can perform in a simple way. If not, avoid proceeding and look for a different video.
After you have replaced the damaged component and assembled the smartphone, install the SIM and battery and reassemble the device, applying the back cover. Then turn on the device using the power button, to verify that everything is working correctly.
Wiko support

If you have encountered problems during the disassembly phase or if you want to rely on the Official help center, then I suggest you access the section Customer Care of the Wiko website.
After opening the link I provided you, you must select the model of the smartphone you own, via the drop-down menu. Next, select the item Problem solving present in the menu alongside.
If none of the options shown on the screen meet your needs, press the button below Contact customer service, to access the private area, where you can create an account to facilitate communications with customer service.
Alternatively, you can do a telephone contact, via the number 0645210426, which is shown to you in the support section, available at the days and times indicated on the same page.


