You need to edit an important document via Word and to insert images inside it. The problem, however, is that you have almost never used the famous word processing program from Microsoft and you are a bit worried about what to do. Consequently, to cope with the problem, you searched for a solution on the Internet and found this tutorial of mine. That's the way it is, am I right? Then I am happy to tell you that you have come to the right place at the right time!
In the next few lines, in fact, I will explain to you in detail how to insert a picture in word, how to adapt it to the text in the best way and, finally, how to take advantage of the main features related to images that Word makes available to its users in its different versions, both for computers and for smartphones and tablets.
How do you say? Can't wait to get started? Well, then get comfortable and give me a few minutes of your time. In no time at all, you will be able to insert images into your document and, in the future, you will have no more problems of this type. At this point, I just have to wish you good reading and, above all, good work!
Index
- How to insert an image in Word from PC
- How to insert a picture in Word Online
- How to insert an image in Word from smartphones and tablets
How to insert an image in Word from PC

Insert an image on Word, in case you have a PC Windows or of an Mac, it is an extremely easy operation, which you can complete in a very short time. Over the next few paragraphs I will explain in detail what are the procedures to follow to succeed in your intent.
How to put a picture in Word

Let's start right from the basics and see simply how to insert an image into a Word document. First, open the document you want to modify, or, if necessary, create a new one using theWord application for Windows or macOS.
At this point, click where you want to insert the image, press on the tab Inserisci (top left) and click on the button Images. From the menu that opened, then choose from the items This device (to search for the image inside the computer folders), Images in the archive (to use the Premium content made available by Word) or Images online (to use images taken from the web or from your own account OneDrive).
If you use a Macby clicking on the button Images you can choose from the options Browser photo (to use the images present in the application library Gallery e Photo booth Mac), Image from File (to use the images inside the Mac folders) or Online images (which allows you to use images taken from the web).
Once you have selected the image, click on the button Inserisci to add it to your document or, if it's the Photo Browser option, drag it into it. Easy, right?
How to insert a picture in Word without moving text
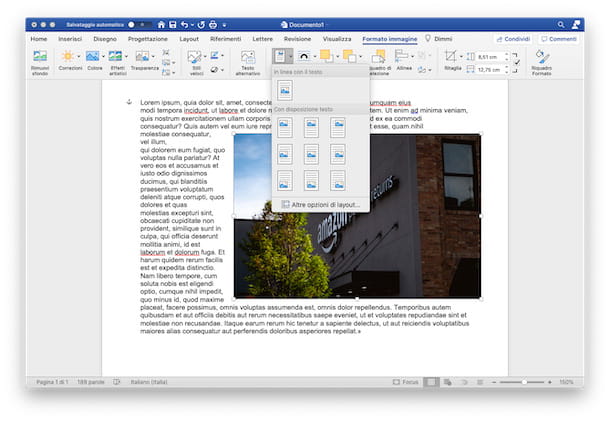
What you want to do is insert a picture in Word without manually moving the text of the document, thus obtaining an orderly visual rendering? Then you can proceed like this: insert the image inside your document (as just seen together) and click on the pop-up icon next to it. You will then be able to access the Layout options and choose, under the heading With text arrangement, where to place your image and how to make it interact with the text.
If you use a Mac, award-winning Location and choose, among the options proposed, where to place your image (in the center of the document, top right, bottom left etc.).
The text, at this point, based on the location you have decided to use, will automatically move accordingly. Alternatively, you can also move the mouse cursor on the image, hold the left click pressed and move it to any part of the document with millimeter precision (also in this case the text will organize itself accordingly).
To make other changes to the text, without directly acting on it, you can use the function Wrap text. To use it, click on the relevant button (located next to the Location) and, from the opened menu, choose how to arrange the text in relation to the image (In line with the text, Close and so on).
If you want some more information to better fit the images inside your documents I leave you to my guide on how to fit an image to a Word sheet.
How to insert a picture as a background in Word
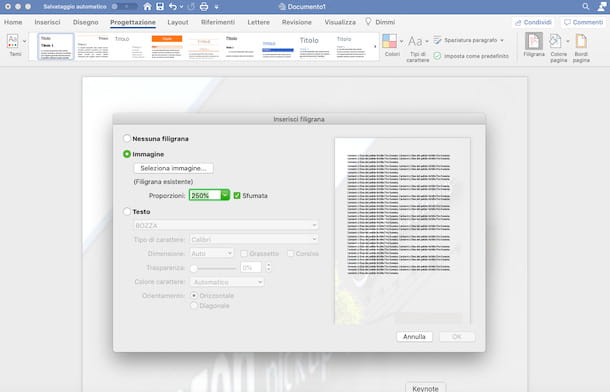
insert a picture as a background in Word, you must first click on the tab Planning and, subsequently, on the option Filigree. Once this is done, in the opened window, select the item Custom watermark, check the box Watermark Image, then press the button Select image and search for the image to insert as background, based on its location (From a file, Bing image search o OneDrive).
Once found, click on the button Inserisci, select the Proportions among the predefined ones (or type the percentage manually) and decide whether or not to fade the image, by ticking the box Gradient. Once this is done, to conclude the procedure, click on the button OK.
The image you select will be visible as the background of all pages of the document. To set a background on a single page, instead, I suggest you read my guide dedicated to inserting backgrounds in Word.
How to insert a PDF image into Word

If you wish to enter aimage in PDF format within your document, you have to act like this: click on the tab Inserisci and then press the icon Subject. In the new window that has opened, click on the item Create from File and then on the button Shop by Department. Now look inside the folders of your PC for thePDF image to insert, select it by clicking on it and press the button Inserisci. At this point you can complete the procedure by pressing the button OK.
Keep in mind, however, that in order to correctly view the image in your document, you will need to have a special program, such as Adobe Acrobat Reader.
Su MacInstead, you can treat PDF images like any other type of image and follow the procedure I explained above or, alternatively, follow the same path indicated in this chapter by treating the image as an object.
If, on the other hand, your intent is insert an image into a PDF acting from Word, open the document in question within the program, wait for its automatic conversion into an editable document (which may not be perfect) and then proceed to insert the images as explained above. Finally, if you want, export the file again to PDF by choosing the appropriate option from the Word save menu. More info here.
How to insert a picture in Word Online
You are currently unable to access the desktop version of Word and would therefore like to make use of Word Online? There is no problem, even through the Web (and free) version of the famous word processor you can insert images into your documents.
There are, however, some limitations that cannot be ignored. Word Online, in fact, does not allow you to insert images as a background for your documents (but displays them if they are already present) or to insert objects, such as PDFs, within your pages. For all the details, read on.
How to put a picture in Word

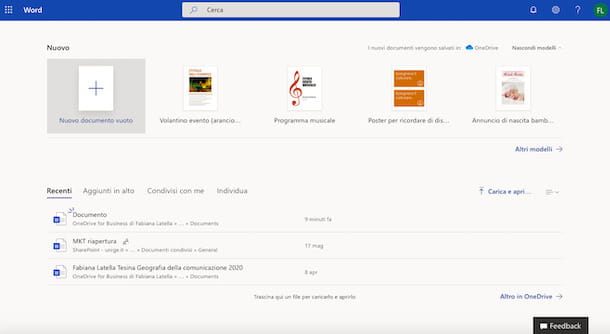
Let's start with the simple insertion of an image in a document. First, log in to Word Online entering your Microsoft account credentials as soon as you are prompted. Then open the document on which you want to insert the image (by selecting it from the initial screen of the service, if already present on OneDrive, or loading it at the moment, by clicking on the appropriate item in the top right).
Then select the tab Inserisciclick on your button Images and decide whether to set your image via the option This device thus accessing the folders on the PC, or whether to use Bing to select an image from the web.
Choosing the first way you will have to click on the button Choose file, search for the image and finally press the key Inserisci. Using the second option, however, a page will open in which to search for an image using the Bing search engine (by typing the text in the search bar) or by navigating within the category already present. Pretty simple, isn't it?
How to insert a picture in Word without moving text
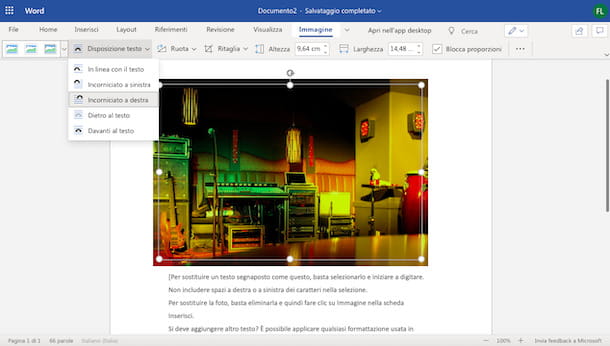
insert a picture in Word Online without moving the text, but making sure that it "systems" itself, the procedure to follow is very similar to the one I described above for the desktop version of the program.
After inserting the image into the document, by clicking on it, you will be able to access the menu Images and then press the button Text arrangement. Through the menu that has opened, then, select one of the items present - In line with the text, Right framed, Framed on the left, etc. - based on the placement you want to give to your image. Once this is done, the text will move by itself, adjusting according to the selected setting.
The other functions I mentioned earlier, such as the ability to move the images to your liking by simply clicking on them or using the function Wrap text, to obtain an even more precise document, they are unfortunately not usable via browser.
How to insert an image in Word from smartphones and tablets

You stai chiedendo how to insert a picture in word from your mobile device? Don't worry, the Word app, available for free on all Android and iPhone / iPad devices up to 10.1 ″ (otherwise it requires a subscription to Microsoft 365, starting from 7,99 euros / month), maintains some of the features present in the desktop version, including the insertion of images. However, it is not possible to insert an image as a background or add objects to your documents. These functions, in fact, are reserved exclusively for the desktop version of the program.
How to put a picture in Word
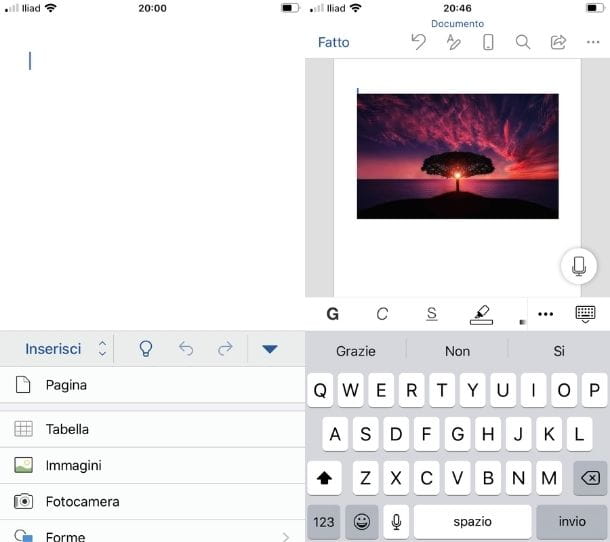
To insert an image in the Word app, select the document to work on, tap where you want to insert your image and go to the tab Home (present at the top of the tablet or accessible via the menus located at the bottom left your smartphone).
Now, in the opened menu, select the options Inserisci e Images, then choose whether to search for the image from Gallery phone, by pressing on the option Galleryo se take a picture, pressing on the option Camera.
You just have to select the image to insert and click on the item Done. The image will then be added into your document.
How to insert a picture in Word without moving text

If what you want is to set an image perfectly adapted to the text without having to manually move it, risking creating unsightly white spaces, you can use the function Wrap text.
To do this, after inserting your image into the document, tap on it to bring up the menu Images (top on tablet and bottom on smartphone). Now, tap on the icon Wrap text (represented by an image with lines in the background) and select the option you prefer among those present (such as, for example, Framed, Over and under and so on). Once you have decided how to place the image and text, all you have to do is press on the item Done.
Alternatively, by tapping on it, you can also move the image manually in anywhere in the document and the text will adapt itself to the new location chosen for the image. Convenient, right?


