You have made a small budget in Excel to keep track of entries and exits, but not being very familiar with the program yet you have encountered a difficulty: there are some writings that are longer than the cells in which they are contained and you cannot adapt the dimensions of the spreadsheet so as not to overlap the contents of two adjacent boxes.
Don't panic! What you have just encountered is a fairly common problem for those new to Excel, but it can be solved in a really simple way. All you need to do is read the directions on how to fit excel cells to content that I am about to give you and put them into practice. Come on, give it a try and I assure you that you will be able to fix your spreadsheet in no time!
I will use to make the tutorial Microsoft Office 2022, which is available for both Windows and macOS. In any case, the information below should be valid for all the most recent versions of Office, from 2007 onwards. You will also find illustrated procedures for Excel Online and the Excel app for smartphones and tablets. Good reading and good fun, or good work, depending on your point of view!
Index
- Fit Excel cells to content on PC and Mac
- Fit Excel Online cells to the content
- Adapt Excel cells to content on smartphones and tablets
Fit Excel cells to content on PC and Mac
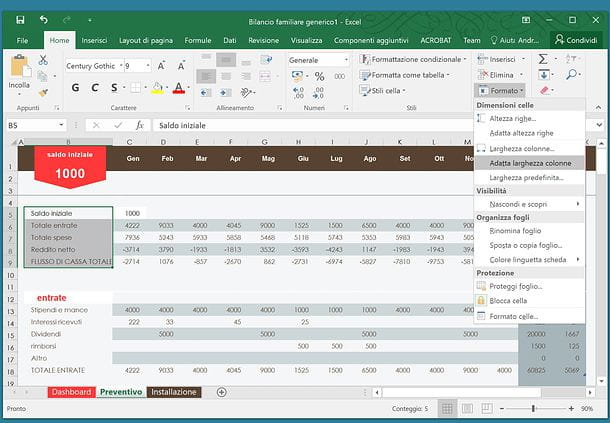
If you don't know how to fit excel cells to content, open the spreadsheet in which the cells to be resized are located and select them by holding down the left mouse button.
Then click on the button Format located at the top right of the Excel toolbar (in the Home) and select the item Fit Column Width or the voice Fit row height give the menu to compare.
In the first case, the cells will widen or shorten horizontally until their contents are fully displayed; in the second case the cells will always rise or fall vertically in order to respect the dimensions of their contents. This is a great method if you want automatically adjust the height of cells in Excel (or their width).
If the cells to resize are all along one same row or a same column, you can quickly adapt them to their content by placing the mouse cursor between the coordinates found at the edges of the spreadsheet and double-clicking on the cells to be enlarged / extended.
For example, if you want to widen the column cells B in order for these to adapt to their content, you must place the mouse cursor between the buttons B e C which are in the upper left and double-click on that point on the screen.

Would you like to become all spreadsheet cells of the same size? Then forget about the process we just saw together and make the simple move that I am about to suggest to you.
Open the spreadsheet where you want to resize cells, click the button Select all (the triangle icon located at the top left), presses the button Format located on the tab Home Excel and select the item Default width give the menu to compare.
In the window that opens, type the size you want to make all the cells of the spreadsheet assume and click on the button OK to apply the changes immediately.

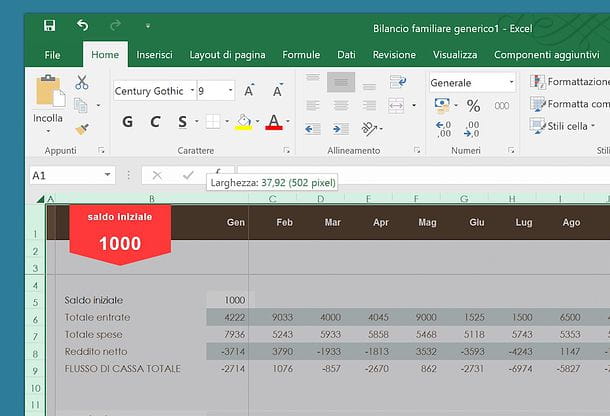
Another way to change the size of all cells of a spreadsheet is as follows: click on the button Select all (the icon with the triangle) which is located at the top left and resizes any cell using the mouse between the coordinates of the document, just as we have seen before to enlarge / lengthen the cells that are part of the same row or column.
All cells in the spreadsheet will assume the size set for the cells in the selected column. To set the exact dimensions for the cells of the spreadsheet, help with the indicators that appear automatically next to the mouse cursor (within which the dimensions taken by the cells, in pixels, will be reported in real time).
You would like it set the width of a column by “copying” it from that of another column? No problem, you can do that too. To begin with, click on the column whose width you want to "copy" and click on the button Copy Excel (or the key combination Ctrl+C/cmd+c on the computer keyboard).
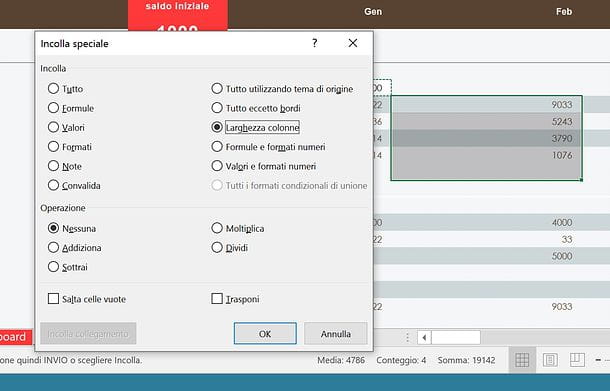
At this point, select the cell (or cells) to resize using the left mouse button, click on arrow below the "Paste" button in the Excel toolbar (top left, in the Home) and select the item Paste special give the menu to compare.
In the window that opens, put the check mark next to the item Column width, make sure that in the field Operations the item is selected None (so as not to make any changes to the contents of the selected cells) and give OK to change the width of the selected cells so that it becomes the same as that of the previously "copied" cells.
If any of the steps are not clear to you and / or you want to learn more about how Excel works with regard to cell resizing, refer to the official Office site, on which you can find very comprehensive instructions on how to resize the rows and columns of the spreadsheets in various ways.
Finally, if you want to know how to fit a picture to a cell in excel, you need to know that the media is placed above the worksheet at the position you indicate, but not inside the cells. This means that the image resizing must be done manually, using the selectors that are shown to you on the sides and edges of it when you click on it.
Fit Excel Online cells to the content

Don't you currently have a copy of Office at hand and / or don't have the Excel app installed on your mobile devices? Don't panic. By connecting to Excel Online and logging in with your Microsoft account, you can edit any spreadsheet directly from your browser, acting in a very similar way to what you could do with "real" Excel.
Obviously the more advanced functions of the software are not available, but if you just have to adapt the Excel cells to their content, with the web version of the application you can do whatever you need.
Come on, try it now! Connect to Excel Online, log in with your Microsoft account, click on the button Upload a workbook located at the top right and select the XLS / XLSX file you want to edit. The file will then be stored on your personal OneDrive account.
When loading is complete, to adapt the width of a column to its content, double-click on the outer margin of its indicator (eg. A for column A). The same goes for the height of the lines, but in this case you have to act on the indicators of the lines (eg. 1 for row number 1) and not on those of the columns.
To assign exact dimensions to rows or columns, instead, you must select the latter, right-click on them and select the item Column width (o Row height) from the menu that appears. In the box that opens, you must then specify the dimensions to assign to the selected cells and that's it.
Adapt Excel cells to content on smartphones and tablets
As you surely know, Microsoft Excel it is also available as an app for smartphones and tablets. It is compatible with all major operating systems in the Android mobile world (even on alternative stores) and iOS / iPadOS and is even free for all devices that do not exceed 10.1 "in size. A Microsoft 10.1 paid subscription is required for devices larger than 365 ”.
That said, know you can fit the Excel cells to the content even on smartphones and tablets acting in a very similar way to what we have just seen on a computer. The application is able to work not only on files created locally on smartphones and tablets, but also on documents stored in OneDrive, Dropbox, iCloud and other famous cloud storage services.
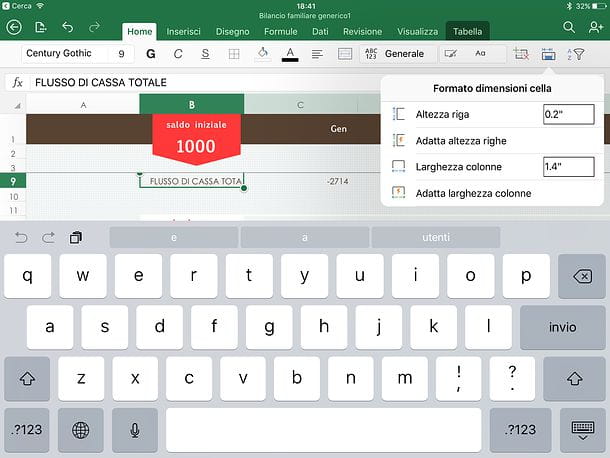
To open a spreadsheet in Excel for smartphone or tablet, start the app, press the button apri and select the file you want to edit. When loading is complete, to adapt the size of certain cells to their content, select the latter (by "tapping" on them), press the button Cell size format (the blue cell icon located on the Home tab of Excel) and choose the option Fit Column Width and / or the option Fit row height give the menu to compare.
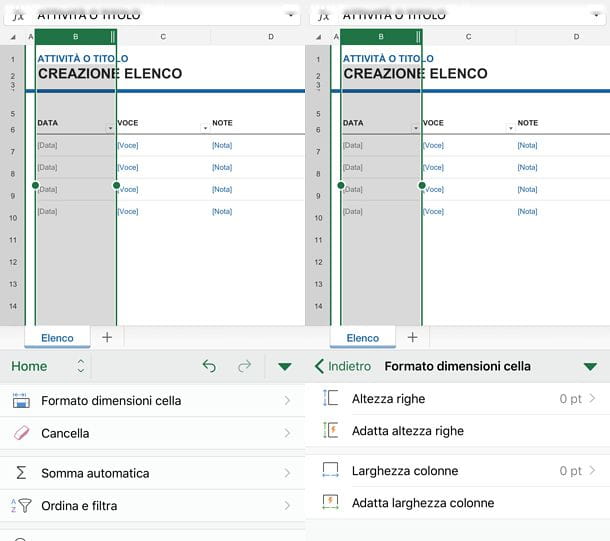
If you are using a smartphone, to access the card Home of Excel and consequently its functions Fit Column Width e Fit row height, tap on the icon pencil located at the top right, make sure that the tab is selected in the drop-down menu at the bottom left Home and scroll the menu that appears at the bottom until you get to the option Cell size format.
Then proceed by selecting the option Fit Column Width or the option Fit row height (depending on whether you intend to adapt the cells to the width and / or height of the content) and that's it.

Naturally, the "manual" cell resizing functions are also available on smartphones and tablets. Therefore you can use your finger to move the indicators that are located between one column and another or between one row and another and thus change the size of all the cells that are part of it.
As on a computer, by selecting a column of the Excel sheet and double-tapping its outer margin, you can adapt the cells of the entire column to the content of the cell that has the longest content.

If you want assign the same size to all cells in the spreadsheet, say “tap” sul little triangle located at the top left in order to select all the cells of the sheet. Then select the button Cell size format from the card Home Excel and specify therow height and column width you want via the appropriate text fields.
Finally, "tap" on the button Submit of the virtual keypad of your smartphone or tablet and all the cells of the worksheet will take on the size indicated by you in the Excel menu.


