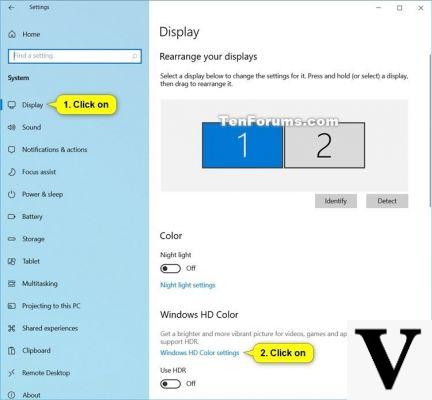
Once you've made sure you're using an HDR-type display and you've installed the right version of Windows 10 on your PC, using Auto HDR is really simple.
By default the function will already be active for anyone who meets the minimum requirements required by Microsoft but if you want to verify or still want more control over the activation of Auto HDR, just go to System Settings.
Turn on Auto HDR
- Open the Settings
- Go to the System> Display menu
- Cliccate sul link Windows HD Color Settings
- Make sure the Use HDR switch is turned on
- Scroll to the bottom of the page and turn on the Auto HDR switch
Disable Auto HDR
- Open the Settings
- Go to the System> Display menu
- Cliccate sul link Windows HD Color Settings
- Scroll to the bottom of the page and turn off the Auto HDR switch
Not sure if you notice the difference between HDR and classic content? Microsoft has thought of introducing a secret function meant only "for the development and evaluation" of Auto HDR. In fact, it is possible to enable the side-by-side view of the original SDR content together with those enhanced to comply with the HDR standard.
The company recommends the use of this function only to more experienced users, however if you are interested in activating the real-time comparison of the two versions of the images, just open a Command Prompt and paste the following code:
reg add HKLMSYSTEMCurrentControlSetControlGraphicsDrivers /v AutoHDR.ScreenSplit /t REG_DWORD /d 1
To disable the split screen, again from the Command Prompt, use this instruction:
reg delete HKLMSYSTEMCurrentControlSetControlGraphicsDrivers /v AutoHDR.ScreenSplit /f
HP Chromebook 14-db0500sa with 14 "display, AMD A4-9120 processor, 4GB RAM and 32GB of internal memory eMMC is available on Amazon for only 280 euros, what are you waiting for?
How to enable Auto HDR in Windows 10


