In other articles published on my blog, I explained how to create a logo in Photoshop and in GIMP, two excellent and very flexible photo editing programs that lend themselves without problems to this purpose too. To create a professional-grade logo, however, it would be better to use the Vector graphics and therefore a program like Adobe Illustrator.
Thanks to vector graphics, in fact, it is possible to create freely scalable logos without loss of quality, and I assure you that making them is a much simpler operation than you can imagine. Do not you believe it? Then read on: in this guide, in fact, I will explain to you in detail how to create a logo with Illustrator both using the desktop version of the program and the mobile version, available for Android and iOS.
In both cases, I guarantee you that making a logo is not complicated at all: you just need to have a precise idea of the project you want to create in mind and then make it take shape using the famous graphics program from Adobe. So, are you ready to get started? Yup? Well: make yourself comfortable, take all the time you need to concentrate on reading this guide and, more importantly, put into practice the "tips" I will give you. I am sure that you will not have the slightest problem in completing your "business" today. Happy reading and have fun!
Index
- How will I create a logo with Illustrator on your computer
- How will I create a logo with Illustrator your smartphone and tablet
How will I create a logo with Illustrator on your computer
Before explaining to you how to create a logo with Illustrator on computer, I remind you that the application in question is included in the suite Adobe Creative Cloud which, as I have already explained to you in another guide, can be tried for free for 7 days, but then requires the subscription of a subscription starting from 24,39 euros / month. That said, let's take action!
Find fonts and other useful graphics

Before seeing in detail how to make a logo with Adobe Illustrator, I recommend that you perform two important preliminary operations: download fonts to use in your creation and browse a variety of ready-made logos to get ideas and have a clearer idea of what to do.
To download the font, I recommend that you turn to the Dafont website, which offers a huge selection of fonts suitable for all tastes and needs. You can browse them both on the basis of the genres they belong to (eg. Cartoon, Retro, Ruined, etc.) and on the basis of the initials of their name (using the letters placed at the top right).
Before downloading a package of fonts, however, make sure that the license is compatible with your needs and, to avoid any kind of problem, download the fonts that can be freely used also for commercial purposes. Understood? If you would like some more information on how to download fonts using this and other online resources, please read the guide I have dedicated to the subject.
If you are looking for inspirations for the logo to be createdInstead, take a look at sites like Logofaves, which presents a very rich and varied gallery of ready-made logos from which to take inspiration for your own creations: you will surely find something valid that will help you clear your ideas about the work to be done in Illustrator. And now I'd say we can really take action!
Create the logo
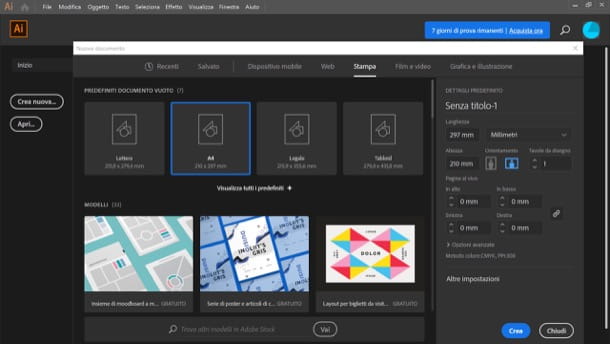
The first step you need to take to create a logo with Illustrator is to press the button Create new ... from the main program window, click on one of the tabs located at the top (eg. Print, Graphics and Illustration, etc.), choose a model from those available and possibly specify the custom dimensions that your logo must have, indicating them in the appropriate text fields (even if saving it in vector format it will be freely scalable). Then press the button Crea to open the work panel and that's it.

In the main Illustrator window, you should see the sheet with the size you chose earlier. If you want to make it easier for you to create the logo, I suggest you also activate the grid by pressing the button on the icon grid located on the right sidebar, next to the wording Ruler and grids.
Now, select the shape you want to use as a base and shape it as you like best. The geometric shapes available in the program can be found by right clicking on the rectangle tool present in the toolbar located on the left of the screen. There are so many to choose from: the rectangle,ellipse, polygon and even the form a star.
Then select the fill color that the shape should have, using the foreground pane in the palette (bottom left), and the color of its border, using the box in the background always present in the palette.

Once you have created your shape, you can modify it in various ways. For example, by clicking on the width tool present in the Illustrator toolbar, you can reshape the edges of the image or you can recall it texture tool and gradient tool which allow, respectively, to apply a texture and a gradient to the shape used to create the logo.

Once you have created the basic shapes for your logo, you can move them anywhere on the work surface using lo direct selection tool (The gray pointer located in the toolbar, top left) and change their perspective by right clicking on them and selecting the items Sort> Bring Forward / Send Back give the menu to compare.
As soon as you are ready to do it, all you have to do is add your site or company name to the logo using it text tool (the fonts and sizes can be set from the appropriate drop-down menus on the right). Then press the "T”Present in the toolbar located on the left, click where you want to insert the text and replace the example words with the text you want to add to your logo.

To change the font, the size of the writing, the color, etc., recall the selection tool (l'icona della black arrow located at the top left, in the Illustrator toolbar), select the text you want to change and use the options and menus in the sections Transform, Appearance, Character e Paragraph to change the orientation of the text, its fill color, the font to use, the font size and so on.
As soon as you are satisfied with the result, save your work by selecting the item Save with name… from the menu Fillet of Illustrator. To export the logo in vector format (which, as I said at the opening of the article, can be enlarged at will without losing the quality of the logo), set the format SVG, otherwise you can export your work in GIF selecting items Export> Save for Web from the menu Fillet of the program.
How will I create a logo with Illustrator your smartphone and tablet

want I will create a logo with Illustrator from smartphone or tablet? And what's the problem ?! All you have to do is use the mobile version of the famous Adobe software - Illustrator for iPad - following the instructions I have already given you in the previous lines (since the mobile counterpart looks so much like the desktop one).
Alternatively, you can take advantage of Adobe Cool, which is free (with some advanced paid features, starting at € 10,99). After installing and running it, log in with yours Adobe ID or, if you prefer, with your account Apple, Google o Facebookby pressing one of the buttons visible on the screen. Once logged in, press the button Create new and select the format you prefer (eg. Square, A4, Etc.).
Once you find yourself in front of the Adobe Fresco workspace, you can start designing your logo by taking the various tools available from the left toolbar (brushes, Text tool, Shapes tool, Eraser tool, etc.), while using the panel on the right you can manage the various levels of the work.
When finished, tap on the symbol of freccia rivolta verse l'alto (top right) and select the export or share option you plan to use.


