Even if now, thanks to cloud services, it is possible to synchronize the phone book of your smartphone with a wide range of devices, you need to copy some numbers to a SIM and keep them stored on the latter, in the "old way" . If you are here now and are reading this tutorial, however, it seems clear to me that something has gone wrong. Let me guess: You checked your phone's settings far and wide but couldn't find the setting to export contacts to SIM, right? So don't worry, you've come to the right place at the right time.
In today's guide, in fact, I will explain to you how to copy numbers from phone to SIM using some apps and some services that, if configured appropriately, allow you to copy the names from the phone book of the smartphone to the SIM memory even on those devices that do not seem to provide this function. In some cases, like that of Apple's iPhones, the procedure would be really impossible to implement (at least directly), but thanks to some "technological stunts" it is still possible to obtain the desired result.
Would you like to know more? So don't waste any more time: take a few minutes of free time, read the instructions below and try to put them into practice. I assure you that you will be surprised by the ease with which you will be able to store your contacts on the SIM memory and / or transfer them from one smartphone to another.
Index
Copy numbers from phone to SIM with Android

If you want copy numbers from phone to SIM and you use an Android smartphone, you can do everything with Copy to SIM Card: a free application available on the Play Store which, as the name suggests quite easily, allows you to transfer contacts from the smartphone memory to the SIM card memory (which , in the classic 128k cards, has a limit of 500 numbers) in an extremely easy and fast way.
To download Copy to SIM Card, open the Play Store (the icon with the colored ▶ ︎ symbol on the home screen of your smartphone), search “copy to sim card” within the latter and proceed with the installation of the app by first selecting its icon (the little man with the arrow pointing towards the SIM card) from the search results and then tapping the buttons Install e Accept. If you are reading this guide directly from your Android terminal, you can open the Play Store page dedicated to Copy to SIM Card by clicking on this link.

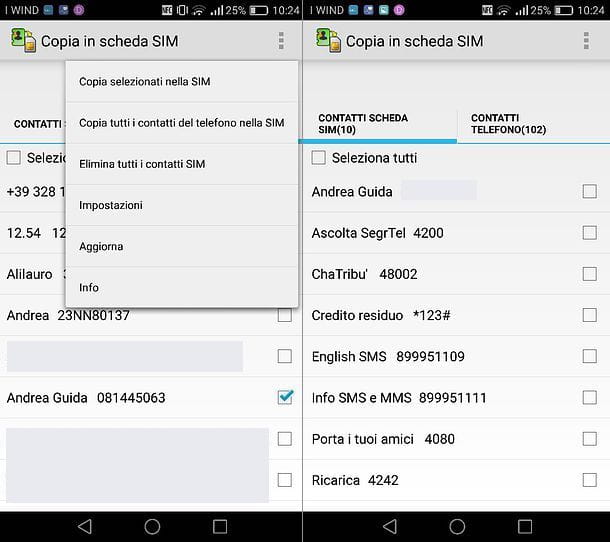
When installation is complete, start Copy to SIM Card and you will find yourself in front of a screen structured in two tabs: on the left SIM card contacts with the list of contacts currently saved on the SIM memory e Phone contacts with the list of contacts saved on the phone. If the card relating to the contacts saved on the phone is empty, proceed as follows: press the ⋮ button located at the top right and select the item Settings from the menu that appears. Then put the check mark next to all the options you see under the heading Choose contacts to display e fai tap sul pulsating OK (in order to tell the application to view all groups of contacts saved on the smartphone memory).
Now, go back to the main Copy to SIM Card screen, select the card Phone contacts and put the check mark next to the names to be copied to the SIM. Then press the ⋮ button located at the top right and select the item Copy selected to SIM from the menu that opens to start copying the selected contacts to the SIM memory.
At the end of the operation, which should only take a few seconds, you can check the actual presence of the selected contacts in the SIM by moving to the tab SIM card contacts di Copy to SIM Card.

Do you want to copy the entire address book of your smartphone to the SIM? This can also be done. Access the card Phone contacts Copy to SIM Card, press the ⋮ button located at the top right and select the item Copy all phone contacts to SIM give the menu check if you press.
In a few seconds and all the contacts in the phone book should be copied to the SIM memory (as long as this is able to host them all!). By default, only the first 19 characters of the names in the address book are copied: if you want to change this setting (which, however, could affect the correct functioning of the app), press the ⋮ button located at the top right, go to the settings Copy to SIM Card and set the Maximum length of SIM contacts through the appropriate menu.
Copy numbers from phone to SIM with iPhone

You have a iPhone? I'm sorry, but Apple smartphones do not provide an option to copy numbers from the phone to the SIM: you can only do the reverse, that is to copy the contacts from the SIM to the iPhone memory (as I also explained to you in my tutorial on how to import contacts to iPhone). In any case there is no need to despair.
If your intention, in fact, is to transfer the contacts from the iPhone address book to another smartphone, for example an Android terminal, there are several solutions that you can consider. For example, you can save your address book to a cloud service - I recommend gmail - and synchronize it on Android in a totally automatic way, or you can export the contacts in the form of VCF files and copy them "physically" to an Android smartphone. Once copied to an Android terminal, the contacts can then be saved on the SIM following the instructions in the previous chapter of this tutorial.
Synchronize contacts with cloud services

If you want to copy contacts from iPhone to Android smartphone, you can make use of gmail. By activating the synchronization of the address book with Gmail, in fact, you can copy your contacts on the cloud service offered by Google and have them synchronized on your Android smartphone.
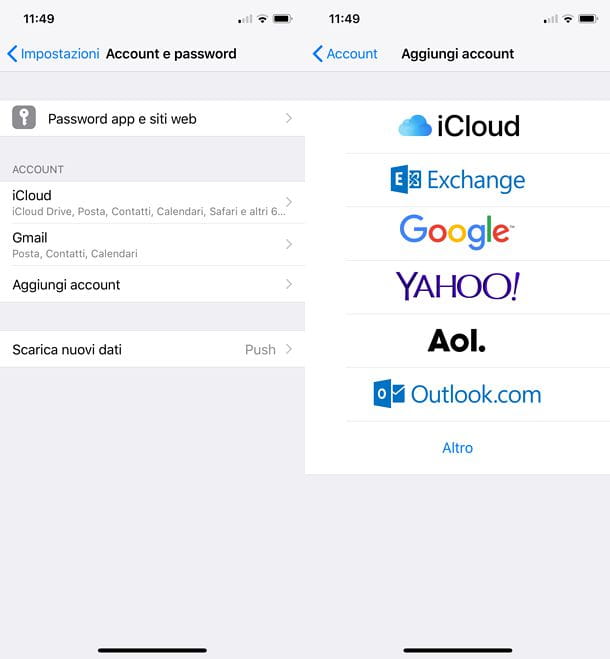
To activate address book synchronization with Gmail, go to settings iPhone (the gear icon on the home screen), go to Account and password e pulsing sul pulsating Add account. Then choose to add an account Google, log in with your credentials and, on the final screen of the procedure, make sure that the synchronization function of contacts is active.
At this point, go to the menu Settings> Contacts> Default account and set up your account gmail as the default account for contact synchronization. Finally, go to the menu Settings> Accounts of your Android smartphone and, if you haven't already done so, set a Google account with which to synchronize the contacts (obviously it must be the same Google account that you configured on the iPhone).
Once you have activated the synchronization of the address book on both devices, you will have the same contacts on iOS and Android and, from the smartphone equipped with the green robot system, you can copy the names of your interest on the SIM following the procedure that I have illustrated previously. . If some steps are not clear to you, I invite you to read my insights on how to synchronize iPhone contacts with Gmail and how to add Gmail accounts on Android.
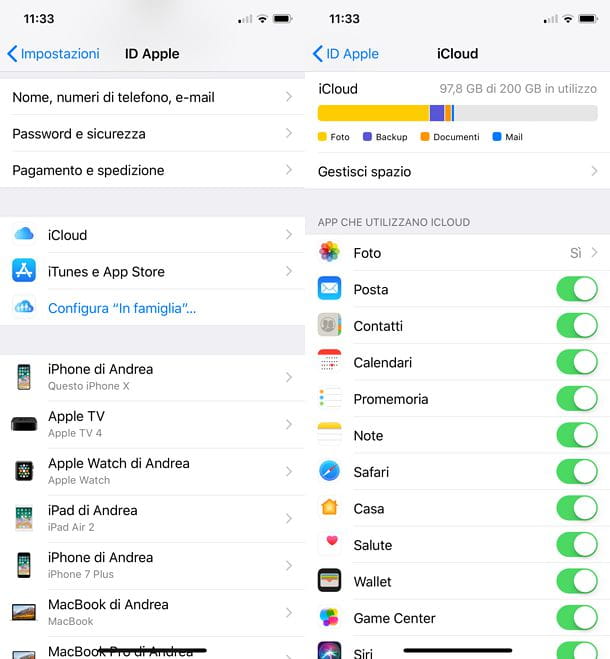
If your intention is not to transfer contacts to a SIM, but only to pass the address book from one iPhone to another, you can do everything through iCloud, Apple's cloud storage service. To be precise, all you have to do is log in to Settings iOS (the gear icon on the home screen), login on iPhone (if necessary), press on yours name and activate the synchronization of the contacts on the menu iCloud.

Once this operation has been completed, you just have to activate the synchronization of contacts with iCloud also on the iPhone on which you intend to copy the address book and that's it. If any steps are not clear to you, check out my tutorial in which I explained how to activate iCloud on iPhone.
Export the address book

If you prefer to export the iPhone address book "offline" and upload it "manually" to an Android smartphone (or any other type of smartphone), you can rely on one of the many applications available on the App Store. I personally recommend My Contacts Backup which allows you to save up to for free 500 contacts format VCF o CSV. To export more contacts, you need to purchase the full version of the app for € 2,29.
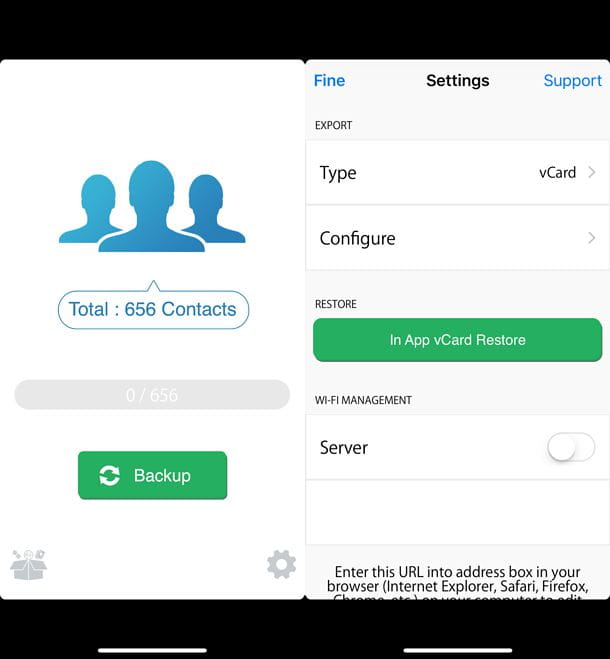
The operation of My Contacts Backup is disarming simplicity: after downloading and starting the app, grant it permission to access the contacts of iOS and presses the icon ofgear located at the bottom right. Then tap on the item Type and choose whether to export the address book in vCard o CSV, depending on your needs (I recommend vCard).
When the operation is completed, press the button end located at the top left and press the button Backup present in the center of the My Contacts Backup main screen to start exporting the address book. If you get a message warning you that the backup size may be too large, reply OK to exclude photos from the latter. Finally, press the button Email and auto-e-mailed the file with the contacts in the address book.
At this point, all you have to do is access your Android smartphone, download the VCF or CSV file attached to the message you sent yourself and import it into the Contacts app by tapping the ☰ button located at the top left and going on Settings> Import> .vcf file.

If any step is not clear to you, I invite you to read my guides on how to save the iPhone address book and how to open VCF files, in which I also told you about how to import VCF contacts on Android terminals.
Once you have imported your iPhone contacts to Android, you can transfer them to the SIM as explained in the previous chapter of this tutorial. Happy?


