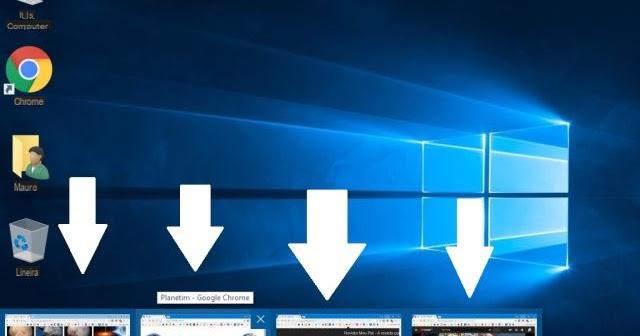
Certainly if you use Windows 10 you may have noticed that by moving the mouse cursor over the folders or open applications on the taskbar, a preview of the open windows will appear.
If you prefer instead disable preview in the taskbar, then consult our guide in which we will explain what to do.
Preliminary information
We always recommend doing an installation through one 100% genuine and original license, this is to avoid data loss or hacker attacks. We are aware that purchasing a license on the Microsoft store has a high cost. For this we have selected for you Mr Key Shop, a reliable site with free assistance specialized in in your language, secure payments and shipping in seconds via email. You can check the reliability of this site by reading the many positive verified reviews. Windows 10 licenses are available on this store at very advantageous prices. Furthermore, if you want to upgrade to the latest versions of Windows operating systems, you can also purchase the upgrade to Windows 11. We remind you that if you have a genuine version of Windows 10, the upgrade to the new Windows 11 operating system will be free. Also on the store you can buy the various versions of Windows operating systems, Office packages and the best antivirus on the market.
How to disable preview in taskbar in Windows 10
Here are the steps to follow to disable the preview in the taskbar on Windows 10:
- First you need to open theregistry editor: then type regedit su Cortana, click on the result obtained with the right mouse button and select Run as administrator.
- Now click on Si in the window that will appear to open the editor, and click from the left menu on theright pointing arrow icon at HKEY_CURRENT_USER.
- At this point, first click on the arrow icon corresponding to Software, and then on the one in correspondence of Microsoft.
- Then click on the arrow icon corresponding to Windows, then on the one in correspondence of CurrentVersion, and finally on the one in correspondence of Explore.
- Now select the folder Advanced, click with the right mouse button on the screen next to the side menu, and move the cursor to the item New.
- At this point select valore DWORD and rename the value ExtendedUIHoverTime.
- Then double click on the file you just renamed, type 25000 in the field under the heading Dati value, and click on Ok.
- Finally, restart your computer and you will no longer see the preview in the taskbar.
In case you decide to display the preview again, simply go to the screen where the value was created, click with the right mouse button on it, select Delete and finally restart the computer.
Other useful articles
Doubts or problems? We help you
Remember to subscribe to our Youtube channel for videos and other reviews. If you want to stay up to date, subscribe to our Telegram channel and follow us on Instagram. If you want to receive support for any questions or problems, join our Facebook community or contact us on Instagram. Don't forget that we have also created a search engine full of exclusive coupons and the best promotions from the web!


