You are tired of finding your valuables Excel documents upset by unauthorized interventions of friends and relatives? Don't think twice: protect them with a nice password. This way, your spreadsheets can only be opened after entering the right keyword.
How do you say? You don't know yet how to password protect excel files? Don't worry, there is no need to install any additional programs on your computer. Just "fumble" in the right menus of Excel and your documents will become inaccessible or, if you prefer, protected from changes. Here's how, in detail.
Final report: I will use for the tutorial Office 2022 for Windows and macOS which, at the time of writing, is the most recent version of the Microsoft suite. However, the indications contained in the guide should be valid for all editions of Excel starting from 2007, i.e. all those equipped with a Ribbon tabbed interface. In addition, I'll also give you some pointers on older versions of Office, such as 2003. That said, there is nothing left for me to do but wish you a good read and a good job!
Index
- Putting the password to an Excel file on Windows
- Put the password to an Excel file on Mac
- Put the password to an Excel file online
- Put the password to an Excel file on smartphones and tablets
Putting the password to an Excel file on Windows
If you are using a Windows PC, you can put the password to an Excel file very simply. All you have to do is open the spreadsheet you want to protect, click on the button Fillet located at the top left, expand the menu Protect Workbook on the next screen and select the item Encrypt with password from the menu that appears. If you don't see the "Protect Workbook" menu, select the item Information from the side bar of the sinistra.
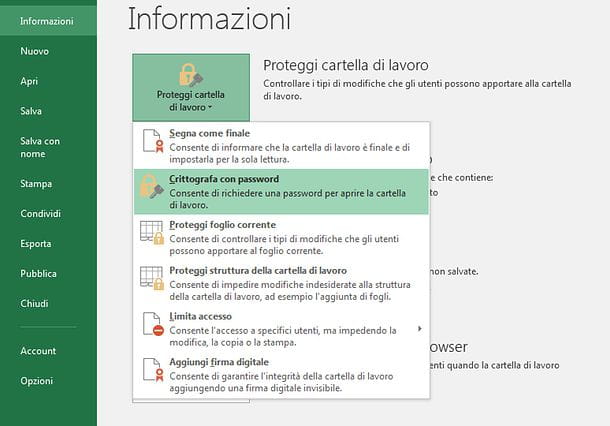
In the window that opens, type the password you want to use to protect your Excel file and click on the button OK. Repeat the same operation to confirm the settings and that's it. From this moment on, your document will be viewable only after entering the right keyword.
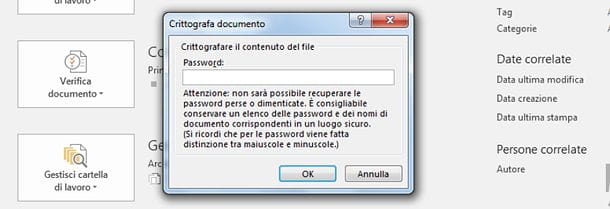
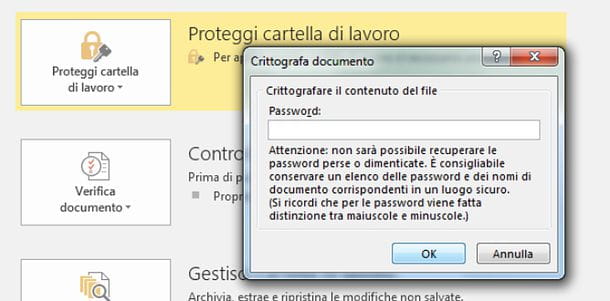
If you change your mind, you can remove the password request from your Excel document by opening it and repeating the steps outlined above. Then click on the button Fillet located at the top left, expand the menu Protect Workbook on the next screen and select the item Encrypt with password give the menu to compare.
In the window that appears on the screen, delete the password currently set for file protection, press on OK And that's it.
How do you say? Would you like to protect your Excel document from changes without preventing it from being viewed by anyone who does not know the unlock password? This can also be done.
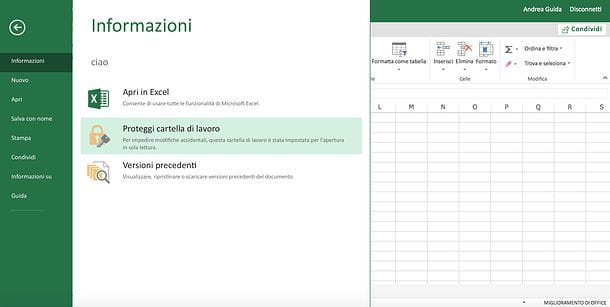
To begin with, open the workbook you want to protect, click on the button Fillet located at the top left, select the item Information from the left sidebar and choose the option Protect Current Sheet from the menu Protect Workbook.
In the next window, put the check mark next to the operations you want to lock with a password, for example Select locked cells, Formato that, Insert columns, Insert lines o Delete columns; type the Password to unlock the changes to the worksheet in the appropriate text field (top), click on the button OK and repeat entering the Password per salvare I modified it.
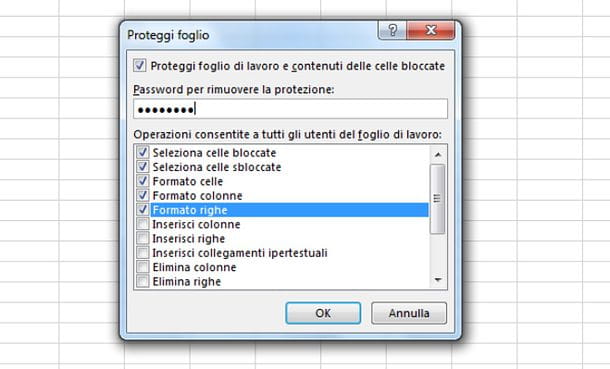
It should be noted that the above protection only applies to the current worksheet. If your workbook consists of multiple sheets, you will need to repeat the operation for all the sheets you want to password protect.
Alternatively, you can select the option Protect workbook structure from the menu File> Protect Workbook, which allows you to block the modification of the structure of the workbook (for example the addition of new sheets) with a password to be entered in the window that appears immediately after on the desktop.

In case of second thoughts, you can revoke the blocks to changes in the Excel document by opening it, returning to the menu File> Protect Workbookby selecting the option Protect Current Sheet or the option Protect workbook structure, by typing the current password in the window that is shown on the screen and pressing OK.
Old versions of Excel
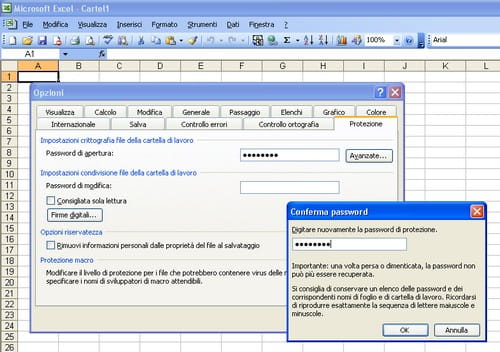
It was used Office 2003 or an even older version of the Microsoft suite and you want to find out how to protect an Excel file with a password, all you have to do is open the spreadsheet to which you want to deny access by unauthorized persons and select the item options from the menu Instruments of the program, above.
In the window that opens, click on the tab Protection , type in the text field Password to open the password you want to use to protect your Excel document, click on OK and type your keyword again to save your settings. You can also allow the document to be opened but prevent it from being changed by typing a password in the field Change password.
Put the password to an Excel file on Mac
I use a Mac? No problem: Excel is also available for the Apple operating system and also on the latter it allows you to protect your workbooks with a password in an extremely simple way: let me explain how.
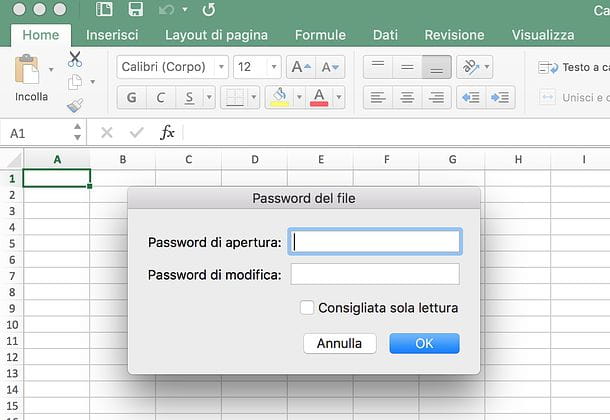
First, open the workbook you want to password protect, then select the item Password from the menu Fillet which is at the top left. In the window that opens, type the password to open you want to set for the document or, alternatively, the change password (to block changes to the file only) and click on the button OK.
If you want, also put the check mark next to the item Read only recommended, to make the file open in read-only mode, and that's it. Then type for the second time the password with which to protect the workbook and press the button OK to save the settings.
In case of second thoughts, you can remove the password for opening and / or editing your Excel file by opening it, returning to the menu File > Password located at the top left and deleting the password you no longer intend to use from the window that opens. Once this is done, click on the button OK per salvare i Cambiomenti.
Put the password to an Excel file online
There is also a web version of Excel, which works directly from the browser without installing additional programs on your computer. Is called Excel Online and it's completely free, you just need a Microsoft account to use it.
Although it allows you to protect your documents by setting them to read-only mode, Excel Online does not allow you to set passwords as it does in Excel for Windows or macOS. Likewise, it does not allow you to open password-protected Excel documents via the desktop version of the program.
If these limits aren't a big deal to you, log into Excel Online, log into your Microsoft account, and choose whether to create one blank workbook (to create a new Excel file) or whether to open an existing document. In the latter case, however, you must first upload the file to OneDrive, the Microsoft cloud storage service (which I told you about in depth in my dedicated tutorial).
Once you have opened the document you want to set in read-only mode in Excel Online, click on the button Fillet located at the top left, select the item information from the menu that appears on the side and click on the icon Protect Workbook. The game is done!
Put the password to an Excel file on smartphones and tablets
Excel is also available as an app for Android, iPhone and iPad and Windows 10 Mobile and is free for all devices that are 10.1 inches or smaller. If you have a larger device, you need to subscribe to the service Office 365, which has prices starting from 7 euros / month.
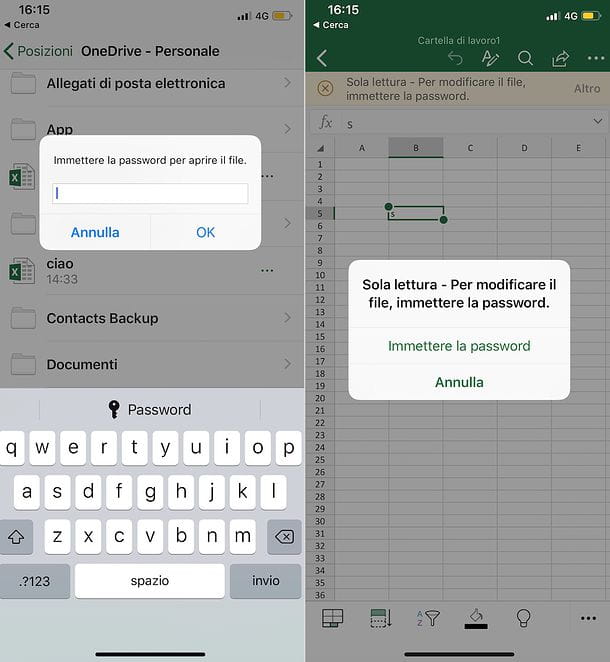
Excel for mobile devices offers many of the features available in the desktop version of the program. However, password protection of documents is not one of them. The only thing you can do is to import, view and edit the documents previously protected from opening and / or editing via the standard version of Excel.
To do this, you must first upload the documents to open on OneDrive, Dropbox or another of the services supported by the Excel app, select them via the tab apri and enter their unlock password when prompted. The steps to take are practically the same on both Android and iOS and Windows 10 Mobile.







![[Review] Samsung Powerbot VR7000: the robot vacuum cleaner from Star Wars](/images/posts/6bc44de38605b5c0fa12661febb1f8af-0.jpg)


