Tabulating in Word for PC and Mac
If you want to learn how totabulate Word, the first step you need to take is to enable the display of the ruler in the document you are writing. To do this, select the View tabfrom the Word toolbar and place a check mark next to the Ruler item.
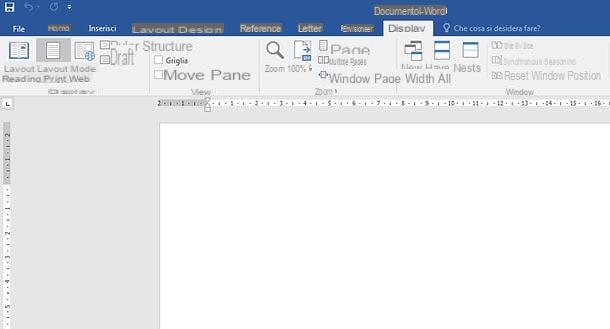
At this point, you need to select the type of tabulation to be applied to the worksheet, by clicking on the box located in the upper left corner of the ruler (where the symbol ? ) should be located. There are several types of tabulation to choose from.
- ∟ - tab with left-aligned text. On Mac, the symbol used for this tab is an arrow pointing to the left.
- ⫠- tab with text aligned to the center. On a Mac, the symbol used for this tab is an arrow pointing up.
- ˩ - tab with right-aligned text. On a Mac, the symbol used for this tab is an arrow pointing to the right.
- ⫡ - tabulation with the numbers aligned to a decimal point. It is useful when there are many numbers in the document and you want to align them in a column. On the Mac, the symbol used for this tabulation is that of an upward-pointing arrow with a dot at its base.
- ∣ - bar tabulation, which does not position the text but inserts a vertical bar at the tabulation position.
- ▿ - first line indent, which allows you to apply an indent to the text in the first line of a paragraph.
- ⌴ - protruding indent, which allows you to indent the text in the second line of a paragraph and in all subsequent lines.
Once you have chosen the type of tab to apply to your document, click on the points on theupper rulerwhere you want to add tabs and you are done.
From now on, if you move the Word cursor to the beginning of a text and press the Tab keyonyour PC keyboard, the text will be moved to the tabs you have inserted.

Another way by which you can tabulatein Word and modify, if necessary, the tabs already inserted in the document is to select the Page Layout tabon theprogram'stoolbarand click on the small arrow located next to theParagraph item. In slack, you can right-click in an "empty" place in the document and select the item Paragraph from the menu that opens.
In the window that appears on the screen, click the Tabs buttonand use theTab Position list(or simply Tabs, on Mac ) to create new tabs or edit tabs already in the document. In this way, you can also specify thetext alignment typeand set afill character tobe used to fill in the gaps between tabs.
This last feature is very useful in the case of indexes and tables of contents, but as I explained in my article on how to make a table of contents in Word there are other features that allow you to do this in an even easier way.

If you have second thoughts, you can delete a tab in Word by simply selecting it in the ruler, holding down the left click and dragging it down (and then releasing the mouse button).
If you want, you can also delete the default tabs that Word adds to every 1.27 cm of the worksheet. To do this on Windows, select the Home tab of the program and click the Replace button located at the top right. If you are using a Mac, go to the menu Composition > Find > Replace in the top left corner.
In the window that opens (on Windows) or in the Word sidebar (on Mac), type ^t in the Find/Search indocument box, leave the Replace with boxblank, andclick the Replace all button to delete all the default tabs in the document at once.

If, however, you want to delete only certain tabs and leave others untouched, click theFind Next/Find button to highlight the next tab and press Replaceto delete it. Repeat the process for all tabs you want to delete and you are done.
Tabulating in Word Online

As you may already know, Microsoft has made available an online version of Word, which is completely free and allows you to take advantage of all the main features of the famous word processing software directly from your browser. Unfortunately, however, among them there is no possibility to add or edit tabs.
Uploading on OneDrive (the cloud storage service from Microsoft, which I told you about in my guide) a document that contains custom tabs, this can be opened in Word Online with a simple double-click: its original tabs will be respected, but it will not be possible to edit or delete them. This means that you can use Word Online to view a tabbed document but - sorry - not to edit it or create a new one.
Tabbing in Word for smartphones and tablets
Need to urgently adjust tabs in a document but don't have your PC handy? No problem: Word is also available as an app for Android, iOS and Windows 10 Mobile, which means you can manage tabs in your documents quite easily from smartphones and tablets too. Unfortunately, not all mobile versions of Word offer the same features (on some you can act precisely on the tabs, on others you have to resort to alternative "tricks"), but in the end the result should still be appreciable.
Another very important thing to note is that the Word app is free for all devices with a screen size equal to or less than 10.1″ (otherwise it requires a subscription to Office 365, from7 euros / month). That said, let's get down to practicalities.
iOS
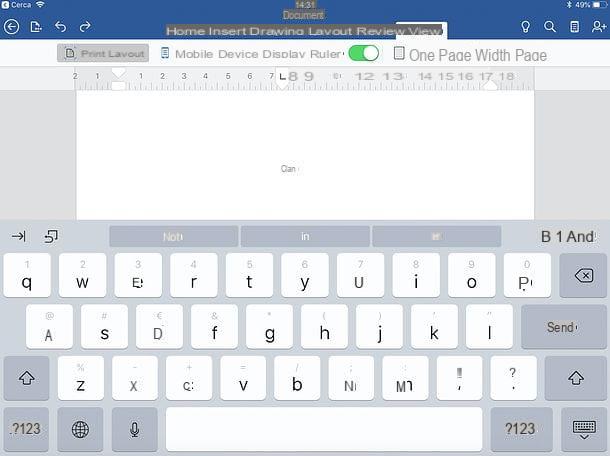
To adjust the tabs of a Word document au iOS, all you have to do is download the Word app from the AppStore, launch it and create a new file or open an existing one. You can import files from your device's memory or from cloud storage services like OneDrive, Dropbox or iCloud Drive.
At this point, if you're using an iPhone, first click on the document and then on the button ... which is located at the bottom right. Then expand the drop-down menu that appears at the bottom left, select View from the drop-down menu, tick the Print Layout option and move the Ruler option to ON .
If you are using an iPad, select the View tab at the top of the app's main screen and move the Ruler toggle to ON . You have now enabled the Ruler view in Word.
Now, tap on the point of the ruler where you want to insert the tab and choose the type of tab to use by double-tapping on the button that appeared on the ruler itself (the tab symbols are the same that I have shown in the chapter of the tutorial dedicated to Word for PC and Mac).
Finally, you just have to move the text by placing the cursor of Word before it and pressing the tab key on the keyboard (→|) if you use an iPad or, if you use an iPhone, by making a long tap on a blank space before the text and selecting the items ▶︎ > Insert > Tab from the menu that opens.
The document, if it already exists, will be saved automatically. Otherwise, to save it, click the back arrow at the top left and choose a name for the file.
Android

As mentioned above, the Android version of Word unfortunately does not provide the tabbing feature. You can, however, take advantage of the paragraph formatting features to align the text in a different way from the default (for example, by adding indents before a portion of text).
To change the layout of the text in Word for Android, download the application from the Play Store and launch it (although on some devices is pre-installed), then choose whether to create a new document or open one. You can import documents from the device's internal memory or from supported cloud storage services(Dropbox, OneDrive, Google Drive, etc.).
Once you've opened the file you're interested in, move the Word cursor to the point before the portion of text you want to move. Then, if you are using a smartphone, tap on the triangle icon located at the bottom right to bring up the toolbar of the app and select Home from the drop-down menu that appears at the bottom left.
Once you've done that, scroll down the menu and use the blue arrow icon going to the right and the four horizontal lines (under the heading Numbered Lists ) to add an indent before the text. Alternatively, go to Paragraph Formatting > Special Indent and choose whether to add a special indent for the first line or overhang .
If you're using a tablet, you can find the commands I just mentioned on the Home tab of the Word app, in the top left corner.
The document, if it already exists, will be saved automatically. Otherwise, to save it, click on the back arrow located at the bottom left and choose a name to give the file.
How to tabulate Word


